3. Administration User
In the Administration > User, you can record setup data that define your organization structure and its users. Information in this link is more “data” related, whereas the information stored on the System drop-down link functions more like switches that control system behavior.
Navigating to Administration System
- On the Oracle Financial Services Lending and Leasing home screen, click Setup > Setup > Administration > User.
The User drop-down link records the following data:
- Organization
- Companies
- Access
- Users
- Credit Bureau
- Correspondence
- General Ledger
- Queues
- Printers
- Bank Details
- Check Details
- Standard Payees
- Currencies
- ZipCodes
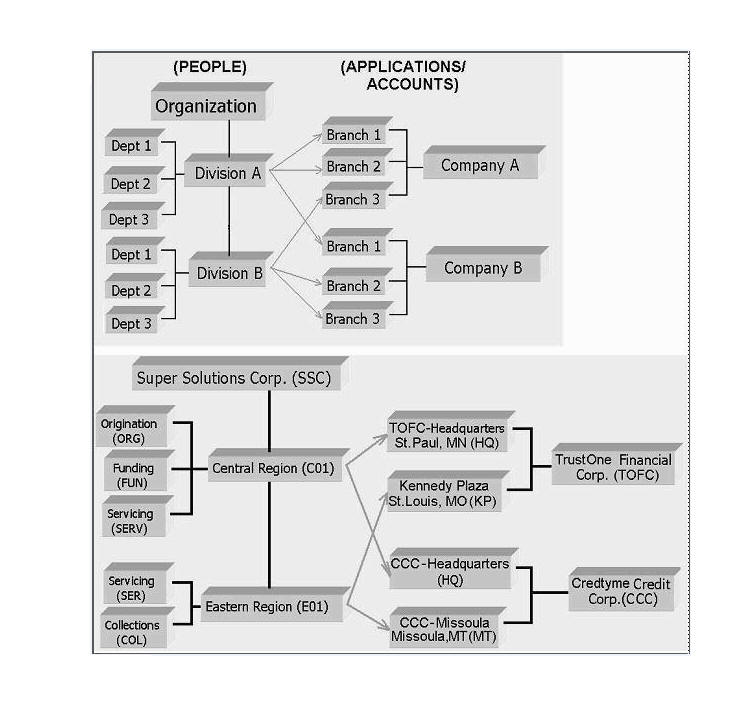
3.1 Organization
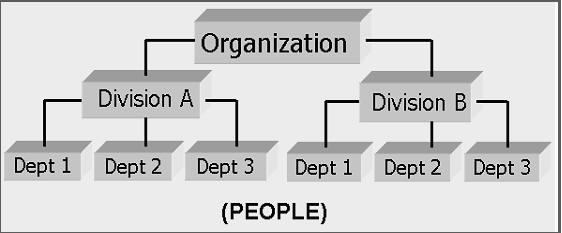
The Organization screen records the operational hierarchy of your business in terms of people. It groups the human resources of your business in three categories: organization, division, and department. The system uses this data to control access of users to applications and accounts.(The Companies screen allows you to setup the location of these applications and accounts.)
Note
You can have only one active organization, so use the Organization field to define your organization at its highest level.
Divisions are groups within your organization that will have access to the same applicationsand accounts. Larger organizations often define their divisions by region. Smaller organizations may define division as branch offices or even departments, and might only have one division defined.
Departments are smaller units within a division. They expand on who is in the corresponding Division field. The system uses this sub screen, for example, when setting up the Services screen on the Utility form. At least one department must be defined for each division.
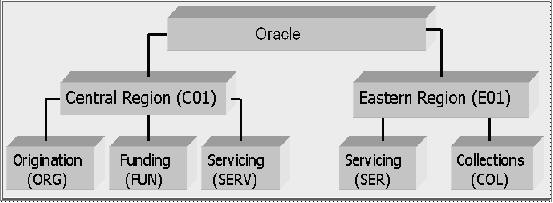
As an example of an organization setup, Oracle Corp. might be defined as:
Organization: O-0001 Oracle Corp. ORA
Division: OD-001 Central Region C01
Department: ODD-01 Origination ORG
Department: ODD-02 Funding FUN
Department: ODD-03 Servicing SER
Division: OD-002 Eastern Region E01
Department: ODD-11 Servicing SER
Department: ODD-12 Collection COL
Note
The Short Name field on the Organization screen allows you to create the ID that Oracle Financial Services Lending and Leasing will use when referring to the organization, division, and department throughout the system.
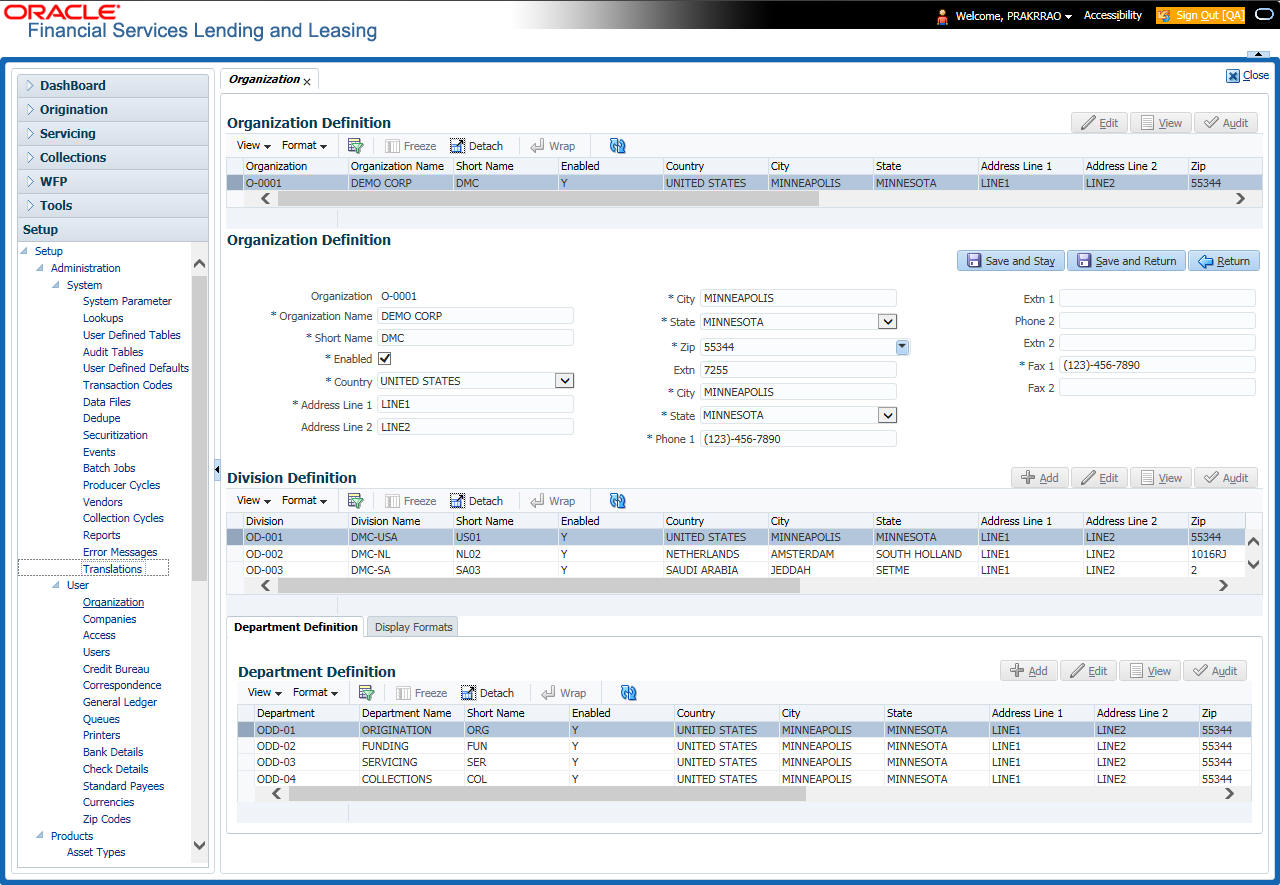
To setup the Organization screen
- Click Setup > Setup > Administration > User > Organization.
- In the Organization Definition section, there can be only one active entry, so use this screen to define your organization at its highest level. Perform any of the Basic Operations mentioned in Navigation chapter.
A brief description of the fields is given below:
Field: |
Do this: |
Organization |
Specify the organization ID (the ID is the unique identifier used internally by Oracle Financial Services Lending and Leasing to represent your organization). Note: Do not edit this field. |
Organization Name |
Specify the organization name. |
Short Name |
Specify the short name for the organization. Note: This ID represents this organization throughout the system. |
Enabled |
Check this box to enable the organization. Note: Only one enabled organization is currently allowed by Oracle Financial Services Lending and Leasing. |
Country |
Select the country where the organization is located from the drop-down list. |
City |
Specify the city where the organization is located. |
State |
Select the state where the organization is located from the drop-down list. |
Address Line 1 |
Specify the address line 1 for the organization. |
Address Line 2 |
Specify the address line 2 for the organization. |
Zip |
Select the zip code of the location where the organization is located from the drop-down list. |
Extn |
Specify the extension of the selected zip code. |
Phone 1 |
Specify the primary phone number for the organization. |
Extn 1 |
Specify the phone extension for the primary phone number. |
Phone 2 |
Specify the alternate phone number for the organization . |
Extn 2 |
Specify the phone extension for the alternate phone number, if specified. |
Fax 1 |
Specify the primary fax number for the organization. |
Fax 2 |
Specify the alternate fax number for the organization. |
- Perform any of the Basic Actions mentioned in Navigation chapter.
- In the Division Definition section, you can setup the information for the groups within your organization that will have access to the same applications and accounts. Perform any of the Basic Operations mentioned in Navigation chapter.
A brief description of the fields is given below:
Field: |
Do this: |
Division |
Specify the division ID. The ID is the unique identifier used internally by the system to represent the division within the organization. Note: Once specified, do not edit this field. |
Division Name |
Specify the division name. |
Short Name |
Specify the short name for the division. Note: This ID represents this division throughout the system (required). |
Enabled |
Check this box to enable the division. |
Country |
Select the country where the division is located from the drop-down list. |
City |
Specify the city where the division is located. |
State |
Select the state where the division is located from the drop-down list. |
Address Line 1 |
Specify the address line 1 for the division. |
Address Line 2 (unlabeled) |
Specify the address line 2 for the division. |
Zip |
Select the zip code of the location where the division is located from the drop-down list. |
Extn |
Specify the extension of the selected zip code. |
Phone 1 |
Specify the primary phone number for the division. |
Extn 1 |
Specify the extension for the primary phone number. |
Phone 2 |
Specify the alternate phone number for the division. |
Extn 2 |
Specify the extension for the alternate phone number . |
Fax 1 |
Specify the primary fax number for the division. |
Fax 2 |
Specify the alternate fax number for the division. |
- Perform any of the Basic Actions mentioned in Navigation chapter.
- Click Setup > Setup > Administration > User > Organization > Department Definition.
- On the Department Definition section, perform any of the Basic Operations mentioned in Navigation chapter.
A brief description of the fields is given below:
Field: |
Do this: |
Department |
Specify the department ID. Note: The ID is the unique identifier used internally by the system to represent the department within the division. |
Department Name |
Specify the department name. |
Short Name |
Specify the short name for the department. Note: This is the ID that appears throughout the system to represent this department. |
Enabled |
Check this box to enable the department. |
Country |
Select the country where the department is located from the drop-down list. |
City |
Specify the city where the department is located. |
State |
Select the state where the department is located from the drop-down list. |
Address Line 1 |
Specify the address line 1 for the department. |
Address Line 2 |
Specify the address line 2 for the department. |
Zip |
Select the zip code where the department is located from the drop-down list. |
Extn |
Specify the zip extension where the department is located. |
Phone 1 |
Specify the primary phone number for the department. |
Extn 1 |
Specify the phone extension for the primary phone number. |
Phone 2 |
Specify the alternate phone number for the department. |
Extn 2 |
Specify the phone extension for the alternate phone number. |
Fax 1 |
Specify the primary fax number for the department. |
Fax 2 |
Specify the alternate fax number for the department. |
- Perform any of the Basic Actions mentioned in Navigation chapter.
- Click Setup > Setup > Administration > User > Organization > Display Format.
- On the Display Format section, perform any of the Basic Operations mentioned in Navigation chapter.
A brief description of the fields is given below:
Field: |
Do this: |
Format Type |
Select the type of format from the drop-down list. |
Format Sub Type |
Select the sub type of the format from the drop-down list. The format sub type will be displayed based on the format type selected. |
Format |
Specify or select the format based on the format type and format sub type selected. For Date and Time Zone format, select the required option from the drop-down list. |
Format Mask |
Specify the format mask. |
Format Filler |
Specify the format filler. |
Special Data |
Specify the special data, if any. |
Enabled |
Check this box to enable the display format. |
- Perform any of the Basic Actions mentioned in Navigation chapter.
3.2 Companies
The Companies screen records the hierarchical structure of your portfolio companies and their branches. Just as Oracle Financial Services Lending and Leasing uses the Organization screen to determine the location of people, it uses the information on the Companies screen to determine the location of applications and accounts. In completing the Companies screen, there can be more than one company, and each company can have more than one branch.
Accounting is performed at the company level. Accounts and applicationscan be sorted down to the branch level. For this reason, branches are set up to reflect different business practices. You would set up different branches if, for example:
- The General Ledger (GL) differs between branches
- The branches work with different accounts
- There is a difference between branches in terms of the tasks they perform (loan origination, servicing, collections, and so on)
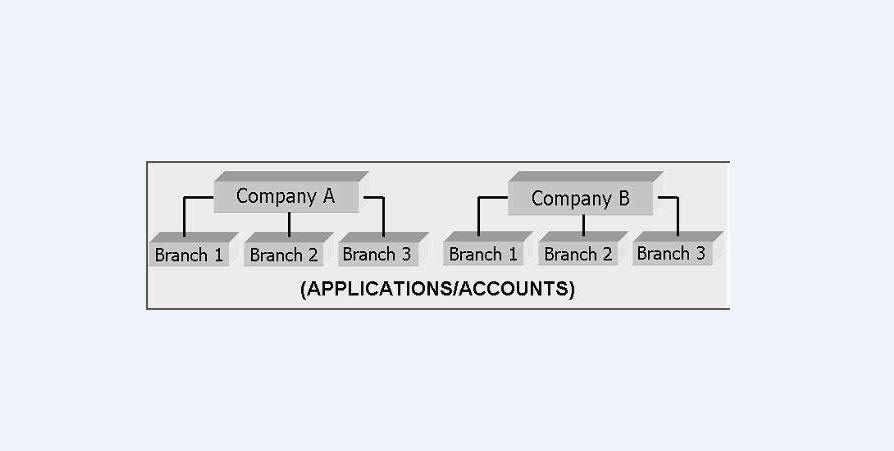
As an example of the companies setup, Oracle Corp. might have the following companies and branches defined as:
Company: C-0001 TrustOne Financial Corp TOFC
Branch: CB-01 TOFC - Headquarters HQ
Branch: CB-02 Kennedy Plaza KP
Company: C-0002 Credtyme Credit Corp CCC
Branch: CB-11 CCC - Headquarters HQ
Branch: CB-12 CCC - Missoula MT

Note
- The system does not limit the number of companies or associated branches with the company you can enter.
- The Short Name field on the Companies screen allows you to create the ID that the system will use while referring to the company and branch.
Key concept: Note the difference between the Company screen and the Organization screen:
- On the Organization screen, Oracle Financial Services Lending and Leasing users belong to an organization and division.
- On the Companies screen, creditapplications and accounts belong to a company and branch.
As you can see in the following Access screen section, the information on the Organization and Companies screens define the operational hierarchy of your companies in terms of which Oracle Financial Services Lending and Leasing users will have access to which applications and accounts
To setup the Companies
- Click Setup > Setup > Administration > User > Companies. The Companies screen defines entities within your organization that originate and/or service Loans.
- In the Company Definition section, perform any of the Basic Operations mentioned in Navigation chapter.
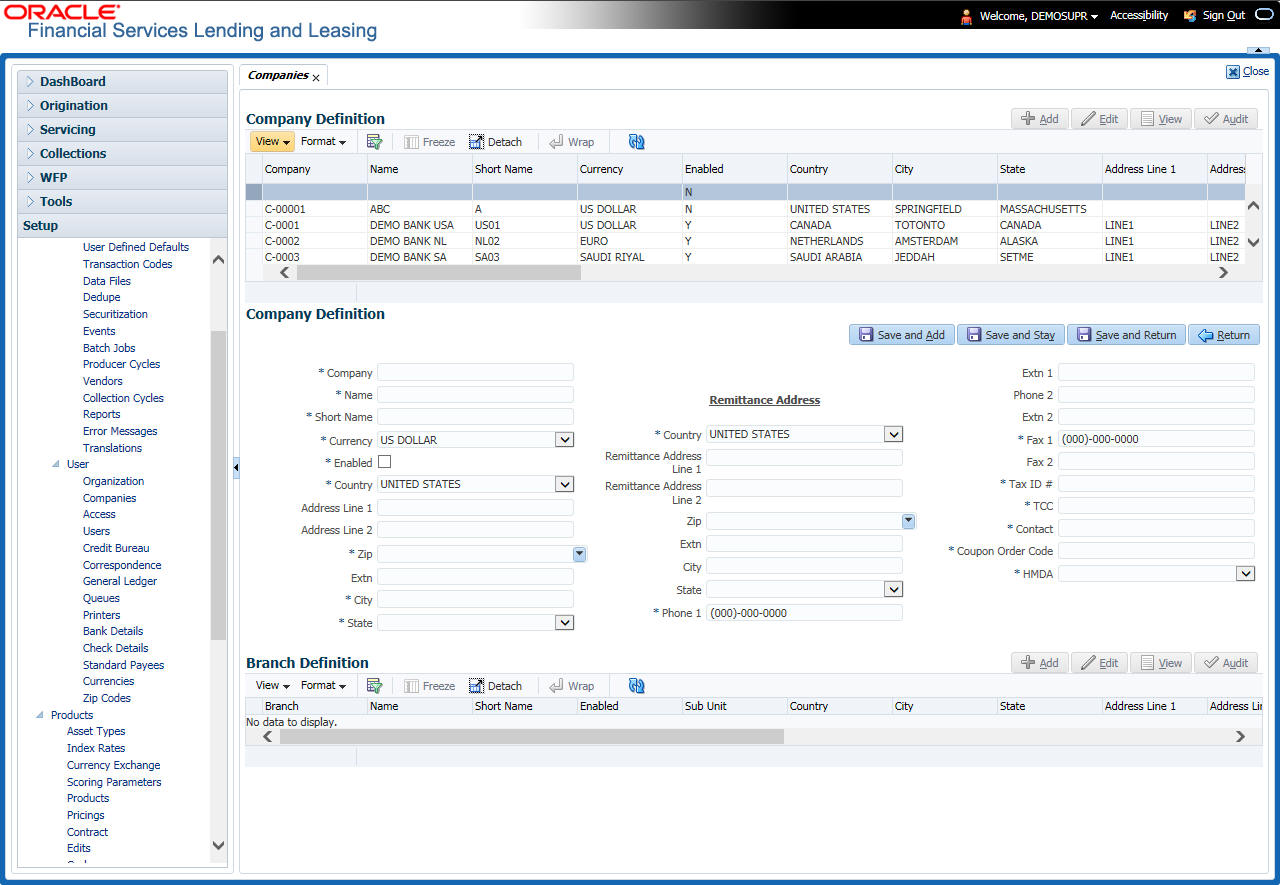
A brief description of the fields is given below:
Field: |
Do this: |
Company |
Specify the portfolio company ID. (This ID is the unique identifier used internally by the system to represent the company). |
Name |
Specify the name of the portfolio company (required). |
Short Name |
Specify the short name for the portfolio company (ID displayed to represent the company). |
Currency |
Select the currency of the portfolio company from the drop-down list. The system displays the default value as ‘US DOLLAR’. |
Enabled |
Check this box to enable the portfolio company. |
Country |
Select the country where the portfolio company is located from the drop-down list. The system displays the default value as ‘UNITED STATES’. |
City |
Specify the city where the portfolio company is located . |
State |
Select the state where the portfolio company is located from the drop-down list. |
Address Line 1 |
Specify the address line 1 for the portfolio company. |
Address Line 2 |
Specify the address line 2 for the portfolio company. |
Zip |
Select the zip code of the location where the portfolio company is located from the drop-down list. |
Extn |
Specify the extension of the zip code where the portfolio company is located. |
Phone 1 |
Specify the primary phone number for the portfolio company. |
Extn 1 |
Specify the phone extension for the primary phone number. |
Phone 2 |
Specify the alternate phone number for the portfolio company. |
Extn 2 |
Specify the phone extension for the alternate phone number. |
Fax 1 |
Specify the primary fax number for the portfolio company. |
Fax 2 |
Specify the alternate fax number for the portfolio company. |
Tax ID # |
Specify the tax identification number for the portfolio company. |
TCC |
Specify the transmitter control code for the portfolio company (1098 Electronic Filing). |
Contact |
Specify the contact information about the portfolio company. |
Coupon Order Code |
If you are using coupons, Specify the coupon order code to be used by a third party printing the coupons for billing statements. |
HMDA |
Select the HMDA agency (Home Mortgage Disclosure Act reporting agency for the company). |
Remittance Address section |
|
Country |
Select the remittance address country from the drop-down list. The system displays the default value as ‘UNITED STATES’. |
City |
Specify the remittance address city. |
State |
Select the remittance address state from the drop-down list. |
Remittance Address 1 |
Specify the remittance address line 1, if it is different from the company address. This address is included as the remittance address on statements. |
Remittance Address 2 |
Specify the remittance address line 2. |
Zip |
Select the zip code of the remittance address line 1 from the drop-down list. |
Extn |
Specify the extension of the remittance address zip code. |
- Perform any of the Basic Actions mentioned in Navigation chapter.
- On the Branch Definition section, perform any of the Basic Operations mentioned in Navigation chapter.
A brief description of the fields is given below:
Field: |
Do this: |
Branch |
Specify the portfolio branch ID. (This ID is the unique identifier used internally by the system to represent the branch within your company). |
Name |
Specify the name of the portfolio branch (required). |
Short Name |
Specify the short name for the portfolio branch (ID displayed to represent the branch) (required). |
Enabled |
Check this box to enable the portfolio branch. |
Sub Unit |
Select the Sub Unit from the drop-down list. Sub Unit refers the entity which is the source of funds for the credit application/Account. System associates the selected sub unit with the particular company/branch combination and displays by default when the same is selected during an application/Account creation. |
Country |
Select the country from the drop-down list. The system displays the default value as ‘UNITED STATES’. |
City |
Specify the city where the portfolio branch is located. |
State |
Select the state from the drop-down list. |
Address Line 1 |
Specify the address line 1 for the portfolio branch. |
Address Line 2 |
Specify the address line 2 for the portfolio branch. |
Zip |
Select the zip code of the location where the portfolio branch is located. |
Zip Extn |
Specify the extension of the zip code, where the portfolio branch is located. |
Phone 1 |
Specify the primary phone number for the portfolio branch. |
Extn 1 |
Specify the phone extension for the primary phone number. |
Phone 2 |
Specify the alternate phone number for the portfolio branch. |
Extn 2 |
Specify the phone extension for the alternate phone number. |
Fax 1 |
Specify the primary fax number for the portfolio branch. |
Fax 2 |
Specify the alternate fax number for the portfolio branch. |
- Perform any of the Basic Actions mentioned in Navigation chapter.
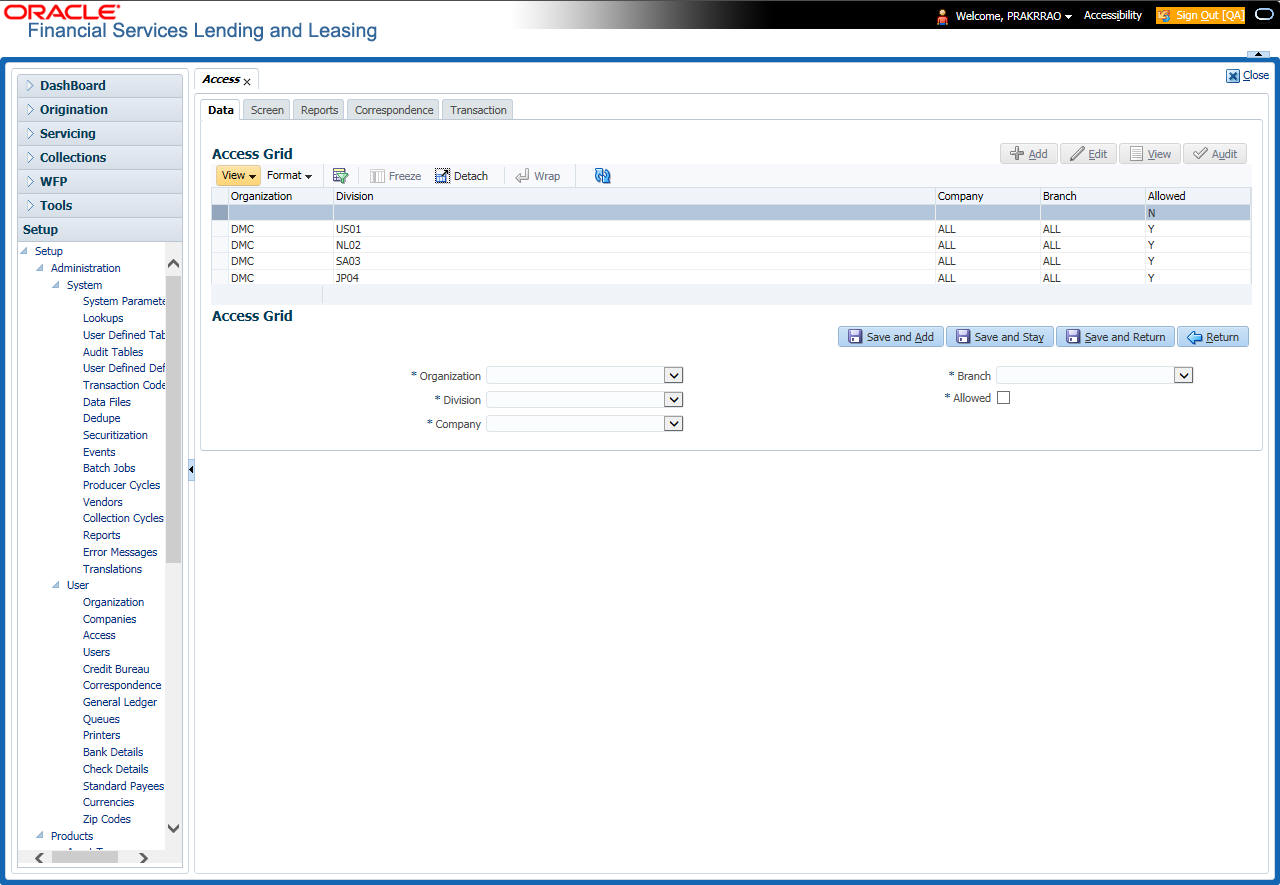
3.3 Access
Using the organizations, divisions, companies, and branches created on the Organization and Companies screens, you can control the access privileges of applications and accounts. On the Access screen, you define which organization/division (users) can gain access to which company/branch (applications and accounts) locations.
Normally, for each division within an organization, you would define a record with Company value of ALL and a Branch value of ALL, then select the Allowed box. You then define other records for the same Organization and Division for other Company and Branch combinations with the Allowed box cleared to restrict access.
To setup the Access
- Click Setup > Setup > Administration > User > Access. The system displays the Access screen. In this screen, you can control the access privileges of the user for the following categories:
- Data
- Screen
- Reports
- Correspondence
- Transaction
3.3.1 Data
The Data screen allows you to restrict access to different data.
To setup the Data
- Click Setup > Setup > Administration > User > Access > Data.
- In the Access Grid section, perform any of the Basic Operations mentioned in Navigation chapter.
A brief description of the fields is given below:
Field: |
Do this: |
Organization |
Select the organization for which you are defining access privileges from the drop-down list. |
Division |
Select the division within the organization for which you are defining Access privileges from the drop-down list. |
Company |
Select the portfolio company to which you are defining access privileges for the organization and division specified from the drop-down list. |
Branch |
Select the portfolio branch of the company to which you are defining access privileges for the organization and division specified from the drop-down list. |
Allowed |
Check this box to provide access to the data pertaining to the company and branch, for the organization and division specified. |
- Perform any of the Basic Actions mentioned in Navigation chapter.
3.3.2 Screen
In the screen, you can control the access to the following:
- Menu – Control access at the application menu level. For example, for Setup menu you can provide access only to an Administrator.
- Screens – Control access to the screens available in the application
- Buttons – Control access based on the stage.
For example, Add and Edit buttons can be disabled once an application is funded.
If you want to restrict updating the Applicant details, then edit button has to be disabled for the stage.
The screen allows you to restrict access to different screens.
To set the Screen Security
- Click Setup > Setup > Administration > User > Access > Screen.
- In the Security Super Group section, you can view the details of the super group you want to work with.
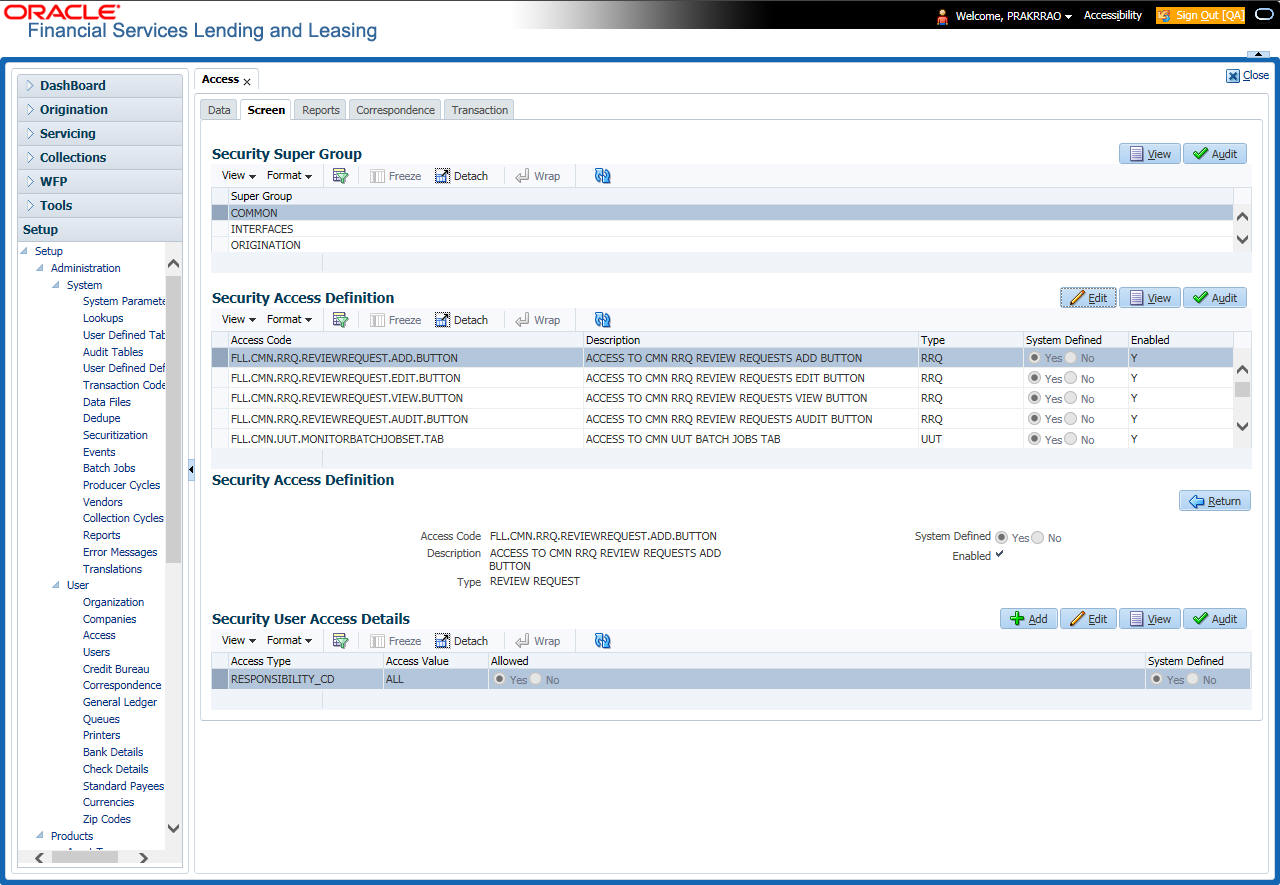
- In the Security Access Definition section, perform any of the Basic Operations mentioned in Navigation chapter.
Note
You can not add a new record
A brief description of the fields is given below:
Field: |
Do this: |
Access Code |
The system displays the selected access code. |
Description |
Modify the description of the access code. |
Type |
The system displays the type of security access definition. |
System Defined |
If ‘Yes’ is selected, the security access definition entry is system defined. If ‘No’ is selected, the security access definition entry is manually defined. |
Enabled |
Check this box to enable the security access definition entry is enabled. |
- Perform any of the Basic Actions mentioned in Navigation chapter.
- In the Security User Access Details section, perform any of the Basic Operations mentioned in Navigation chapter.
A brief description of the fields is given below:
Field: |
Do this: |
Access Type |
Select the access type of the user who will have access to this screen from the drop-down list. |
Active Value |
Select the active value of the user who will have access to this screen from the drop-down list. |
Allowed |
Select ‘Yes’ to allow access to this screen or ‘No’ to deny access to this screen. |
System Defined |
Select ‘Yes’, if the screen user access definition entry is system defined. Select ‘No’, if the screen user access definition entry is manually defined. |
- Perform any of the Basic Actions mentioned in Navigation chapter.
3.3.3 Reports
In the Reports screen you can control access to generate certain reports.
To set up Reports
- Click Setup > Setup > Administration > User > Access > Reports.
- In the Reports section, you can view the following information:
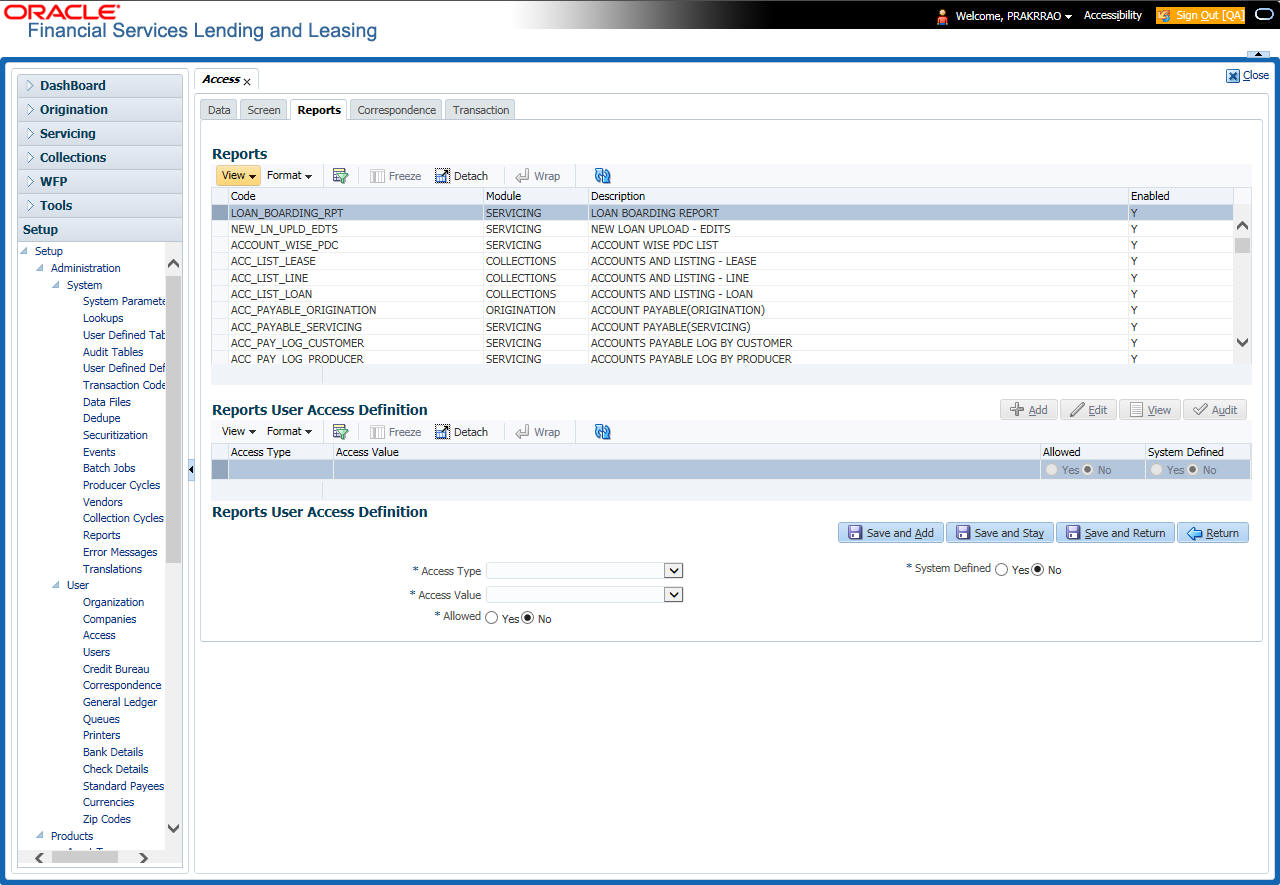
A brief description of the fields is given below:
Field |
View this: |
Code |
Displays the code of the report. |
Module |
Displays the code of the report from the drop-down list. |
Description |
Displays the description of the report. |
Enabled |
Displays whether the report definition is enabled or not. |
- In the Reports User Access Definition section, you can set the access rights for the report selected in the Reports section. Perform any of the Basic Operations mentioned in Navigation chapter.
A brief description of the fields is given below:
Field: |
Do this: |
Access Type |
Select the access grid function type from the drop-down list. |
Access Value |
Select the access function grid value from the drop-down list. |
Allowed |
Select ‘Yes’ to allow access or ‘No’ to restrict access to the entry based on the access type and value. |
System Defined Yes/No |
Select ‘Yes’, if the report user access definition entry is system defined. Select ‘No’, If the report user access definition entry is manually defined. |
- Perform any of the Basic Actions mentioned in Navigation chapter.
3.3.4 Correspondence
The Correspondence screen allows you to restrict access to different correspondence commands on the Letters menu, thus restricting your ability to generate certain correspondence.
If you do not have the responsibility to create a type of correspondence, the corresponding command on the Letters menu is unavailable (dimmed).
To setup the Correspondence
- Click Setup > Setup > Administration > User > Access > Correspondence.
- In the Correspondence Codes section, perform any of the Basic Operations mentioned in Navigation chapter.

A brief description of the fields is given below:
Field: |
Do this: |
Code |
The system displays the correspondence code name you want to work with. |
Description |
The system displays the description for the correspondence code (display only). |
Enabled |
Check this box to enable the selected correspondence code entry. |
- In the Correspondence User Access Definition section, perform any of the Basic Operations mentioned in Navigation chapter.
A brief description of the fields is given below:
Field: |
Do this: |
Access Type |
Select the access grid function type from the drop-down list. |
Access Value |
Select the access function grid value from the drop-down list. |
Allowed |
Select ‘Yes’ to allow access or ‘No’ to restrict access to the entry based on the access type and value. |
System Defined Yes/No |
Select ‘Yes’, if the correspondence user access definition entry is system defined. Select ‘No’, If the correspondence user access definition entry is manually defined. |
- Perform any of the Basic Actions mentioned in Navigation chapter.
3.3.5 Transaction
The transaction screen allows you to view and restrict access to the following account transactions maintained in the system.
- ACCOUNT MONETARY TXN
- ACCOUNT NON MONETARY TXN
- PRODUCER MONETARY TXN
- ACCOUNT CONDITION TXN
- SECURITIZATION TXN
- ESCROW MONETARY TRANSACTIONS
- ESCROW NON MONETARY TRANSACTIONS
- FEE ASSESSMENTS
- ESCROW ANALYSIS AND DISBURSEMENTS
Along with restricting access, you can also define authorization permissions for monetary transactions. While defining authorization permissions, you can allow transactions to Authorize through assigned Maker/Check responsibilities with/without having specific authorization criteria defined. However, authorization criteria can be defined only for monetary transactions which needs authorization.
To define access/authorization rights for Transaction
- Click Setup > Setup > Administration > User > Access > Transaction.
- In the Transaction Super Group section, select the super group you want to work with.

- In the Transaction Codes section, perform any of the Basic Operations mentioned in Navigation chapter.
A brief description of the fields is given below:
Field: |
Do this: |
Code |
The system displays the transaction code you want to work with. |
Description |
Specify/Edit the description for the transaction. |
Authorize |
Check this box to enable authorization by another user. Such transactions can be authorized on the Authorization tab of Transaction Authorization screen in Servicing Module. Note: For monetary transactions, system allows you to define both Maker and Checker authorization in the Maker and Checker Responsibility tabs respectively. For non-monetary transactions, you can define maker responsibility for authorization. When the Authorization check box is not selected, any new transactions posted will not go for authorization. For more information, please refer the Transaction Authorization (Maker-Checker) chapter in the Oracle Financial Services Lending and Leasing User Guide. |
Enabled |
Select this box to enable the transaction. |
- Perform any of the Basic Actions mentioned in Navigation chapter.
You can define the authorization restrictions using the following sub tab:
- Maker Responsibility
- Checker Responsibility
- Authorization Criteria
Note
‘Checker Responsibility’ and ‘Authorization Criteria’ tabs are available only for monetary transactions (i.e. Authorize flag set to ‘Y’).
To define Maker Responsibility
- Click Setup > Setup > Administration > User > Access > Transaction.
- In the Transaction Super Group section, select the super group you want to work with.
- In the Maker Responsibility section, perform any of the Basic Operations mentioned in Navigation chapter.
A brief description of the fields is given below:
Field: |
Do this: |
Access Type |
Select ‘RESPONSIBILITY’ as the access type from the drop-down list. |
Access Value |
Select the user responsibility from the drop-down list. |
Allowed |
Select ‘Yes’ to allow access or ‘No’ to restrict access to the entry in the Transaction Codes section, based on the access type and value. |
System Defined |
Select ‘Yes’, if the transaction user access definition entry is system defined. Select ‘No’, if the transaction user access definition entry is manually defined. |
Perform any of the Basic Actions mentioned in Navigation chapter.
To define Checker Responsibility
When a particular monetary transaction needs checker authorization you can define the same in ‘Checker Responsibility’ tab and also specify the Authorization Criteria for the transaction.
- Click Setup > Setup > Administration > User > Access > Transaction.
- In the Transaction Super Group section, select the super group you want to work with.
- In the Transaction Codes section, select the monetary transaction with the Authorize flag as ‘Y’.
- In the Checker Responsibility section, perform any of the Basic Operations mentioned in Navigation chapter.
A brief description of the fields is given below:
Field: |
Do this: |
Access Type |
Select ‘CHECKER RESPONSIBILITY’ as the access type from the drop-down list. |
Access Value |
Select the user responsibility from the drop-down list. |
Allowed |
Select ‘Yes’ to allow access or ‘No’ to restrict access to the entry in the Transaction Codes section, based on the access type and value. |
System Defined |
Select ‘Yes’, if the transaction user access definition entry is system defined. Select ‘No’, if the transaction user access definition entry is manually defined. |
- Perform any of the Basic Actions mentioned in Navigation chapter.
To define Authorization Criteria
You can define conditional authorization by creating a sql statement based on required criteria. For example, you can define a condition to allow transaction authorization in an account for amount greater than 500.
- Click Setup > Setup > Administration > User > Access > Transaction.
- In the Transaction Super Group section, select the super group you want to work with.
- In the Transaction Codes section, select the monetary transaction with the Authorize flag as ‘Y’.
- In the Authorization Criteria section, you can add/edit the following details in the ‘Criteria Name’ and ‘Criteria Details’ section.
- In the Criteria Name section perform any of the Basic Operations mentioned in Navigation chapter.
A brief description of the fields is given below:
Field: |
Do this: |
Name |
Specify a name for the criteria. |
Description |
Specify a description for the criteria. |
Authorization Level |
Specify the level of authorization responsibility in numeric value. Note: You will need to specify the same value as defined for each user within ‘Checker Responsibility’ Lookup Type (CHECKER_RESPONSIBILITY_CD) in Setup > Administration > System > Lookups screen. |
Enabled |
Select this box to enable the criteria. |
- Perform any of the Basic Actions mentioned in Navigation chapter.
- In the Criteria Details section perform any of the Basic Operations mentioned in Navigation chapter.
A brief description of the fields is given below:
Field: |
Do this: |
Seq |
Specify a sequence number. |
( |
Specify the open/entry criteria. |
Parameter |
Select the transaction parameter from the drop-down list. The list displays transaction parameters for the selected transaction and the parameters in user defined table ‘INP_BMP_ACC’. |
Comparison Operator |
Select the comparison operator from the drop-down list. |
Criteria Value |
Specify the required criteria value for validation. |
) |
Specify the close/exit criteria. |
Logical Expression |
Select the logical operator from drop-down list. |
Enabled |
Select this box to enable the criteria. |
- Perform any of the Basic Actions mentioned in Navigation chapter.
- Click Check Criteria to validate the correctness of the statement and to resolve errors, if any.
You can add multiple checker responsibility and define multiple selection criteria for each checker responsibility.
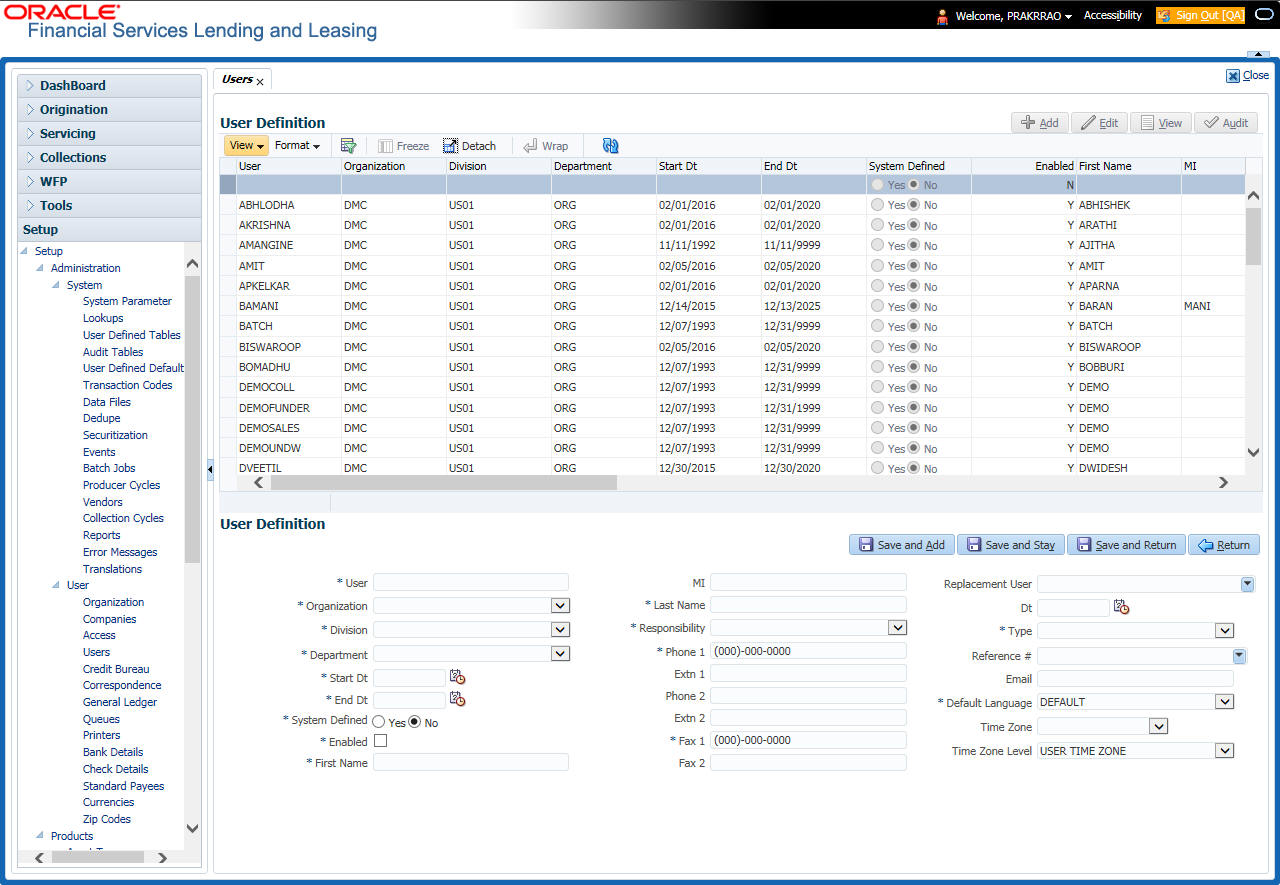
3.4 Users
The Users screen allows you to create and set up an user. In the User Definition section, you can assign a user an identification name and password to log on to the system. You can also assign the organization, division, and department where each user is located. Additional fields allow you to record information for contacting the user. You can also define the time frame within which a user has access to the system to ensure compliance to the company’s schedule. This is a very useful feature to prevent logins during scheduled maintenance.
The Responsibility field records the job function of the user and defines the level of access that user has within the system; in particular:
- What menu items does the user have access to?
- What transactions can the user perform on the Maintenance screen on the Customer Service screen?
- What edits can the user perform on the Verification link during origination?
Note
The system’s SUPERUSER responsibility grants access to the entire system. Give careful consideration to the number and type of users who receive this responsibility.
To set up the Users screen
- Click Setup > Setup > Administration > User > Users. The system displays the Users screen.
- In the User Definition section, perform any of the Basic Operations mentioned in Navigation chapter.
A brief description of the fields is given below:
Field: |
Do this: |
User |
Specify the user ID. Note: This field is a unique indicator and cannot be updated, edited, or deleted once saved. |
Organization |
Select the organization to which the user belongs, from the drop-down list. |
Division |
Select the division to which the user belongs, from the drop-down list. |
Department |
Select the department to which the user belongs, from the drop-down list. |
Start Dt |
Specify the start date for the user. You can also select from the adjoining calender icon. |
End Dt |
Specify the end date for the user. You can also select from the adjoining calender icon. |
System Defined |
Select ‘Yes’, if the entry is system defined. System defined entries cannot be modified. Select ‘No’, if the entry is not system defined and it can be modified. |
Enabled |
Check this box to enable the user. |
First Name |
Specify the first name of the user. |
MI |
Specify the middle initial of the user. |
Last Name |
Specify the last name of the user. |
Responsibility |
Select the responsibility for the user from the drop-down list. Note: The users mapped to the role ‘Responsibility’ can only view the screens. |
Phone 1 |
Specify the user’s primary phone number. |
Extn 1 |
Specify the phone extension for the primary phone number. |
Phone 2 |
Specify the user’s alternate phone number. |
Extn 2 |
Specify the phone extension for the alternate phone number. |
Fax 1 |
Specify the user’s primary fax number. |
Fax 2 |
Specify the user’s alternate fax number. |
Replacement User |
Select the user ID of the replacement user from the drop-down list. |
Dt |
Specify the date from when the replacement is effective. You can also select from the adjoining calender icon. Note: These two fields allow you to create a replacement user for the current user. This is particularly useful when a new employee assumes the duties of a former. By completing the Replacement User and Replacement Dt field, the system recognizes the replacement user as the current user on the effective date. For more information, refer the section, ‘Replacement Users’. |
Type |
Select the user type from the drop-down list. |
Reference # |
Specify the reference number for the user from the drop-down list. |
Specify user’s email address. |
|
Default language |
Select the default language from the drop-down list. |
Time Zone |
Select the required Time Zone from the drop-down list, The specified time zone would be applicable at company level. |
Time Zone Level |
Select the time zone level (Organization, Company or User) that would apply by default, when specific time zone is not specified at Company and User level. |
- Perform any of the Basic Actions mentioned in Navigation chapter.
3.4.1 Replacement users
By completing the Replacement User and Dt fields on the Users screen, you can replace an existing user with a new user. The system assigns all responsibilities of the original user to the new user as of the date of the replacement.
The Replacement User and Dt fields allow you to designate a replacement for the current user in the User ID field. When you complete the Replacement User and Dt fields, save your entry, and then enable the record, the system replaces the original user. The system changes the End Dt field to the date when the original user was replaced (the same date in the Dt field).
The system assigns the queues of the original user to only those replacement users who have the same user responsibilities (or Super User responsibility) as set in the system.
The system updates the following when replacing users:
- Assigns all applications in the replaced user’s underwriting queue with the status New to the replacement user’s queue.
- Assigns all applications in the replaced user’s funding queue with a status other than Funded to the replacement user’s queue. The system currently stores the collector name in the back end tables, which are updated with the replacement users ID in the case of the replacement of any user.
- Also updates the Producer Management screen with the replacement user in the Underwriter and Collector fields. The system assigns all applications routed to the original user to the replacement user. This also includes any future applications for the replaced user.
- The system automatically updates the Collector ID field in all accounts to the replacement user and routes all accounts assigned to the original user to the replacement user.
Note
The system will not update the replacement user ID for accounts that are closed.
- On the queue setup of Customer Service screen’s Responsibilities sub screen, the record for the original user will be disabled and a new record will be created for the replacement user. If the replacement user already exists in the setup, The system will not create a new record. It updates the user ID and routes all accounts that were assigned to the original user, based on the account condition, to the replacement user.
3.4.2 Application and Oracle Identity Manager Synchronization
Oracle Identity Manager is for user administration. Oracle Financial Services Lending and Leasing has been developed in such a way that it can be implemented with or without Oracle Identity Manager. In case OID has been employed, the user definition is done in OID and then synchronized to the Oracle Financial Services Lending and Leasing Users table using a utility JAR called OID Synchronization JAR. In OID, users are defined across various groups belonging to a realm which is nothing but the directory structure in OID. A user can be configured to belong to multiple groups in a realm. Every time the user tries to login to Oracle Financial Services Lending and Leasing or OBIEE, the system validates the login ID and the password with OID and provides access to those applications.
3.5 Credit Bureau
In the system, an important part of the origination process is pulling a credit report from a credit bureau and scoring that information against a user-defined risk model. These credit reports can be pulled both automatically and manually.
After you enter an application, the system compares its contents against pre-screen criteria. If the application passes a pre-screen edits check, the system advances the status of the application and automatically pulls a credit report.
You can manually request a credit report for an applicant or any other party included on the application, such as co-signers and spouses by selecting the bureau from which you want to pull the report. If more than one report type is defined for the selected bureau, then you can indicate the type of report you want to pull.
The following are few additional Credit Bureau Setup details:
- The credit bureau from which the report is pulled is determined by the applicant’s zip code. The credit bureau interface searches the information in the Credit Bureau Zip Matrix tab and matches the applicant’s zip code to determine the bureau(s) from which to request a report.
- The number of credit reports automatically pulled per applicant is controlled through the credit request parameter CRB_MAX_BUREAU_PULL. If this parameter is set to 1, a credit bureau request will be made for the Bureau1 credit bureau from the zip code matrix. Likewise, if this parameter is set to 2, a credit bureau request will be made for the Bureau1 and the Bureau2 credit bureaus from the zip code matrix.
- The system automatically pulls credit reports for only the primary applicant and the primary applicant's spouse (for joint applications) unless the CRB_ALL_APL_BUREAU_PULL credit request parameter is set to Y. However, if the parameter is set to Y, the system pulls credit reports for all of the applicants on the Lease, regardless of their relationship to the primary borrower.
- Passwords, default report formats, and other required information from the credit bureaus are set up in the Report Formats screen.
Member codes and passwords when switching credit bureau access methods (moving from dial-up to Net Connect). The member codes and passwords are not dependent on the connection method used to access the bureau.
Frame relay access is from the database server to the Experian host though a TCP/IP socket connection. The connection is outbound only and it is to a specific port (699 or 700) on the Experian host.
The credit bureau service will be accessing Experian Net Connect service through HTTP to the ECALS URL supplied by Experian as well as by the HTTPS to the URL returned as a response to the ECALS URL inquiry (the credit request URL). This access is from the database server access.
3.5.1 Credit Bureau
The setup for Credit Bureau spans across the following links:
- Report Formats
- Connections
- Zip Matrix
- Parameters
- Score Reasons
- Reporting
Navigating to Credit Bureau
- On the Oracle Financial Services Lending and Leasing home screen, click Setup > Setup > Administration > User > Credit Bureau.
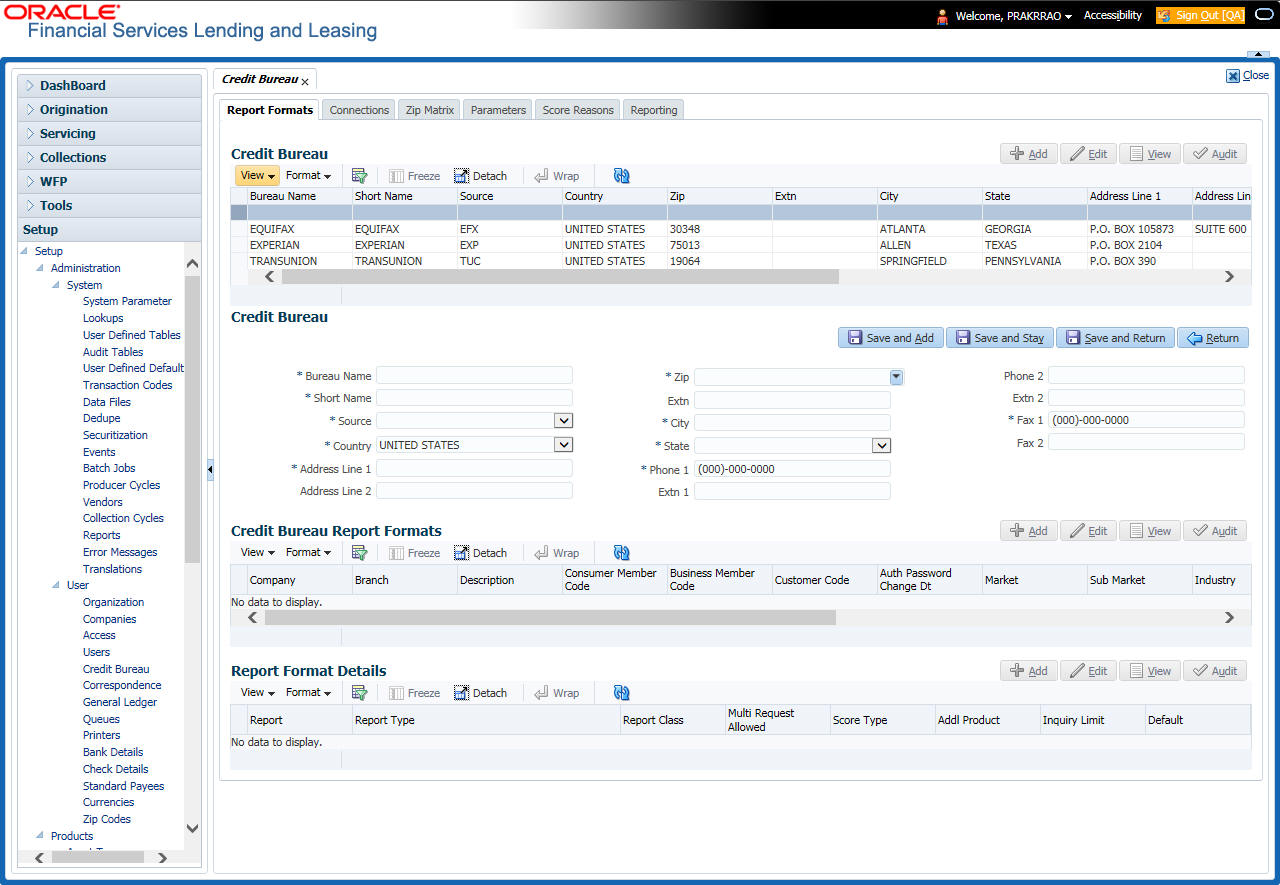
3.5.1.1 Report Formats
The Reports Formats screen captures and tracks the attributes related to the multiple types of reports offered by the credit bureau agencies. When a company enlists the service of a credit bureau, the credit bureau provides a membership code and password. This information needs to be entered on the Reports Formats screen before you can request a credit report. You must define at least one report for each credit bureau from which you want to pull reports.
The information on the Report Formats screen is location-specific. If the business requires different membership codes for each location, be it a company or branch, then individual records must be set up.
The Score Type, Additional Product, and Inquiry Limit fields on the Credit Report Setup section are optional. They may not apply to all credit bureau types and even if they do apply, you may want to leave them blank and rely on a default value set up at the credit bureau.
Note
For more information, refer to the the application Installation Guides.
To setup Report Formats
- Click Setup > Setup > Administration > User > Credit Bureau > Report Formats
- In the Credit Bureau section, perform any of the Basic Operations mentioned in Navigation chapter. :
A brief description of the fields is given below:
Field: |
Do this: |
Bureau Name |
Specify the name of the credit bureau company. |
Short Name |
Specify the abbreviated or short name for the bureau. |
Source |
Select the credit bureau source from the drop-down list. |
Country |
Select the country of the credit bureau address from the drop-down list. |
City |
Specify the city for the credit bureau address. |
State |
Select the state of the credit bureau address from the drop-down list. |
Address Line 1 |
Specify the address line 1 for the credit bureau. |
Address Line 2 |
Specify the address line 2 for the credit bureau. |
Zip |
Select the zip code for the credit bureau address from the drop-down list. |
Extn |
Specify the extension of the zip code for the credit bureau address. |
Phone 1 |
Specify the primary phone number for the credit bureau. |
Extn 1 |
Specify the extension for the primary phone number. |
Phone 2 |
Specify the secondary phone number for the credit bureau. |
Extn 2 |
Specify the extension for the secondary phone number. |
Fax 1 |
Specify the primary fax number for the credit bureau. |
Fax 2 |
Specify the alternative fax number for the credit bureau. |
- Perform any of the Basic Actions mentioned in Navigation chapter.
- In the Credit Bureau Report Formats section, perform any of the Basic Operations mentioned in Navigation chapter.
A brief description of the fields is given below:
Field |
Do this: |
Company |
Select the portfolio company that will be using the above credit bureau from the drop-down list. |
Branch |
Select the portfolio branch from the company that will be using the above credit bureau from the drop-down list. |
Description |
Specify the credit report format description. |
Member Code |
Specify the credit bureau member code (assigned by bureau). |
Password |
Specify the credit bureau password. |
Customer Code |
Specify the customer code. |
Auth Password Change Dt |
Display the last authorization password change date. The Experian Net Connect product requires that the Auth Password (or SSP Password in Experian jargon) be changed every 90 days (or sooner). Equifax may have similar requirements, but they were not known at the time of this writing. Use the date displayed in this field to identify when the password needs to be changed. Note: The password needs to be changed both in the system and at the credit bureau. Changing the password does not initiate or perform a change at the bureau. Changing the password at the bureau must be done outside the system. Contact the credit bureau for the procedure for changing the password (display only). |
Auth User ID |
Displays the authorization user ID (display only). |
Auth Password |
Displays the authorization password (display only). Note: This field is not displayed to the user and is also encrypted before being stored in the database (display only). |
Change Authorization User Id/Password section |
|
New Auth User Id |
Specify the authorization user ID. |
New Auth User Password |
Specify the authorization user password. |
TransUnion Details section (Note: This is only applicable for TransUnion.) |
|
Market |
Specify the TransUnion market id. |
Sub Market |
Specify the TransUnion Sub Market id. |
Industry |
Specify the TransUnion Industry code. |
Experian Details section (Note: This is only applicable for Experian.) |
|
Preamble |
Specify the Experian preamble code. |
Host Code |
Specify the Experian host ID. |
UIC |
Specify the Experian UIC. |
Equifax Details section (Note: This is only applicable for Equifax.) |
|
Service Name |
Specify the equifax service name. The service name will be provided to you by Equifax when your company's Internet System to System account is created. Possible values for pulling credit reports are acrotest (for access to the test system) and acro (for access to the production system). |
- Perform any of the Basic Actions mentioned in Navigation chapter.
- In the Report Format Details section, perform any of the Basic Operations mentioned in Navigation chapter.
A brief description of the fields is given below:
Field |
Do this: |
Report |
Specify the report name to be accessed from the credit bureau. |
Report Type |
Select the report type of the credit bureau report from the drop-down list. |
Score Type |
Select the credit score type from the drop-down list. |
Addl Product |
Select the product code from the drop-down list. |
Inquiry Limit |
Select the inquiry limit for the credit report from the drop-down list. |
Enabled |
Check this box to enable the report as default. |
- Perform any of the Basic Actions mentioned in Navigation chapter.
3.5.1.2 Connections
The Connections screen records and supports various connections to the credit bureau to receive reports from the agencies. The system supports connections to the bureaus through one or more modems attached to the database server, network accessed modem server, or direct network connection (usually frame relay).
For modem-based connections, multiple credit bureaus can be accessed over the same modem. If there are multiple requests in the queue, the order in which the bureaus are listed determines the order in which the requests are processed.
For example,
If the credit bureau service checks the submitted credit requests and finds three Experian, one Equifax, and two TransUnion credit requests and the connections setup is Bureau1=TUC, Bureau2=EFX, and Bureau3=EXP, the two TransUnion requests will be processed first, the Equifax request next, and then the three Experian requests.
Note
For this above example, adding two more modems and assigning a specific bureau to each one would help to avoid the delay caused by queuing all requests through a single modem.
IMPORTANT: Direct network connections must be set up for only one bureau.
Like the Credit Bureau section on the Report Formats screen, the data fields used on the Connections screen are generic and not all fields are used for all access methods. The following table summarizes the data needed for each access method:
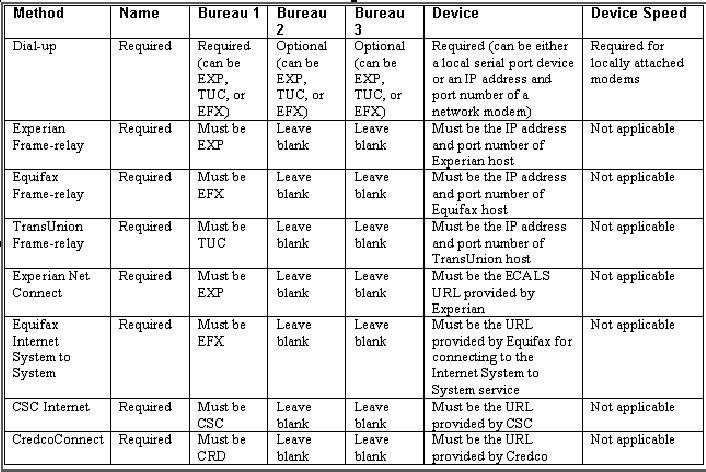
For frame relay access, specify the IP address provided by the bureau followed by a space and then the port number (for example, 192.168.36.2.700).
Experian Net Connect
At the time of this writing, the Experian product ECALS URL is:
http://www.experian.com/lookupServlet1?lookupService
Name=AccessPoint&lookupServiceVersion=1.0&serviceName=Net
Connect&serviceVersion=2.0&responseType=text/plain
Note
The URL given above is one continuous string. This can be verified by entering the URL with a browser. The displayed value will be an HTTPS URL.
Enter the entire ECALS URL provided by Experian into the Device field. Notice that this URL does not start with https. The ECALS URL is a URL used by the credit bureau service to request the HTTPS URL. The HTTPS URL is not displayed on any setup screen and is only known to the credit bureau interface at runtime.
Equifax Internet System to System
At the time of this writing, the Equifax Internet System to System URL is:
https://transport5.ec.equifax.com/servlet/stspost
CSC Tri-Merge
At the time of this writing, the CSC URL is:
https://www.emortgage.Equifax.com/cgi-bin/emspop.exe
To setup the Connections
- Click Setup > Setup > Administration > User > Credit Bureau > Connections.
- In the Credit Bureau Connections section, perform any of the Basic Operations mentioned in Navigation chapter.
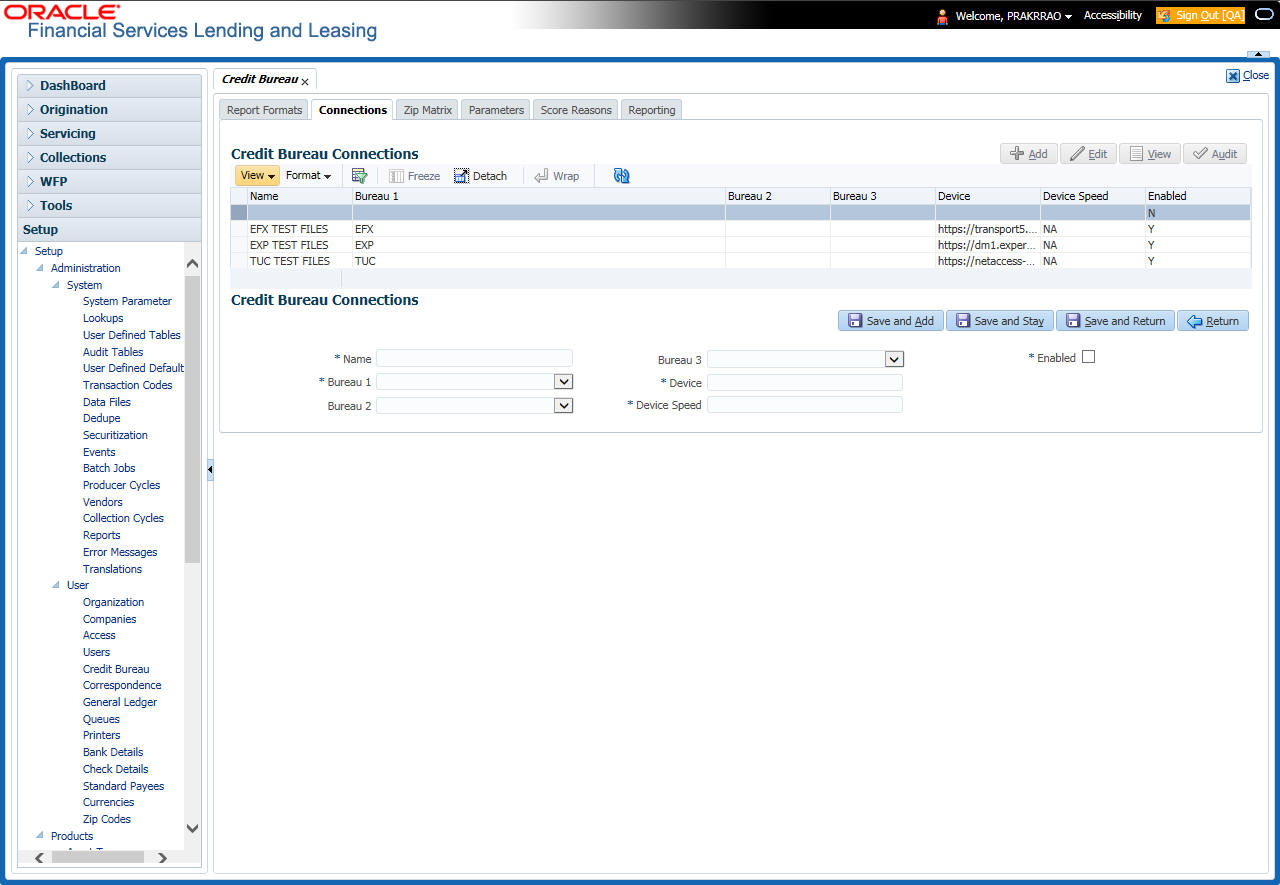
A brief description of the fields is given below:
Field: |
Do this: |
Name |
Specify connection name. |
Bureau 1 |
Select first credit bureau from the drop-down list. |
Bureau 2 |
Select 2nd credit bureau from the drop-down list. |
Bureau 3 |
Select 3rd credit bureau from the drop-down list. Note: The Bureau1, Bureau2, and Bureau3 fields in the Credit Bureau Connections section specify which bureau types can be accessed over the connection. |
Device |
Specify the connection device name. The Device field lists the physical device name for a modem, or the IP address for a network accessed connection. |
Device Speed |
Select the connection device speed. The Device Speed field is only applicable to server-attached modems. It is used to specify the communications speed between the server and the modem. |
Enabled |
Check this box to enable the connection. |
- Perform any of the Basic Actions mentioned in Navigation chapter.
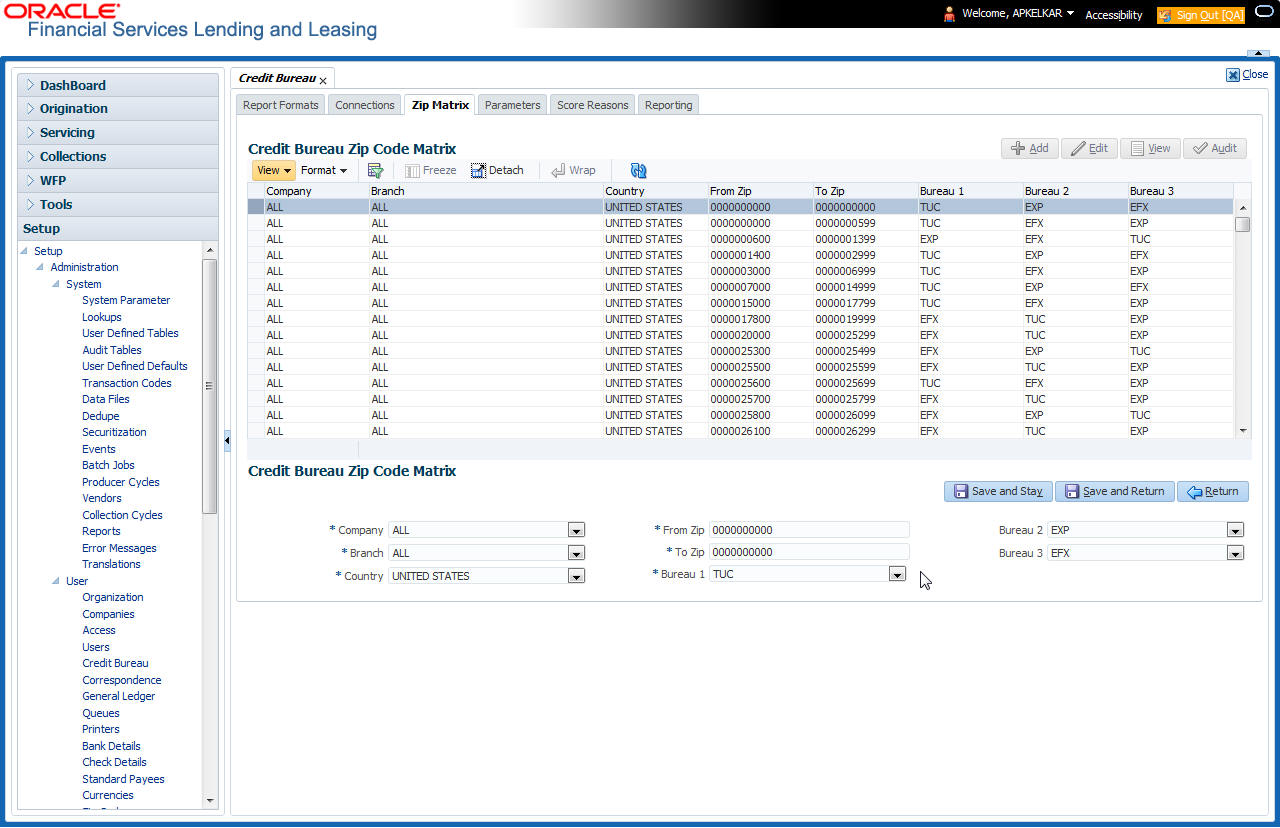
3.5.1.3 Zip Matrix
The system uses the zip code of the applicant’s current home address to determine which credit bureau to use when automatically pulling a report. The Zip Matrix screen allows you to record the credit bureau from which a report is pulled based on a range of zip codes, as well as the company, branch and country of the account.
When searching for a zip code match, the system:
- Reads the first credit bureau defined in the matrix
- Reads the credit report format to get the appropriate membership code and password for the user’s location
- Requests a credit report.
If the system cannot pull a report from the first bureau, it pulls one from the second. If the zip code you entered does not fall in the matrix setup, then the system uses a default zip matrix (0000000000 to 0000000000) to select the required bureau.
To set up the Zip Matrix
- Click Setup > Setup > Administration > User > Credit Bureau > Zip Matrix
- In the Credit Bureau Zip Code Matrix section, perform any of the Basic Operations mentioned in Navigation chapter.
A brief description of the fields is given below:
Field: |
Do this: |
Company |
Select the portfolio company from the drop-down list. |
Branch |
Select the portfolio branch from the drop-down list. The branch will be displayed based on the company selected. |
Country |
Select the country from the drop-down list. |
From Zip |
Specify the starting zip code (From). |
To Zip |
Specify the ending zip code (To). |
Bureau 1 |
Select the preferred bureau #1 (first bureau pulled), from the drop-down list. You must enter at least one credit bureau in the Bureau 1 field for each zip code range. The bureau entered in the Bureau 1 field for each range is the primary bureau. For any given range, do not list the same credit bureau in more than one field. |
Bureau 2 |
Select the preferred bureau #2 (second bureau pulled) from the drop-down list. |
Bureau 3 |
Select the preferred bureau 3 (third bureau pulled) from the drop-down list. |
- Perform any of the Basic Actions mentioned in Navigation chapter.
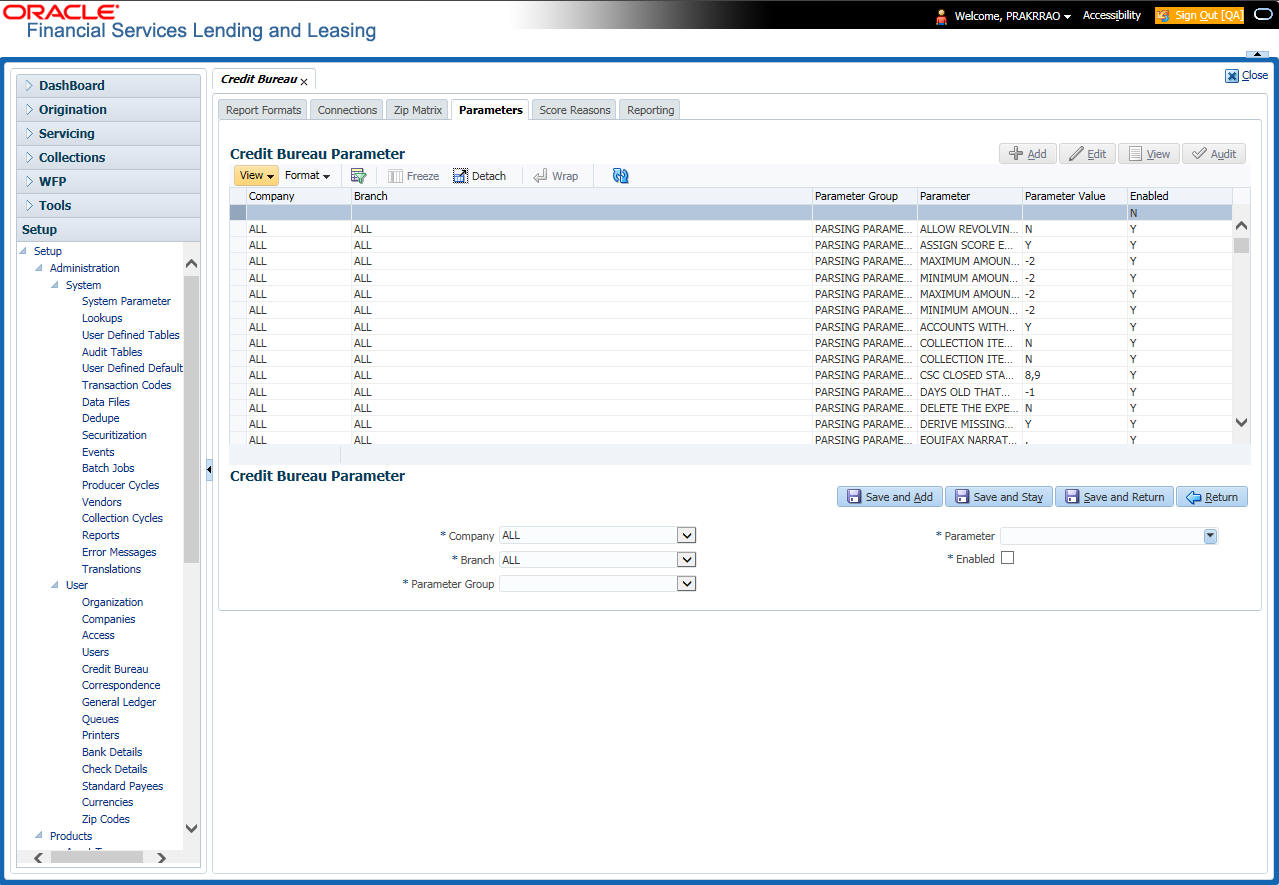
3.5.1.4 Parameters
The Parameters screen records parameters specifically dealing with credit bureau information. These parameters are divided into three groups:
- Parsing parameters
- Request parameters
- Configuration parameters
Parameters can be defined at the company or branch level. The following credit bureau parameters are configured during the installation:
PARSING PARAMETERS FOR CREDIT BUREAU SERVICE
CONFIGURATION PARAMETERS FOR CREDIT BUREAU SERVICE
The following credit bureau parameters are configured during implementation:
REQUEST PARAMETERS FOR CREDIT BUREAU Service
Request Parameters for Credit bureau Service
To setup the Parameters
- Click Setup > Setup > Administration > User > Credit Bureau > Parameters.
- In the Credit Bureau Parameters section, perform any of the Basic Operations mentioned in Navigation chapter.
A brief description of the fields is given below:
Field: |
Do this: |
Company |
Select the portfolio company from the drop-down list. |
Branch |
Select the portfolio branch from the drop-down list. The branch will be displayed based on the company selected. |
Parameter Group |
Select the credit bureau parameter group from the drop-down list. |
Parameter |
Select the credit bureau parameter from the drop-down list |
Parameter Value |
Specify the credit bureau parameter value. |
Enabled |
Check this box to enable the credit bureau parameter. |
- Perform any of the Basic Actions mentioned in Navigation chapter.
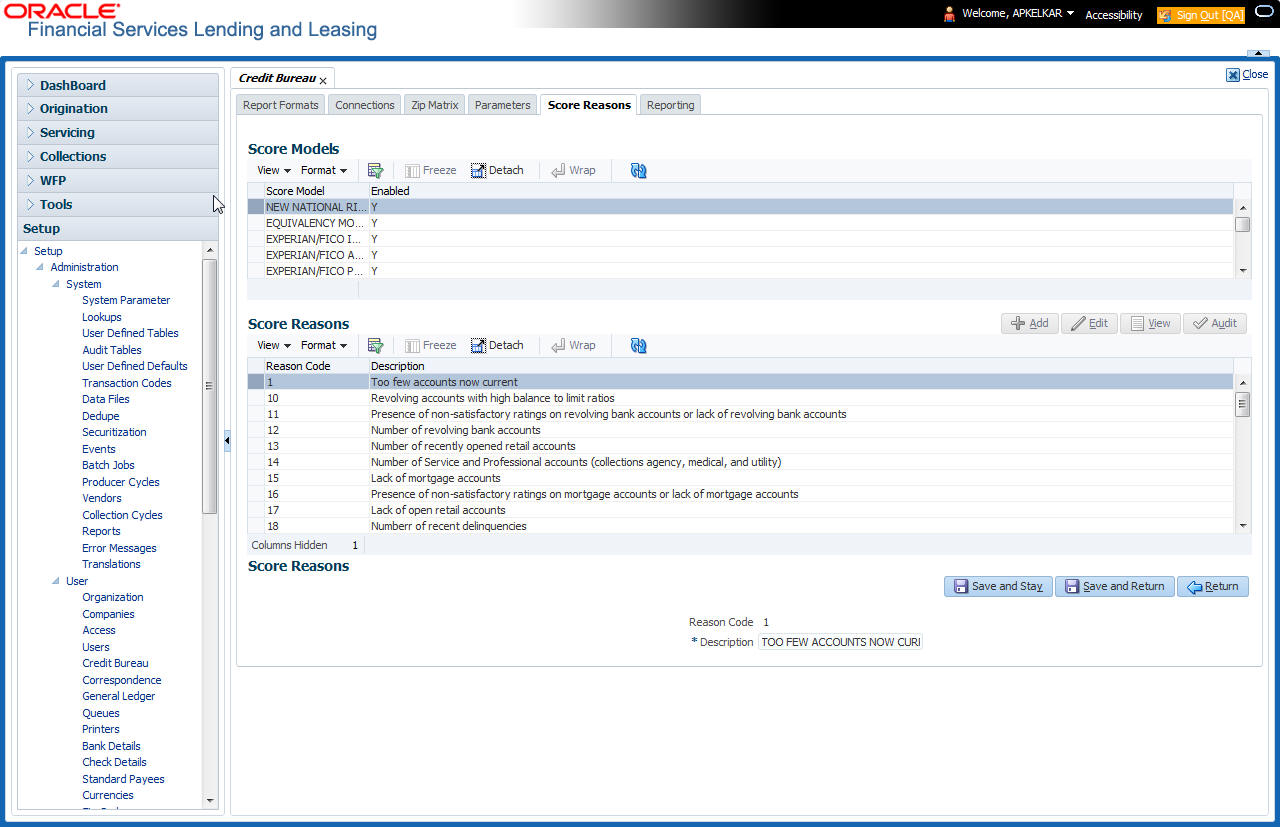
3.5.1.5 Score Reasons
The Score Reasons screen allows you to define or modify the scoring reason codes and descriptions for the predefined scoring models used by the credit bureau agencies.
Note
This information is not associated with the user-defined scores determined by the internal Oracle Financial Services Lending and Leasing model during product setup.
To setup the Score Reasons
- Click Setup > Setup > Administration > User > Credit Bureau > Score Reasons.
- In the Score Models section, you can view the following information.
A brief description of the fields is given below:
Field: |
Do this: |
Score Model |
Displays the credit bureau score model (display only). |
Enabled |
Displays if the credit bureau score model is enabled or not. |
- On the Score Reasons sub screen, perform any of the Basic Operations mentioned in Navigation chapter.
A brief description of the fields is given below:
Field |
Do this: |
Reason Code |
Specify the reason code. |
Description |
Specify the description. |
- Perform any of the Basic Actions mentioned in Navigation chapter.
3.5.1.6 Reporting
The system reports to the credit bureau agencies in the Metro 2 format with the payment and account status information of each account holder. The Credit Bureau Reporting screen contains the program identifier to be reported to the bureaus.
To setup the Reporting
- Click Setup > Setup > Administration > User > Credit Bureau > Reporting.
- In the Credit Bureau Reporting section, perform any of the Basic Operations mentioned in Navigation chapter.
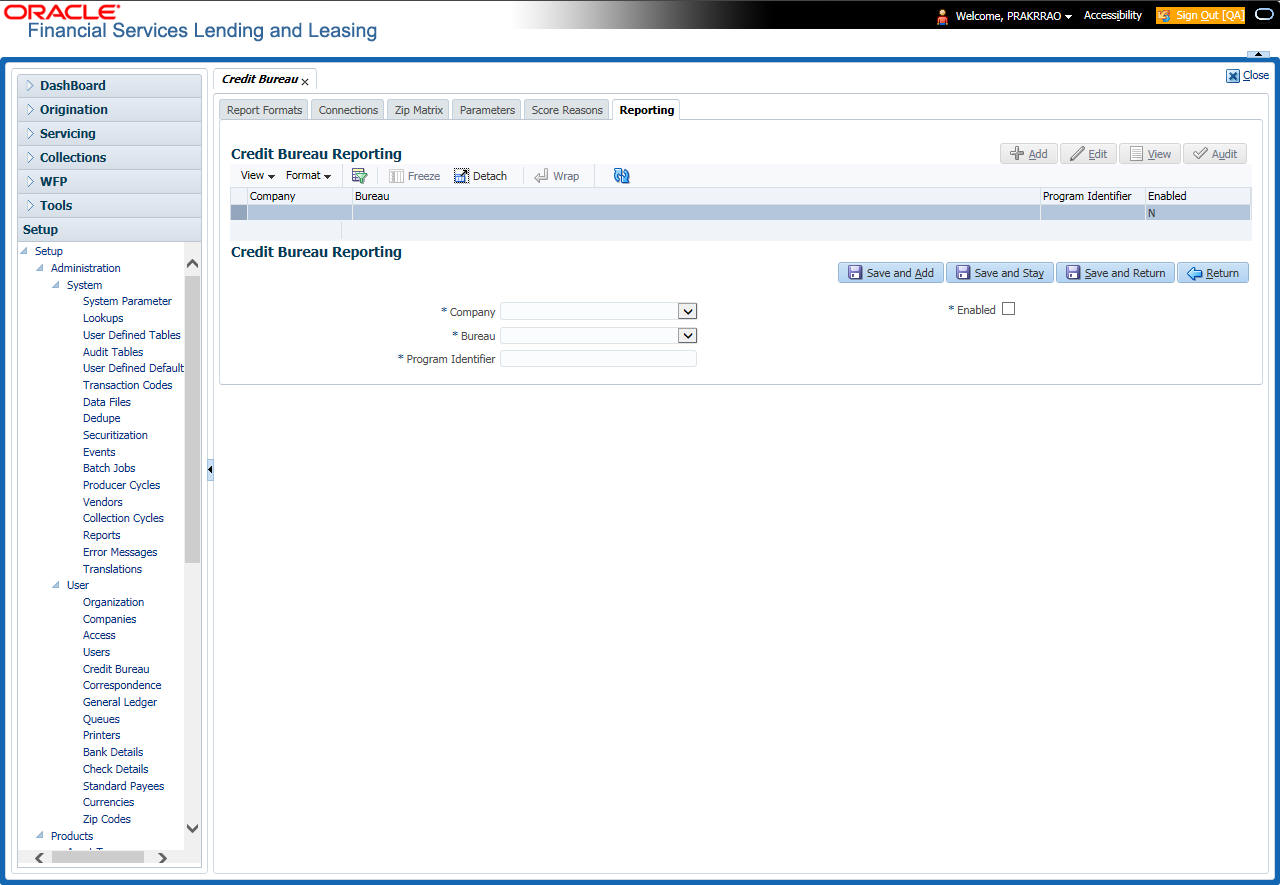
A brief description of the fields is given below:
Field |
Do this: |
Company |
Select the portfolio company from the drop-down list. |
Bureau |
Select the bureau from the drop-down list. |
Program Identifier |
Specify the program identifier. The customer receives this from the bureau and uses it to identify itself to that bureau. You will need to update this information. |
Enabled |
Check this box to enable the program. |
- Perform any of the Basic Actions mentioned in Navigation chapter.
3.5.2 Special Metro II Code reporting
The system allows you to report the following special Metro II segments to the credit bureau output file:
- Consumer Information Indicator Code (CIIC)
- Compliance Condition Code (CCCD)
- Special Comment Code (SPCC).
The system users will need to use call Action/Results and Reason fields on the Call Activities sub screen of the Customer Service form (Lending > Customer Service > Customer Service (2) master tab > Account Details tab > Call Activities sub tab) to place specific account conditions where these Metro II segments are to be reported. The specific segment reported for a given condition will be based on the account condition and call activity reason codes.
Note
It is the responsibility of the Administrator or individual user to setup Special Metro II Code reporting functionality.
When users open one of the following conditions:
Code |
Description |
CIIC |
Consumer Information Indicator Code (METRO2 - FCRA) |
CCCD |
Compliance Condition Code (METRO2) |
SPCC |
Special Comment Code (METrO2) |
The system recognizes the condition, processes the selected Metro II reporting call activity reason code, and generates the Metro II reporting segment in the Metro II reporting output file.
Note
- You are responsible for selecting the correct Metro II reporting segment reason code to be reported. If you do not select a Metro II reporting segment reason code, the system will not generate information to Metro II output file. If you select an incorrect Metro II reporting segment reason code, the system will report the selected Metro II reporting segment. the system does not validate the contents of the Reason field with the contents of the Condition field.
- To end the reported Special Metro II Special Code, close the open Special Metro II Condition (no reason code needed). The system recognizes the closing of the open Special Metro II Condition and will not create a Metro II reporting segment in the output file.
- The CBU_FILE_FREQUENCY (METRO 2 FILE FREQUENCY) Company system parameter determines if output file is generated and created daily or output file is written with daily data and output monthly.
To setup Metro II Code reporting
- On the Oracle Financial Services Lending and Leasing home screen, click Setup > Setup > Administration > User > Queues > Call Action Results to open and close the following system defined condition codes:
Action Code
Description
CIIC
Consumer Information Indicator Code (METRO2 - FCRA)
CCCD
Compliance Condition Code (METRO2)
SPCC
Special Comment Code (METRO2)
When setup is completed, you can open and close Special Metro II code conditions.
Note
Opening and closing Special Metro II Code reporting is a manual process.
The CBU_FILE_FREQUENCY (METRO 2 FILE FREQUENCY) Company system parameter determines, if output file is generated and created daily or output file is written with daily data and output monthly.
3.5.3 Oracle Wallet Manager setup
The Experian Net Connect, Equifax Internet System to System, and CSC interfaces within the the system credit bureau service use functionality provided by the Oracle Wallet feature. Use the Oracle Wallet Manager on the database server to create and export a wallet for use by the credit bureau service.
Note
All of the above mentioned interfaces use the same Oracle wallet. If a wallet already exists and is in use by one of the credit bureau interfaces, there is no need to create another wallet. Due to differing certificate requirements, there may be a need to import additional trusted certificates into the wallet, but there will not be a need to create a new one. The credit bureau parameter ORA_WALLET_PATH contains the location of the Oracle Wallet used by the credit bureau service.
To create and export a wallet suitable for use by the credit bureau
Refer to the Oracle documentation for more detailed instructions on how to use the Oracle Wallet Manager to create and manage a wallet:
- If a wallet does not already exist, create one somewhere on the database server. The location must be readable and writable by the Oracle user. Make a note of the full path where the wallet is stored (for example, /etc/ORACLE/WALLETS/oracle or C:\oracle\WALLETS).
- For Transunion credit bureau, a separate wallet file is needed under transunion folder inside the main wallet path (for example: /etc/ORACLE/WALLETS/oracle/transunion or C:\oracle\WALLETS\transunion).
- The wallet needs to contain the public key for the certificate authority that issued the server certificate for each HTTPS web site that will be connected to by the credit bureau interface. At the time of this document, those sites are:
https://ss1.experian.com
Experian
https://transport5.ec.equifax.com
Equifax
https://www.emortgage.Equifax.com
CSC
This list may change. Use the URL provided to you by the credit bureau when they set up your service. To get the proper Experian HTTPS URL, enter the ECALS URL that was provided by Experian into a web browser. The response returned to the browser is the HTTPS URL that will be used to communicate with Experian.
- Import the necessary certificate authority’s certificate files into the Oracle wallet that was created in Step 1. See the appendix of this chapter for detailed instructions of how to download and install a trusted certificate.
- Test the wallet by connecting to each web site with a simple command issued from SQLPlus.
SQL> select utl_http.request('https://ss1.experian.com', NULL, 'file:/etc/ORACLE/WALLETS/oracle', 'password') from dual;
Replace the URL in the above command with each HTTPS URL given to you for use by the credit bureaus. Also replace the wallet path with the path to your wallet and your wallet password. The output from the command is not important, what is important is that it runs without displaying an Oracle error. If there is an Oracle error, then something is wrong with the contents of the wallet, the path to the wallet, and/or the wallet password.
- When the wallet contains all of the required trusted certificates, export the wallet to a text file. On the Operations menu of the Oracle Wallet Manager, choose Export All Trusted Certificates. The text file MUST be located in the same directory as the wallet and the filename MUST be default.txt. Anytime a change is made to the trusted certificates in the wallet, the wallet must be re-exported to the same text file.
- In the Setup > Setup > Credit Bureau > Parameters set the ORA_WALLET_PATH and ORA_WALLET_PASSWORD parameters.
3.5.4 Oracle JVM Security setup
The Experian Net Connect interface within the credit bureau service requires the use of the Oracle Java Virtual Machine (JVM) that is resident in the Oracle database. Furthermore, specific permissions must be granted to the Java classes used by the credit bureau service. These permissions have been added to the set_java_perms.sql script that is part of the distribution. This script (as well as many other useful SQL scripts) is available from the Oracle Financial Services Software technical support Oracle Financial Services Lending and Leasing patches web site.
The set_java_perms.sql script needs to run as the SYS user (or a user with SYS privileges). The script will prompt for SYS user id and password. Be prepared to provide it when prompted. Also, the script will select the value of the ORA_WALLET_PATH parameter from the credit bureau parameters table. Make sure that it has been updated with the proper wallet path before running the set_java_perms.sql script (although the script can be safely run again if necessary).
Credit Bureau Service operation
The basic operation of the credit bureau service has not changed. Once setup, there is no operational difference between accessing the credit bureaus via dial-up, frame relay, or the Internet.
3.5.5 Importing a trusted certificate into an Oracle Wallet
The HTTPS servers used by Experian, Equifax, and CSC for their Internet based credit report services (as well as all HTTPS servers) contain a site certificate signed by a trusted Certificate Authority (CA). The CA is an entity that guarantees the identity of the HTTPS server. If the client trusts the CA, and the CA says that the HTTPS server is who they say they are, then the client inherently trusts the HTTPS server. Normally, a client tool such as Microsoft Internet Explorer has a large store of trusted CA certificates which makes secure communication between a client and a trusted HTTPS server relatively seamless and uneventful. Unfortunately, the store of CA certificates in the default Oracle wallet is rather small and it is likely that it will not contain the certificate of the CA that is certifying one or more of the credit bureau web sites. This means that the CA certificate must be imported into the wallet. To do this, the certificates must first be exported from a browser and then imported into the Oracle wallet using the Oracle Wallet Manager.
Using Microsoft Internet Explorer to Export a Certificate
- Use Microsoft Internet Explorer and connect to one of the HTTPS URLs referenced in the Oracle Wallet Manager Setup section of this document.
If the web site asks for a user id and password, cancel the dialog box and remain on the top-level HTTPS screen.
- Once connected, from the browser’s File menu, choose Properties.
- Click the Certificates button.
- Click the Certification Path tab. The bottom-most certificate is the one generated by the host itself. The one or more certificates above the bottom-most one are of greater importance to this task. The screen shot below displays a web site with two CAs (an intermediate, and a primary). Whether it is an intermediate CA or a primary one, the steps are the same for saving the certificate as a text file.
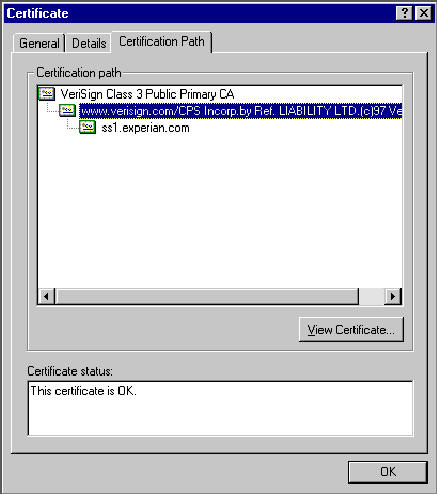
- Click the first certificate above the bottom-most certificate (it may be the only certificate above the bottom-most certificate).
- Click the View Certificate button.
- Click the Details tab.
- Click the Copy to File button.
- Click the Next button.
- Choose the Base 64 encoded format.
- Click the Next button.
- Enter a filename and location for the file.
- Click the Next button.
- Click the Finish button.
- Repeat steps 5 through 14 for the next certificate in the certification path, if any.
3.5.6 Importing the Certificates into an Oracle Wallet
- Copy the certificates exported and saved during the process described above onto the database server (not the iAS server).
- As the Oracle user (or Administrator on Windows), start the Oracle Wallet Manager.
- Open the wallet that will be used by the credit bureau service. Create a new wallet if one does not already exist.
- View the list of Trusted Certificates in the wallet.
- Check the list of certificates against the list of certificates that are in use on the HTTPS servers used by the credit bureaus (and that were exported and saved during the export process described above).
- Click the Trusted Certificates heading in the left list box of the Oracle Wallet Manager.

- Use Microsoft Internet Explorer to view the certificate details for the HTTPS web sites (File > Properties > Certificates > Certification Path > View Certificate > General) that will be contacted by the credit bureau service. Look through the list of certificates shown in the right panel of the Oracle Wallet Manager and look for a match between the Issued To and Valid To dates shown in the Internet Explorer View Certificate screen.
The screen shot below shows a certificate that is already in the wallet’s list of trusted certificates (see the last entry for the www.verisign.com/CPS certificate).
- On the Operations menu, choose Import Trusted Certificate and follow the prompts for locating and loading the files that were copied onto the database server in step 1 for any certificate not already stored in the wallet.
- On the Wallet menu, choose Save when finished loading certificates.
3.5.7 De-duping Credit Bureau data
Oracle Financial Services Lending and Leasing allows you to remove duplicate (“de-dupe”) liabilities data from the credit bureau information.
De-duping logic
The de-duping logic is based on a number of parameters that the system compares among tradelines (only) to determine if they are duplicates. The following fields are used to determine if two tradelines are duplicates:
Field: |
Description: |
Account # |
The account number of the consumer with the lender for the particular account. |
Open Date |
The date the account was opened. |
Member Code |
The subscriber code of the lender with the respective credit bureau. Note: Since member codes for the same lender differ across bureaus, this field is used only for tradelines reported by the same bureau. Since reports obtained from CSC can have tradelines from different bureaus, this field is only for reports pulled from the credit bureaus. |
All available bureau reports pulled later than DEDUP_CRB_EXPIRATION_DAYS days old will be used.
The following system parameters will be set up to provide switches to allow the functionality to be turned on and off:

Whenever two (or more) items are identified as duplicates, Oracle Financial Services Lending and Leasing uses the following hierarchy to pick one of the items as the “correct” one:
- Last Reported Date: The row that has been reported most recently is used.
- Owner: In case of a tie on the last reported date, one of the tradelines is picked in the descending order of priority depending on who the tradeline belongs to: Primary, Spouse, then Secondary.
Debt Ratio combination
Oracle Financial Services Lending and Leasing uses the system parameter DBR_JOINT_INC_DEBT_WITH_SPOUSE to decide whether to combine debt ratios of the spouse with the primary applicant. The DBR_JOINT_INC_DEBT_WITH_COAPP parameter decides whether to do the same on a non-spousal joint application.
When this indicator is checked, all liabilities in the Liability section on the Summary sub screen of the Applicant (2) master tab with the Include box selected will be used in the debt ratio calculation.
The following system parameter will be set up to provide switches to allow the functionality to be turned on and off:
De-duping process
The de-duping logic will be integrated into the system decision-making process in the following manner:
Initial credit pulls on new applications
- If the JOINT_DEDUP_SPOUSE_LIABILITIES/ JOINT_DEDUP_ALLAPL_LIABILITIES system parameters are set to Y, uses the de-duping logic described above to uncheck the duplicate liabilities in the spouse's/co-applicant’s liabilities.
- If the DBR_JOINT_INC_DEBT_WITH_SPOUSE/ DBR_JOINT_INC_DEBT_WITH_ALLAPL parameters are set to Y, the system includes the liabilities of the spouse/ co-applicant while calculating the debt ratio of the primary applicant.
- The system will use all available credit reports at the time.
Subsequent credit pulls (manual)
- To remove duplicate liabilities from the calculation, choose the Dedup Liabilities button on the Underwriting form (Applicants master tab > Summary sub screen > Liability section). (Potential record locking situations force the action to remain manual versus the system automatically doing it).
- If the Populate Debt and Include Debt boxes are selected in the Applicant/Customer Detail section on the Bureau master tab on the Underwriting form for the credit request and the JOINT_DEDUP_SPOUSE_LIABILITIES/ JOINT_DEDUP_ALLAPL_LIABILITIES system parameters are set to Y, the system will use the de-duping logic described above to uncheck the duplicate liabilities in the spouse's/co-applicant's liabilities.
- If the DBR_JOINT_INC_DEBT_WITH_SPOUSE/ DBR_JOINT_INC_DEBT_WITH_COAPL parameters are set to Y, the system will include the liabilities of the spouse/ co-applicant while calculating the debt ratio of the primary applicant.
- The system will use all available credit reports at the time of the request that have been requested within the number of days specified in the DEDUP_CRB_EXPIRATION_DAYS parameter.
Restrictions
The de-duping logic will be limited based upon the discussion above. If the system cannot identify two tradelines as duplicates based upon the logic mentioned above, the individual tradelines will be retained. In such circumstances, both tradelines will be used in the debt ratio calculation and it will be the user’s responsibility to disregard one of them by clearing the Include check box.
3.6 Correspondence
The Correspondence screen enables you to setup the system’s correspondence.
The system provides two types of correspondence: predefined and ad hoc. The following chart provides a quick summary of both:
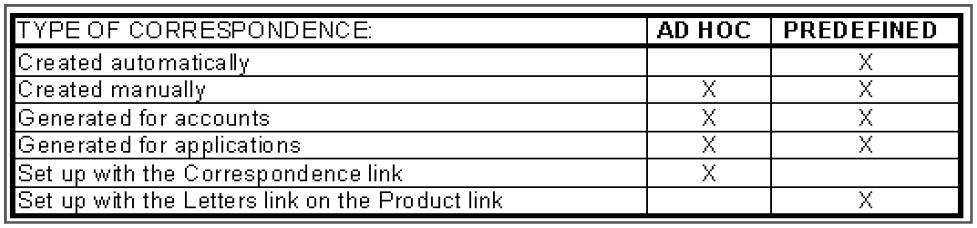
This chapter explains how to setup ad hoc correspondence with the Correspondence form.
The Correspondence screens provide a cost-effective and easy to use method to build custom documents that draw information from the system’s database without additional programming. You can choose what to include in a letter, create a template, and then use this template to produce a letter.
The core of the Correspondence module is the document element -- the information stored in the database merged into the correspondence. The system has document elements defined for commonly used data elements in correspondence, such as account numbers, account balances, customer addresses, telephone numbers, and due dates.
Correspondence consists of a document file with text of your choice and the document elements from the system’s database.
You can create a correspondence set that consists of one or more documents. If a correspondence set consists of more than one document, such as the account details letter and a payment overdue letter, it prints both documents every time the system generates correspondence for a customer.
The Correspondence module creates the following standard ad hoc correspondence:
- Microsoft Word (rtf)
- Adobe Acrobat (pdf/xfdf)
Note
In this document and in the system, the term bankers system is synonymous with Adobe Acrobat.
3.6.1 Correspondence
The Correspondence screen contains the following sub screens:
- System Functions
- Elements
- E-Form Elements
- Documents
- Correspondence
Navigating to Correspondence
- On the Oracle Financial Services Lending and Leasing home screen, click Setup > Setup > Administration > User > Correspondence.
3.6.1.1 System Functions
The System Functions screen enables you to view the predefined functions for the appropriate Lease product in the system. These are attributes from the database.
Functions define how the system retrieves data to include in correspondence. The data is retrieved as elements which are either specific database columns or calculated values. Elements are recorded on the Elements screen.
To view the predefined system functions
- Click Setup > Setup > Correspondence > Lease > System Functions.
- In the Function Definition section, you can view the following information.
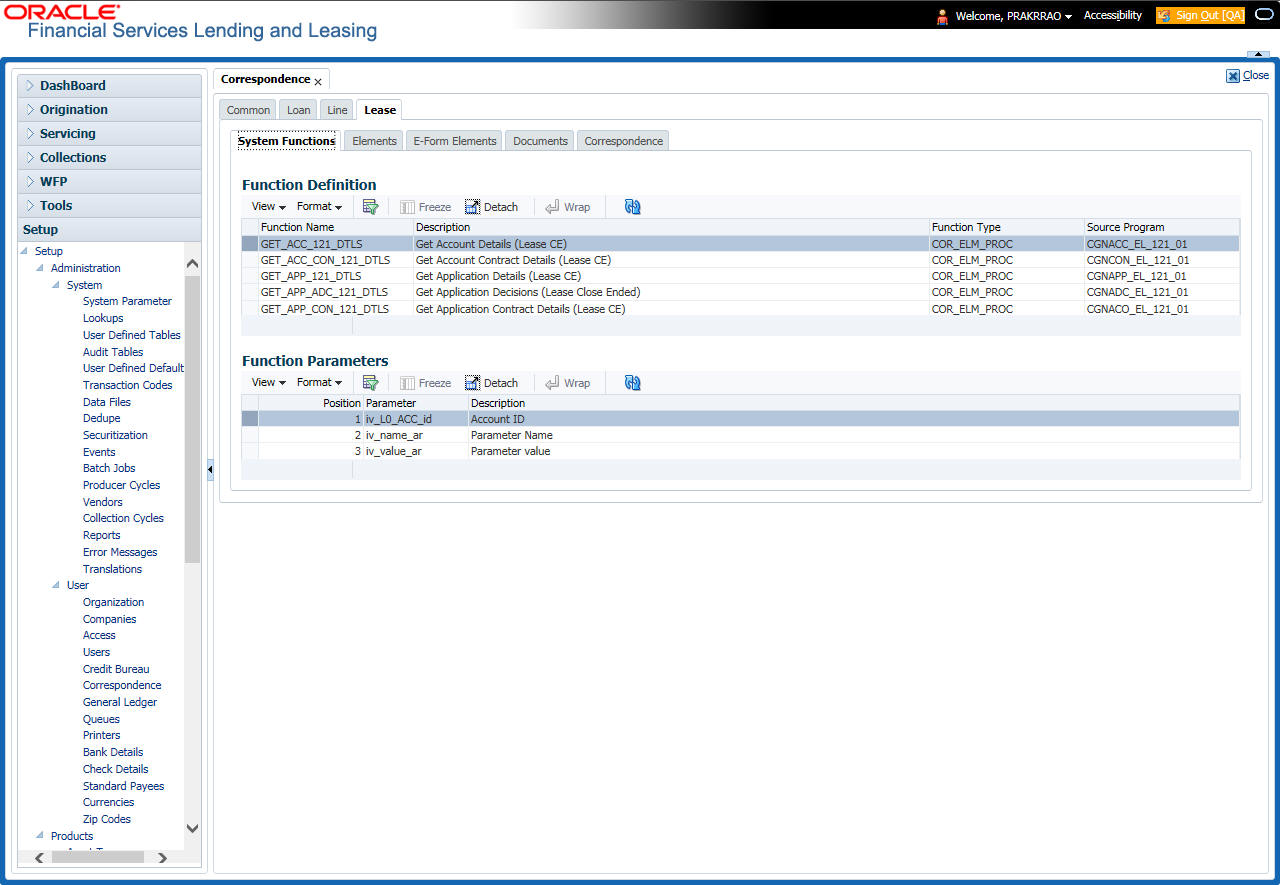
A brief description of the fields is given below:
Field: |
View this: |
Function Name |
Displays the function name. |
Description |
Displays the function description. |
Function Type |
Displays the function type. |
Source Program |
Displays the source program. |
- In the Functions Parameters section, you can view the following information.
A brief description of the fields is given below::
Field: |
View this: |
Position |
Displays the parameter position. |
Parameter |
Displays the function parameter. |
Description |
Displays the function parameter description. |
3.6.1.2 Elements
The Elements screen displays the predefined document elements retrieved from the database when the correspondence is generated.
In the Element Definitions section, you can update or edit only the Description field.
To view the Elements
- Click Setup > Setup > Administration > User > Correspondence > Lease > Elements
- On the Element Definitions screen, perform any of the Basic Operations mentioned in Navigation chapter. You cannot add a new record.
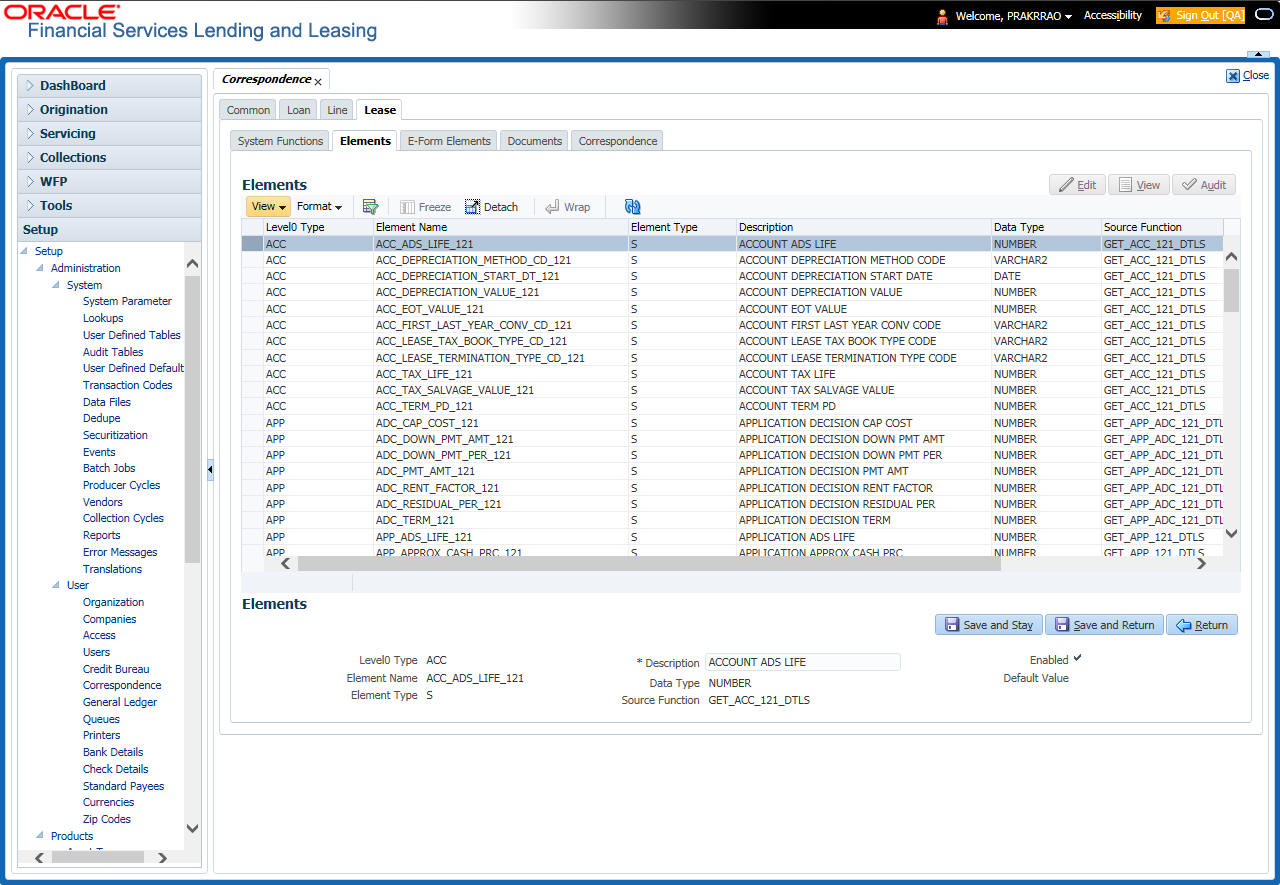
A brief description of the fields is given below:
Field: |
Do this: |
Level0 Type |
Displays the element Level0 type. |
Element Name |
Displays the element name. |
Element Type |
Displays the element type. |
Description |
Specify the element description. |
Data Type |
Displays the element data type. |
Source Function |
Displays the element function. |
Enabled |
Displays if the element is enabled or not. |
Default Value |
Displays the default value. |
- Perform any of the Basic Actions mentioned in Navigation chapter.
3.6.1.3 E-Form Elements
The E-forms Elements screen defines elements included when the system generates online correspondence with a browser. The E-forms screen is set up only for PDF elements using the XFDF format. These definitions translate the external element required by the vendor to a systems correspondence element.
For example,
Type |
Details |
Vendor Element |
AllBorrowers.FullNameStreetCityStateZip (Contains names of all borrowers with address of primary customer) |
The system’s Elements |
PRIM_APL_NAME SPOUSE_APL_NAME PRIM_APA_ADDRESS1 PRIM_APA_ADDRESS2 PRIM_APA_ADDRESS3 |
Translation: |
PRIM_APL_NAME || ', ' || SPOUSE_APL_NAME || ', ' || PRIM_APA_ADDRESS1 || '; ' ||PRIM_APA_ADDRESS2 || '; ' || PRIM_APA_ADDRESS3 |
To setup the E-forms Elements
- Click Setup > Setup > Administration > User > Correspondence > Lease > E-Form Elements
- In the E-form Elements Definitions section, perform any of the Basic Operations mentioned in Navigation chapter.
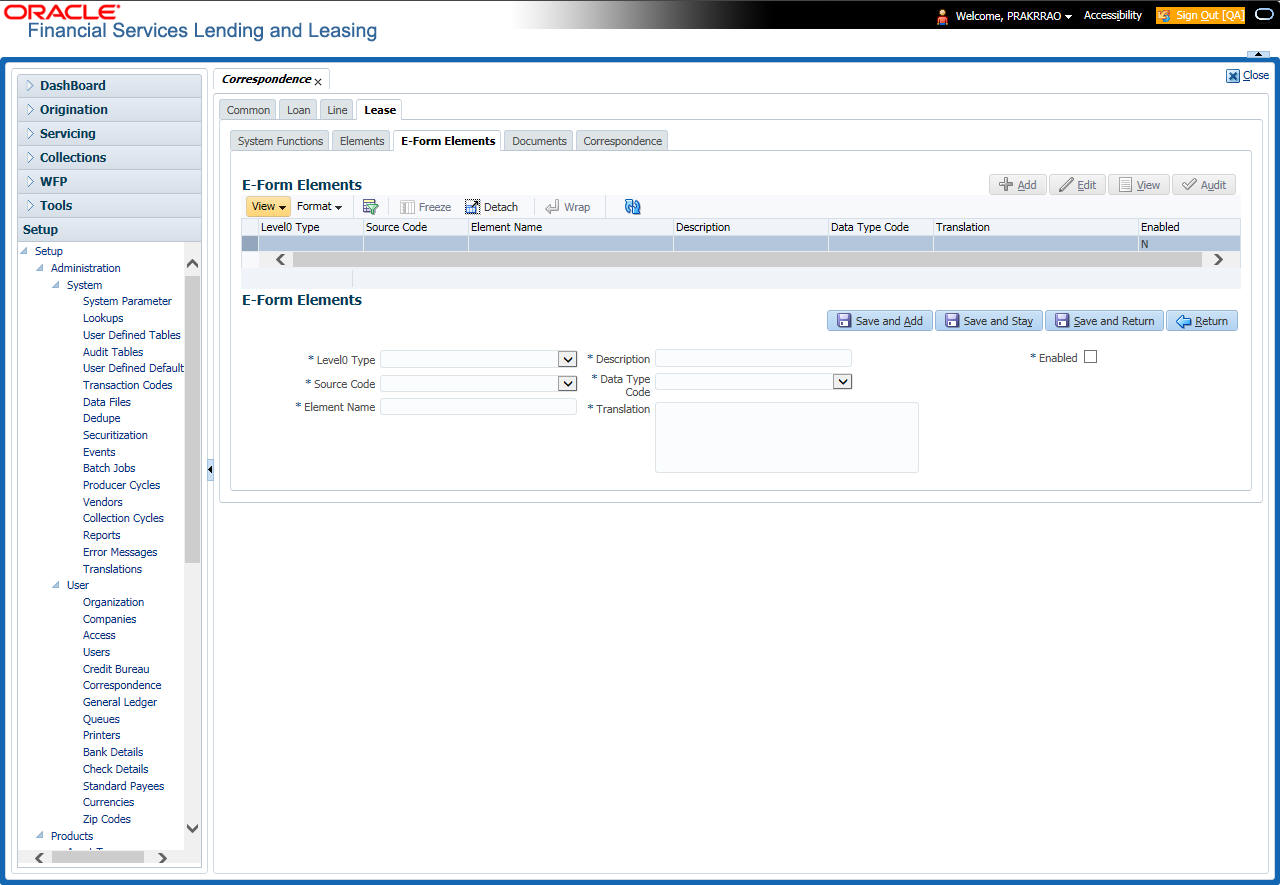
A brief description of the fields is given below:
Field: |
Do this: |
Level0 Type |
Select the element Level0 type from the drop-down list. |
Source Code |
Select the element e-form source code from the drop-down list. |
Element Name |
Specify the element name (the name used in the external form). |
Description |
Specify the element description. |
Data Type Code |
Select the element data type code from the drop-down list. |
Translation |
Select the translation for the e-form element (SQL statement fragment defining the element data), from the drop-down list. |
Enabled |
Check this box to enable the e-form element. |
- Perform any of the Basic Actions mentioned in Navigation chapter.
3.6.1.4 Documents
The Documents screen enables you to set up the various documents and the data fields that the system compiles together when creating a correspondence. The system provides two different document formats: Word or XFDF: XML-based form.
Note
Oracle Financial Services Software assumes that the user is familiar with Word and the Merge Document command. If the user is creating e-form documents with XFDF, then Oracle Financial Services Software assumes that person is familiar with Adobe forms.
To setup documents to be compiled in correspondence
- Click Setup > Setup > Administration > User > Correspondence > Lease > Documents.
- In the Document Definition section, perform any of the Basic Operations mentioned in Navigation chapter.
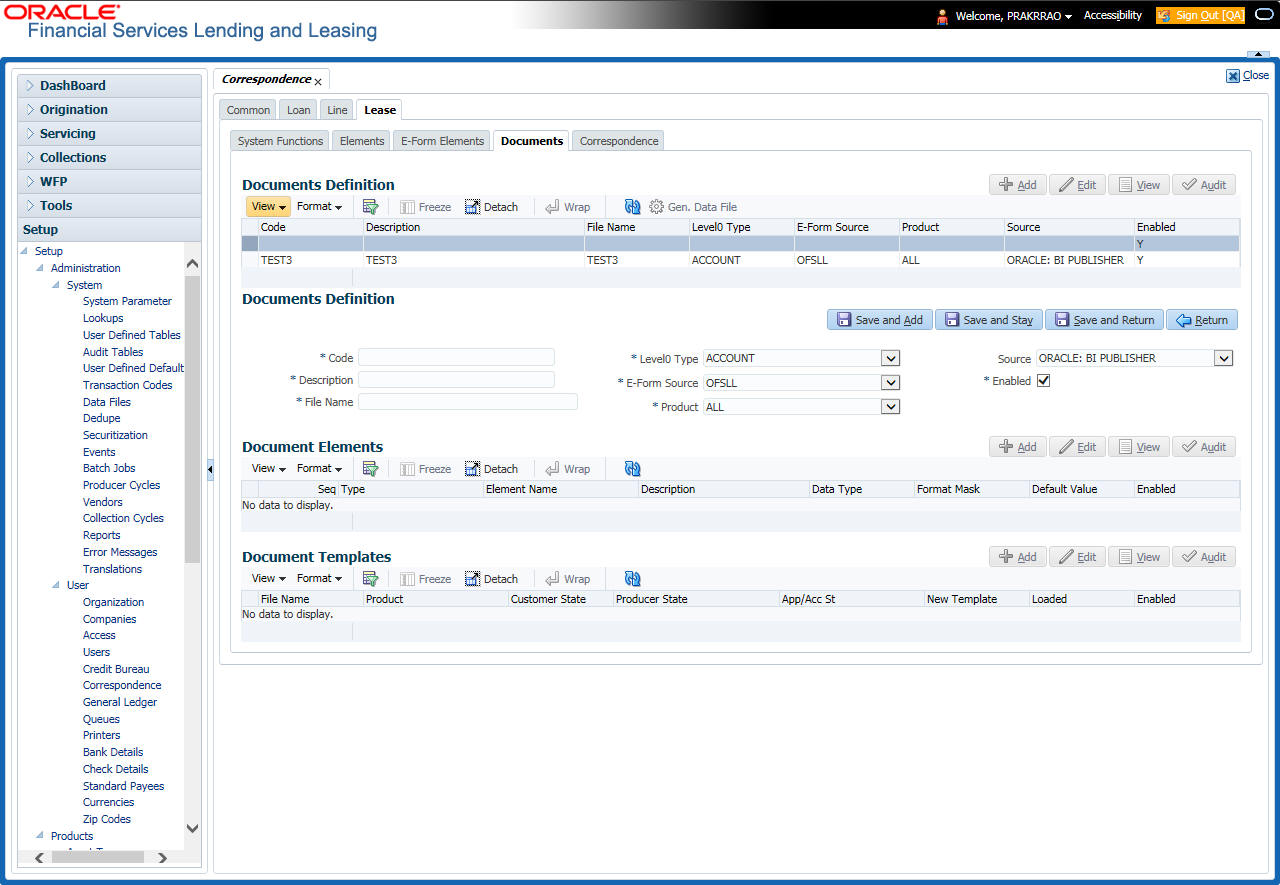
A brief description of the fields is given below:
Field: |
Do this: |
Code |
Specify the document code to define the name for the new document. |
Description |
Specify the document description for the new document. This entry appears in the Correspondence section on the Request screen, when you generate an ad hoc correspondence. |
File Name |
Specify the document file name for the resulting file (Word or XFDF document). |
Level0 Type |
Select the level0 type from the drop-down list. |
E-form Source |
Select the element e-form source from the drop-down list. |
Product |
Select the document product from the drop-down list. |
Source |
Select the document source type from the drop-down list. |
Enabled |
Check this box to enable the document definition. |
- Perform any of the Basic Actions mentioned in Navigation chapter.
- In the Document Elements section, perform any of the Basic Operations mentioned in Navigation chapter.
A brief description of the fields is given below:
Field: |
Do this: |
Seq |
Specify the sequence number to order the document elements. |
Type |
Select element type from the following from the drop-down list. This list provides the following options: System-defined – If you select, the value is supplied by the system and cannot be changed in the Correspondence Request screen. Constant. User Defined Element – If you select, you can choose the value and change it in the Correspondence Request screen. User Defined Constant – If you choose, you can choose the value, but you cannot change it in the Correspondence Request screen. Translated Element – If a document contains an e-form element and you do not select this option, then the value will not be translated. |
Element Name |
Select the element name from the drop-down list. |
Description |
Specify element description. Notes: 1. Check that the element name does not have blank spaces or special characters, such as the forward slash “/” or backward slash “\”. 2. If the element is system-defined, then the system will automatically complete this field. |
Data Type |
Select the element data type from the drop-down list. |
Format Mask |
Select the element format mask from the drop-down list. |
Default Value |
Specify the element default value. |
Enabled |
Check this box to include the element in the document. |
- Perform any of the Basic Actions mentioned in Navigation chapter.
- In the Document Template section, you can set the information about the template which is attached to the correspondence documents. The template thus saved is similar to the template functionality available in MS word. Perform any of the Basic Operations mentioned in Navigation chapter.
A brief description of the fields is given below:
Field: |
Do this: |
File Name |
Specify the file name to define the name for the new template. |
Product |
Select the product for which the template is valid, from the drop-down list. |
Customer State |
Select the customer state for which the product is valid, from the drop-down list. |
Producer State |
Select the Producer state for which the product is valid, from the drop-down list. |
App/Acc St |
Select the Applicant/Account state for which the product is valid, from the drop-down list. |
New Template |
Check this box to load the template as a new template. |
Loaded |
Check this box to indicate that the template is loaded. |
Enabled |
Check this box to enable the template. |
- Perform any of the Basic Actions mentioned in Navigation chapter.
The Document Elements sub screen records the system’s application or account information that appears in the ad hoc correspondence
To generate a data file for a document
- In the Document Definition section of Setup > Setup > Administration > User > Correspondence > Lease > Documents, select the record for which you want to generate a data file.
- Click Gen. Data File button.
The system displays a new screen with the following options:
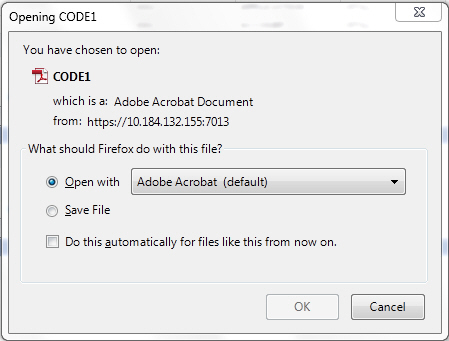
- Open with – Select to view the data file in the format you want. The adjacent drop-down list provides a list of formats compatible with the system. The system downloads the file and displays it.
- Save File – Select to save the data file on your system.
- Check the box Do this automatically for files like this from now on to apply selected properties for the files which are similar to the current one.
3.6.1.5 Correspondence
The Correspondence screen enables you to define who will receive the documents you created on the Document Definition screen by creating correspondence sets. Each document must belong to a set, and a set can have more than one document.
To set up a correspondence set
- Click Setup > Setup > Administration > User > Correspondence > Lease > Correspondence. The correspondence setup is classified into two:
- Documents
- Functions
- In the Correspondence section, perform any of the Basic Operations mentioned in Navigation chapter.

A brief description of the fields is given below:
Field: |
Do this: |
Code |
Specify the correspondence code. |
Description |
Specify the correspondence description (required). |
Print Schedule |
Select the correspondence output schedule type from the drop-down list. |
Level |
Select the correspondence level type from the drop-down list. |
Group |
Select correspondence group from the drop-down list. |
Company |
Select the correspondence company from the drop-down list. |
Branch |
Select the correspondence branch from the drop-down list. |
Product |
Select the correspondence product from the drop-down list. |
Enabled |
Check this box to enable the correspondence. |
- Perform any of the Basic Actions mentioned in Navigation chapter.
- Click Setup > Setup > Administration > User > Correspondence > Lease > Correspondence > Documents.
- In the Documents section, perform any of the Basic Operations mentioned in Navigation chapter.
A brief description of the fields is given below:
Field: |
Do this: |
Document |
Select the correspondence document from the drop-down list. |
Recipients |
Select the recipients for the document from the drop-down list. |
Enabled |
Check this box to enable the recipient selected. |
- Perform any of the Basic Actions mentioned in Navigation chapter.
- Click Setup > Setup > Correspondence > Lease > Correspondence > Functions.
- In the Functions sub screen, you can define the functions that should be executed before or after correspondence is generated. Perform any of the Basic Operations mentioned in Navigation chapter.
A brief description of the fields is given below:
Field: |
Do this: |
Function |
Select the correspondence functions from the drop-down list. |
Execute When? |
Select when to execute the correspondence function from the drop-down list. |
- Perform any of the Basic Actions mentioned in Navigation chapter.
3.6.2 Creating Correspondence
- To create a correspondence add a record in the document definition block. For example: SAMPLE_LOAN_APP
- In the Document Elements section, add the elements required in the correspondence.
- Click on Gen.Data File to generate PDF file of the report.

- Copy and save the content in the pdf file as an xml file. The saved xml file should have the same name as entered in the Code column of Document Definition section. For Example: SAMPLE_LOAN_APP.xml.
- Open MS Word.
Note
Oracle Financial Services Software assumes that BIP Desktop Tool is installed and the user is familiar with the BIP Report Tool.
- In BI Publisher Tab in MS Word, click on Sample XML and import the saved xml file. For Example: SAMPLE_LOAN_APP.xml.
- Create the template by inserting required elements tag.
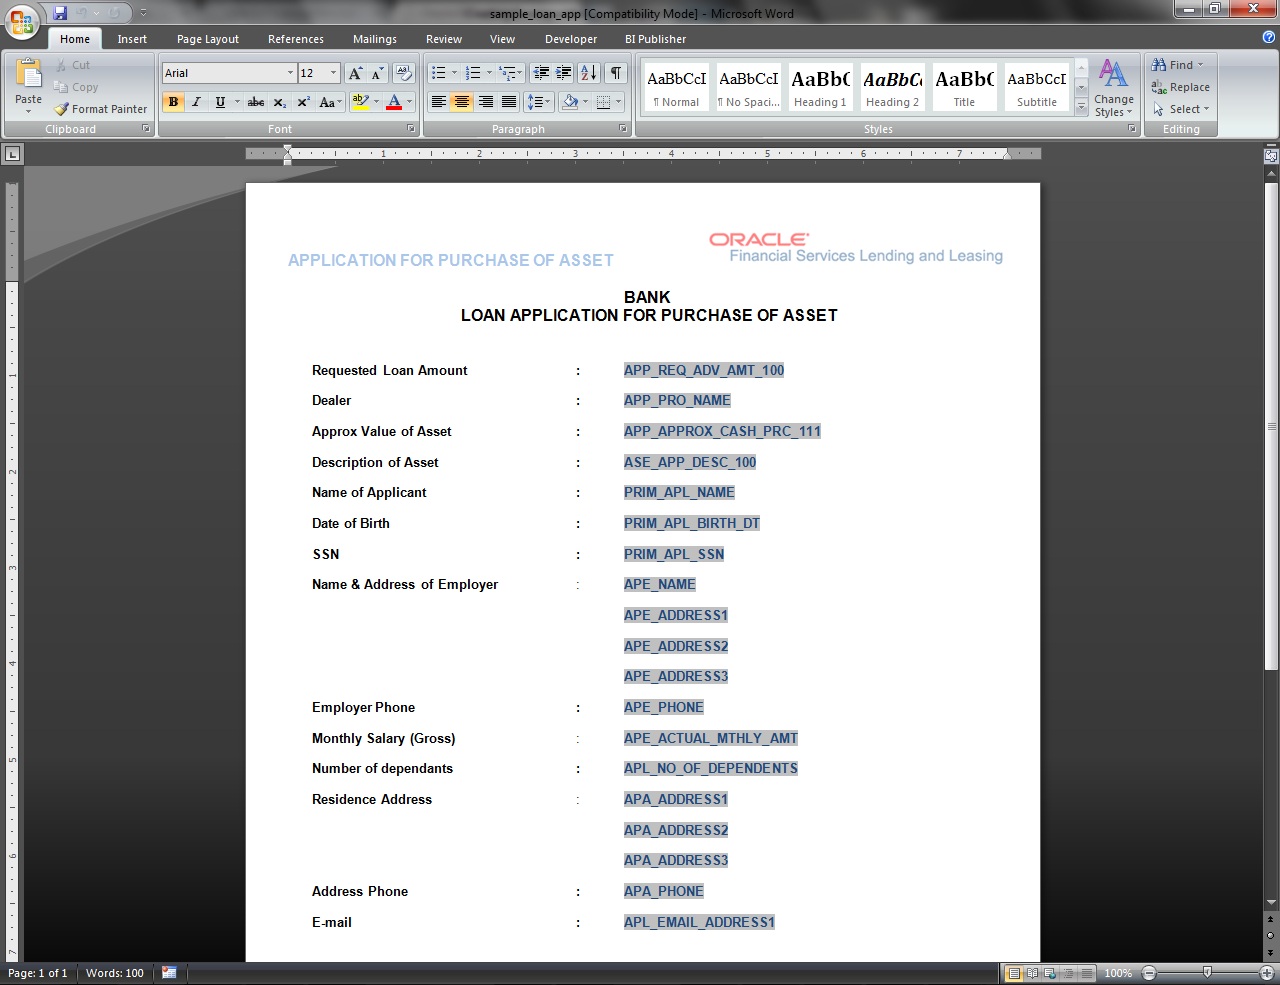
- The template created in MS Word should be saved with .rtf extension. For Example: SAMPLE_LOAN_APP.rtf
Note
The .xml and .rtf file should be saved with the same name as entered in the ‘Code’ column of Document Definition section.
- Upload the rtf template in the BIP and create the data model with SQL query as “select CDO_XML_DOCUMENT from correspondence_docs where cdo_id = :docId”.
- After the data model creation, launch the correspondence screen and click Correspondence tab.
- You can setup a correspondence with the created doc.
3.6.3 Generating Correspondence
- To generate a correspondence open the application for which the correspondence should be generated.
- Click Correspondence tab. In the Correspondence section, click on Add.
- Select the created Correspondence. Click Save and Add to save and add a new record. Click to Save and Return save and return to main screen. Click Return to return to main screen without modifications.
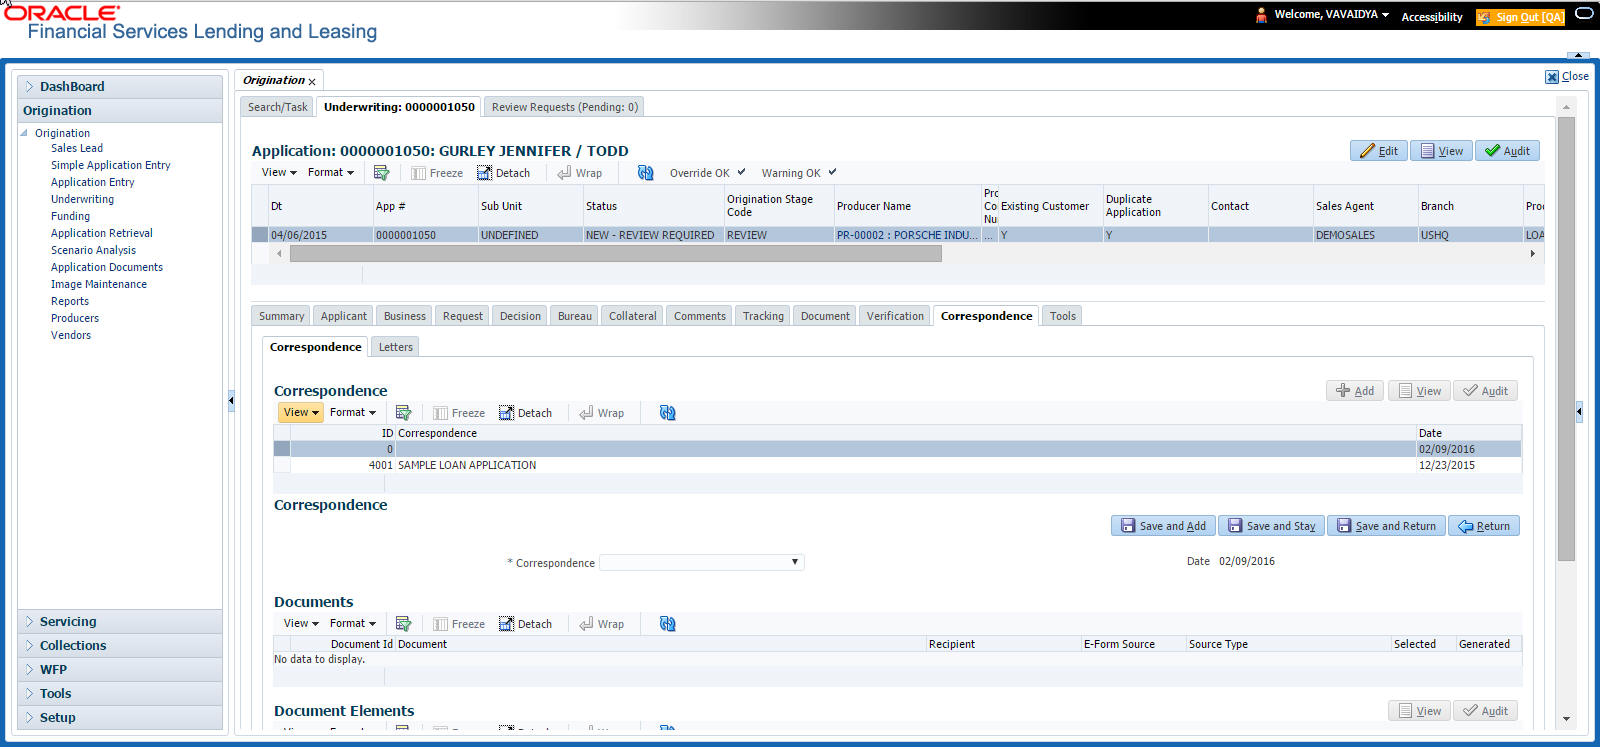
- Click Generate to generate the selected correspondence and View Correspondence to view the Correspondence in PDF format.
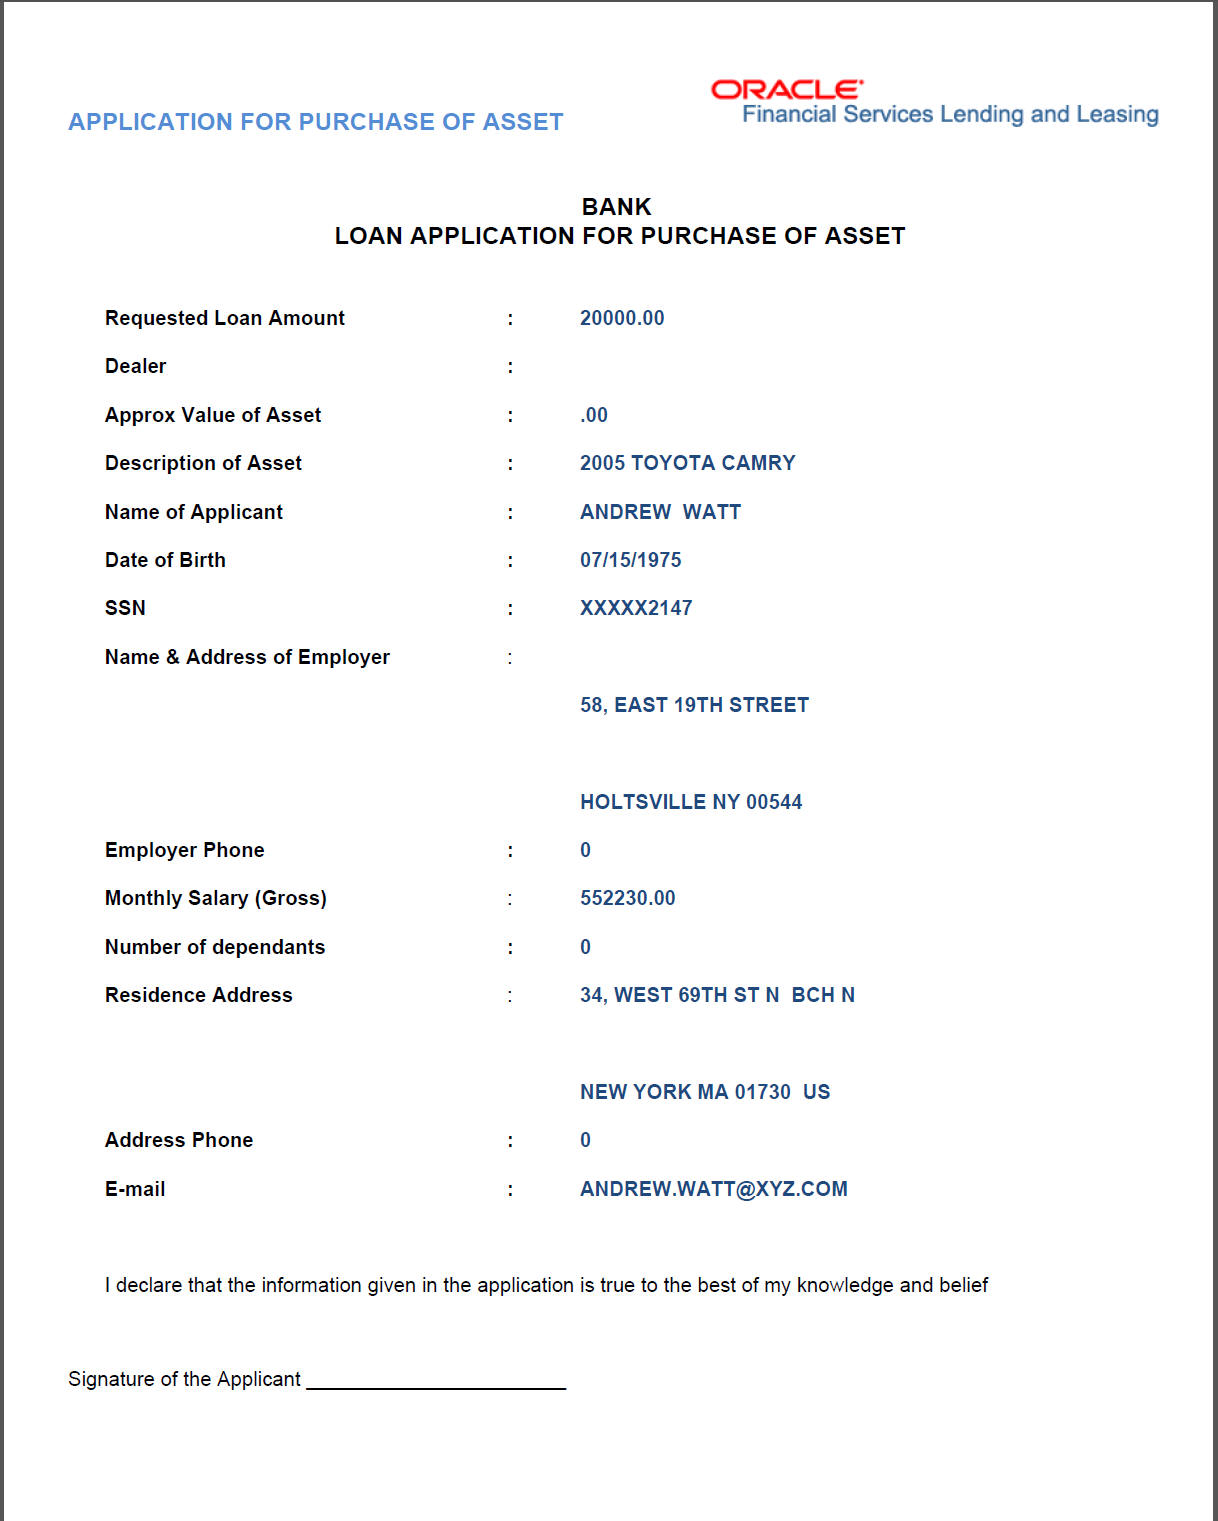
3.7 General Ledger
The application’s General Ledger Setup screen can generate and transfer transactions to the accounting software your company uses. It is the interface that transfers all financial transactions to the accounting system. It provides your accounting software with an ASCII data file containing the GL (general ledger) entries for the process date.
This chapter explains the General Ledger form - the system interface that enables you to:
- Map system transactions to your GL transactions.
- Define the requirements for header and derived segments
The system supports the bulk uploading of general ledger setup data. This enables you to upload multiple setup data, avoid reentering setup data, and more importantly, reduce data entry mistakes. The system currently supports uploading using a fixed-length format only, where each data is at a pre-fixed position only. You can run batch jobs with the Set Code SET-BLK to upload pricing and GL data.
Accounting Company Definition
The “accounting company” is the entity for which the financial statements are prepared for legal reporting. You must define your accounting company when implementing Oracle Financial Services Lending and Leasing GL Interface. The accounting company is based upon the portfolio company set up in the system. For example, if there are two companies set up within one organization, the two portfolio companies will be used as accounting companies. Each of these companies will have its own GL set up.
3.7.1 General Ledger
In Setup > Setup > Administration > User > General Ledger > General Ledger, you can setup data that needs to be setup in the system to export transactions to the user’s general ledger application.
The system uses segments to create the complete GL account to which the amount is to be posted. The defined segments are linked together to create the GL account. One of the segments is bound to be the natural account. The other segments could be direct values (like the natural account) or derived values. The segment is grouped into four categories:
- Translation Definition
- Attribute Definitions
- Transaction Definition
- Transaction Links
Navigating to General Ledger
- On the Oracle Financial Services Lending and Leasing home screen, click Setup > Setup > Administration > User > General Ledger > General Ledger.
- In the Company section of the General Ledger screen, select the portfolio company you want to work with.
3.7.1.1 Translation Definition
GL segment values are defined on the Translation Definition.
To setup the Translation Definition
- Click Setup > Setup > Administration > User > General Ledger > General Ledger > Translation Definition.
- In the Segment Definitions section, perform any of the Basic Operations mentioned in Navigation chapter.
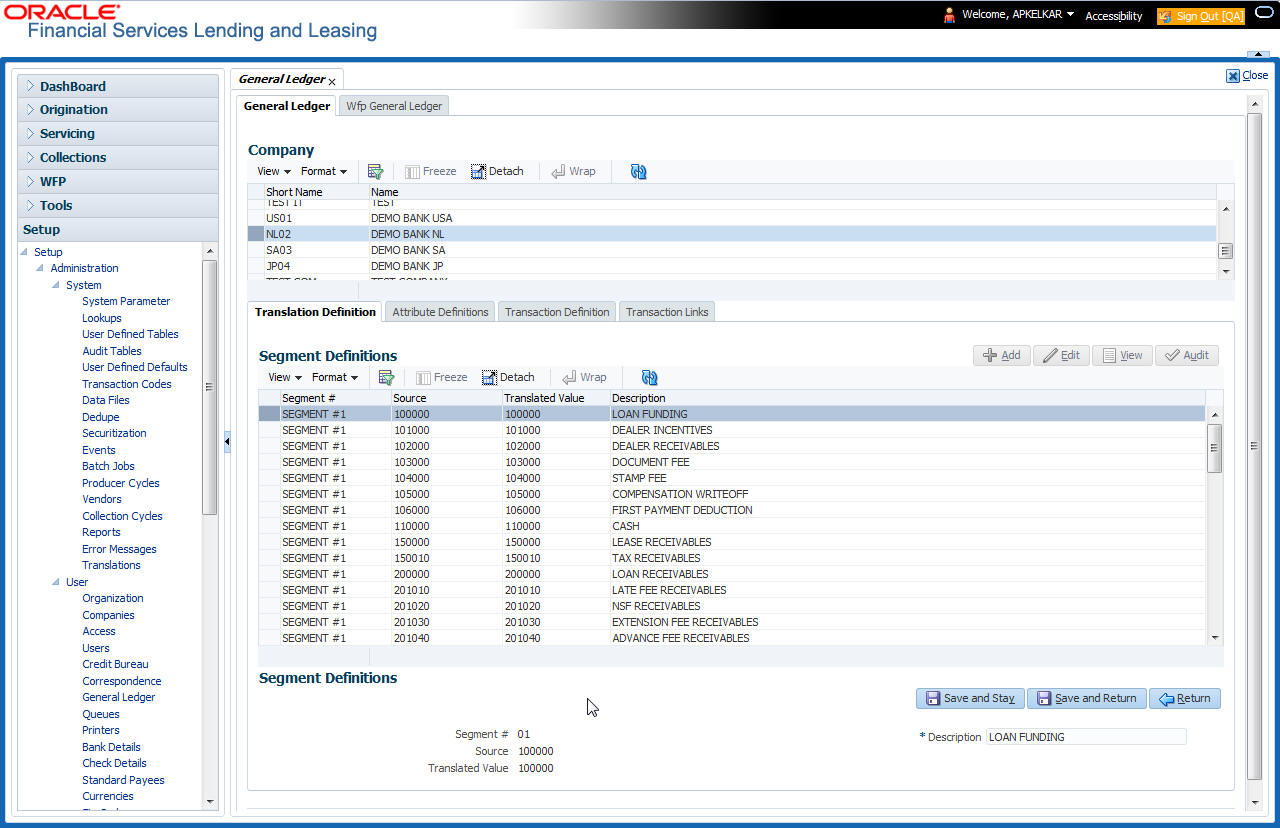
A brief description of the fields is given below:
Field: |
Do this: |
Segment # |
Select the segment number. the system can support up to 10 segments, from the drop-down list. Valid values range from 01 to 10. |
Source |
Specify the Source to record a “direct value” or “translated value”. Direct Value: In case the segment value is not a derived value (more on derived segments later), the Source field contains the same value as the “Translated Value” field. This would contain a list of all the valid values for each segment (for example, GL account number). Translated Value: In case the segment value is a derived value, the Source field is used to store the value of the condition string that will be applicable for the particular segment. For example, if the value 02 value in the Segment # field is derived using the branch of the customer as a source criteria, then the entry would read as: Segment #: 02 Source: CB-001 Translated Value: HQ Description: HEADQUARTERS Therefore, for all accounts in branch CB-001 for segment 02, the translated value of HQ will be used in the GL account number (required). |
Translated Value |
Specify the actual segment value. All valid segment values for all segments are defined here. |
Description |
Specify the description of the segment. |
- Perform any of the Basic Actions mentioned in Navigation chapter.
3.7.1.2 Attribute Definitions
The General Ledger interface uses two types of segments:
- Header segment types
- Detail segment types
Both are recorded on the Attribute Definitions screen in the Segment Type field.
Header segment types
The header segment types are the account attributes used as selection criteria to map a transaction to GL segments. The system supports 10 header segments. Four of these are predefined. The four predefined segments are:
# |
Segment |
Description |
01 |
PRODUCT TYPE |
Product Type |
02 |
BACKDATED TXN |
Backdated Transaction |
03 |
PRODUCT |
Product Code |
04 |
STATUS |
Account Status |
This means that the system will allow the attributes listed above to be used as criteria for categorizing the transactions. Segment selections depend on the values in the header segment fields.
You can define six additional header segments. The Attributes Definitions screen records the header segments. A header segment must be an account attribute.
Detail segment types
Detail segment types allow you to set up components of the GL account number. A GL account number can be composed of multiple segments that are combined to create the composite GL account number. Default detail segments used in the system are:
# |
Segment |
Description |
01 |
Account # |
The natural account number in the GL for the transaction |
02 |
Branch |
Customer Branch |
Eight additional detail segments can be defined. One of the segments is bound to be the “natural account.” (A natural account is an account from the client’s master listing of all general ledger accounts, or “chart of accounts.”)
The detail segments could be direct values (like the natural account) or derived values.
Note
Simply adding a header or detail segment will not be enough. Additional programming is required before any new header or detail segment can be used. Please consult Oracle Financial Services Software, Inc. before adding any segments.
To setup the Attribute Definitions
- Click Setup > Setup > Administration > User > General Ledger > General Ledger > Attribute Definitions.
- In the Attribute Definitions section, perform any of the Basic Operations mentioned in Navigation chapter.
A brief description of the fields is given below:
Field: |
Do this: |
Segment Type |
Select the segment type from the drop-down list. |
Segment # |
Select the segment number from the drop-down list. |
Description |
Specify the segment description (required). |
- Perform any of the Basic Actions mentioned in Navigation chapter.
3.7.1.3 Transaction Definition
The Transaction Definition screen enables you to define GL transactions and to associate the Debit and Credit segments for each GL Transaction.
In GL Transactions sub screen, the Transaction Code column contains GL transactions defined by the client team. The Segments section contains a Debt and Credit section. These are both detail segments.
To setup Transaction Definition
- Click Setup > Setup > Administration > User > General Ledger > General Ledger > Transaction Definition.
- In the GL Transactions section, perform any of the Basic Operations mentioned in Navigation chapter.
A brief description of the fields is given below:
Field: |
Do this: |
Transaction Code |
Specify unique GL transaction code. |
Description |
Specify description for the GL transaction. |
Product Type |
Specify the product type. |
Backdated Txn |
Specify the back dated transactions. |
Product |
Specify the product. |
Status |
Specify the status. |
Enabled |
Check this box to enable the transaction. |
Attribute 5 |
Specify the header attribute 5. |
Attribute 6 |
Specify the header attribute 6. |
Attribute 7 |
Specify the header attribute 7. |
Attribute 8 |
Specify the header attribute 8. |
Attribute 9 |
Specify the header attribute 9. |
Attribute 10 |
Specify the header attribute 10. |
- Perform any of the Basic Actions mentioned in Navigation chapter.
- In the Segments section, perform any of the Basic Operations mentioned in Navigation chapter.
A brief description of the fields is given below:
Field: |
Do this: |
Sort Seq |
Specify the sort sequence (optional). |
Enabled |
Check this box to enable the segment. |
Debit section |
|
Debit ACC # |
Select the segment value from the drop-down list. |
Branch |
Select the segment value from the drop-down list. |
Segment #3 |
Select the segment value from the drop-down list. |
Segment #4 |
Select the segment value from the drop-down list. |
Segment #5 |
Select the segment value from the drop-down list. |
Segment #6 |
Select the segment value from the drop-down list. |
Segment #7 |
Select the segment value from the drop-down list. |
Segment #8 |
Select the segment value from the drop-down list. |
Segment #9 |
Select the segment value from the drop-down list. |
Segment #10 |
Select the segment value from the drop-down list. |
Credit section |
|
Credit ACC # |
Select the segment value from the drop-down list. |
Branch |
Select the segment value from the drop-down list. |
Segment #3 |
Select the segment value from the drop-down list. |
Segment #4 |
Select the segment value from the drop-down list. |
Segment #5 |
Select the segment value from the drop-down list. |
Segment #6 |
Select the segment value from the drop-down list. |
Segment #7 |
Select the segment value from the drop-down list. |
Segment #8 |
Select the segment value from the drop-down list. |
Segment #9 |
Select the segment value from the drop-down list. |
Segment #10 |
Select the segment value from the drop-down list. |
- Perform any of the Basic Actions mentioned in Navigation chapter.
As mentioned in the Attributes Definitions screen section, the system can support up to 10 header segments.
Each transaction can be mapped to one or more GL accounts using the segment mapping section. A segment number can be a natural account or can be a derived segment. In case of a natural account, you need to select the segment value (from the list of predefined segments).
Entering DERIVED in the Segment Number field instructs the system to look for the derived value from the segments defined in the Segments Definition section on the Translation Definition screen.
Let’s take an example:
Company: ABC Bank
Transaction Code: adv
Description: Advance
Product Type: Funding Transaction
Branch: CB-001
Segment #1: 200000
Segment #2: DERIVED
Let’s assume segment #2 is derived from the branch where the account belongs. While calculating the account number, the system interprets segment #2 as follows:
The system will look for a segment value for segment #2 for the account in question using the branch of the account (CB-001). It will use the segment value it finds, say HQ. This will be segment value for segment #2.
IMPORTANT: The derived segment logic can be used for all segments except for the one designated as the natural account segment.
CAUTION: Please note that the logic for calculation of the derived segments is customized for each client. You will need to contact Oracle Financial Services Software inc. in case you want to change the logic or add new derived segments.
“Best Match Feature” for General Ledger (GL) Transactions
The system provides the functionality wherein for each monetary transaction, you can generate entries in the General Ledger (GL) based on the setup. For a single transaction (for example, a late charge), the system allows GL entries to be generated based on different criteria regarding the loan account (for example, product type, product, status, and so on). A late charge entry for one product type can differ from a late charge entry for a different product type.
For example,
Assume you have set up the following four late charge fee GL transactions based on product and status.
GL Transactions section
Transaction Code |
Description |
PRODUCT |
STATUS |
flc_a |
late charge |
loan auto |
|
flc_aa |
late charge |
loan auto |
active |
flc_b |
late charge |
loan atv |
|
flc_bb |
late charge |
loan atv |
active |
For a late fee for an ACTIVE account for a LOAN AUTO, Oracle Financial Services Lending and Leasing will process the GL Transaction FLC_AA. However, if the late fee is for a CHARGED OFF account for a LOAN ATV, Oracle Financial Services Lending and Leasing will process the GL Transaction FLC_B.
3.7.1.4 Transaction Links
The system enables you to map the various transactions to your General Ledger transaction types with the Transaction Links screen. The list of transactions available in the Transaction Code will be derived from the transactions setup on the Transaction Definition screen.
To setup the Transaction Links
- Click Setup > Setup > Administration > User > General Ledger > General Ledger > Transaction Links.
- In the Transaction Links section, perform any of the Basic Operations mentioned in Navigation chapter.
A brief description of the fields is given below::
Field: |
Do this: |
Transaction Code |
Specify the transaction code. |
Description |
Select the transaction description from the drop-down list. |
GL Transaction Code |
Specify the corresponding GL transaction code. |
Description |
Select the GL transaction description from the drop-down list. |
- Perform any of the Basic Actions mentioned in Navigation chapter.
You can have more than one transaction mapped to a user-defined GL transaction. In that case, the system summarizes all the transactions to the GL transaction. For example, the system uses separate transaction codes for fees, such as LATE_FEE and SERVICING_FEE. If a client site would rather have all fees go into one debt and one credit account, they would define a GL transaction and link all transactions to that defined transaction.
You could also have one transaction linked to more than one GL transaction. The system will use the setup on the header segments to identify the correct GL transaction setup to use.
For example, if the FLC (Late Charge) transaction is mapped to the CHG_LC and CHGR_LC transactions, then the system will look at the header segment definitions to identify the correct GL transaction. Let’s say the header segment used is Account status and that CHG_LC is used for “active” accounts and CHGR_LC is used for “charged off” accounts. In this case, the system will identify the correct GL transaction depending on the account status.
3.8 Queues
When processing an account, various users might work on the accounts to complete different tasks.
The account processing workflow facilitates the movement of the account from one person to another with queues. Queues create a work section of accounts waiting for a particular and common task to be performed. The system’s powerful queuing module automates this otherwise manual process.
In the Queues setup screen, you can setup and manage workflow and work assignments on a daily basis to ensure that the appropriate queues are available for users at all times.
Any time an account’s status is changed, the system checks whether the account is in the right queue.
The system will sort queues based on an account’s status and condition. A condition is the state of an account at a particular time, such as a delinquent, which determines the action a user needs to take.
Queues in the system are distinguished to two types of queues:
- Origination Queues
- Customer Service Queues.
Customer service queues
In the Customer Service screen, queues create a work list of accounts waiting for a particular and common task to be performed, such as collecting on a delinquency. The system’s powerful queuing module automates this otherwise manual process. The Queue Setup form allows you to manage workflow and work assignments and ensure that all accounts are in the queues of the appropriate users at all times.
Customer Service queues distribute and route accounts that require some particular action to be performed to specific users or departments. The system sorts customer service queues based on an account’s status and condition.
Accounts become available for queue assignment when an account receives a condition. Conditions can be applied automatically by the system or manually by users. For example, during nightly processing, the system recognizes an account as delinquent and automatically assigns it a condition of DELQ (“Delinquent”). The users can manually change an account’s condition using combination of Action and Result field entries on the Servicing > Servicing > Customer Service > Customer Service > Customer Service > Call Activities.
These Action and Result field entry combinations are set up on Setup > Setup > Administration > User > Queues > Call Actions Results.
The system associates an account with one or more queues based on multiple parameters, including user-defined criteria and the follow-up date. For example, customer service queues might be configured so accounts are parsed to users according to:
- Due date changes
- Deferment requests
- Title and insurance follow-up dates
Collections queues are included in the Customer Service queue. These queues focus on:
- General collections
- Bankruptcy
- Foreclosure
- Repossession
- Deficiency
Customer Service queues can be built online or in a nightly batch job. Within each queue, the order of the accounts can be sorted based on user-defined criteria.
Note
- Although, the system allows you to define your own selection criteria in creating queues, the system’s performance depends on how the selection criterion is defined. The application highly recommends that you get approval from your database administrator before using any queue selection criteria. Also, avoid using user-defined tables and columns in the selection criteria.
- You can use these same methods for creating and closing queues in the case of repossession, foreclosure and deficiency.
The Call Actions Results screen allows you to define the contents of the Action and Result fields on the Customer Service screen’s Add Call Activities section. The system uses this information to allow users to manually change the condition of an account, and thus assign or remove the account to a queue.
Depending on how you set up call action result codes on the Call Actions screen, conditions and queues are created or closed. You can also restrict the use of certain call activities based on responsibility.
The lookup type ACC_CONDITION_CD defines which account conditions can be created. The application’s queuing engine determines, if queues need to be created based on the information in the Lookups sub screen for this lookup type.
The following table displays the possible combinations of condition and queue.
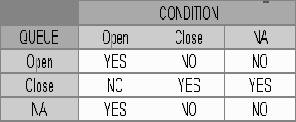
- Condition: Open, Queue: Open
- In this state, both the account condition and queue are created or opened at the same time.
- The system’s transaction-processing engine automatically creates DELQ, TIP, SCHGOFF conditions and queues; therefore, you need not setup any call action result with these conditions.
- CHGOFF is an account status, so no queues are created. To follow-up on charged-off accounts, create DEFICIENCY condition with this option.
- BKRP (Bankruptcy), REPO (Repossession), FORC (Foreclosure) account conditions and queues can be opened with this option. Also, account level indicators (for reporting purpose) are set.
Note
- An account is moved to the condition, when a Call activity is posted; however, the Queue is moved only when you click Update queue manually or in the EOD batch.
- Accounts are automatically moved based on the system parameter set up.
- Condition: Open, Queue: NA
- In this state, only the account condition is created or opened.
- This option should be used only if queuing is not necessary on this account condition.
- Condition: NA, Queue: Close
- In this state, the queue associated to the account condition is closed.
- This option should only be used if an existing queue on this account condition should be closed. For example, for accounts with bankruptcy condition, delinquency follow-up is not necessary. In such case, DELQ queue can be closed while the condition is still open.
- DELQ, TIP, SCHGOFF queues can be closed by using this option.
- Condition: Close, Queue: Close
- In this state, both the account condition and queue are closed.
- The system’s transaction-processing engine automatically closes DELQ, TIP, SCHGOFF conditions and queues; therefore, don’t setup any call action result with these conditions.
- BKRP (Bankruptcy), REPO (Repossession), FORC (Foreclosure) account conditions and queues can be closed with this option. Also, account level indicators (for reporting purposes) are set.
Note
Condition will be removed from the Summary conditions section.
Navigating to Queues screen
- On the Oracle Financial Services Lending and Leasing home screen, click Setup > Setup > Queues.
- The system displays the Queue Setup screen. You can setup queues related to:
- Customer Service
- Call Action Results
3.8.1 Customer Service Tab
The Customer Service section allows you to set up the customer service queues. The screen includes a Hard Assigned box. When selected, the system assigns an equal amount of accounts to each individual user working on a that queue. Also, an account that is hard assigned will remain assigned to the individual who opens that account until that person is no longer working that queue
Customer Service command buttons
The Customer Service screen contains following three command buttons:
Command button: |
Function: |
Update Queue |
Queues can be updated whenever selection criteria has been updated. They may also be updated manually, if the nightly batch fails. |
Un-Assigned |
Depends on location of the cursor when you choose this button. Customer Service - “Un-assigns” all accounts in this queue. Responsibilities and Users > Responsibilities - “Un-assigns” all accounts in this queue. Responsibilities and Users > User - “Un-assigns” all accounts assigned to the specific user. Unassigned accounts may now be selected by updating the queue and re-assigned. |
Check Criteria |
Reviews the selection criteria for errors. The system will not allow you to enable a queue with invalid selection criteria. |
To set up the Customer Service queues
- On the Queue Setup screen, click Setup > Setup > Administration > User > Queues > Customer Service. Queues are further filtered based on the following criteria:
- Selection Criteria
- Sort
- Responsibilities and Users
- Data node assignments
- Group Assignment
- In the Queue Definition section, perform any of the Basic Operations mentioned in Navigation chapter.
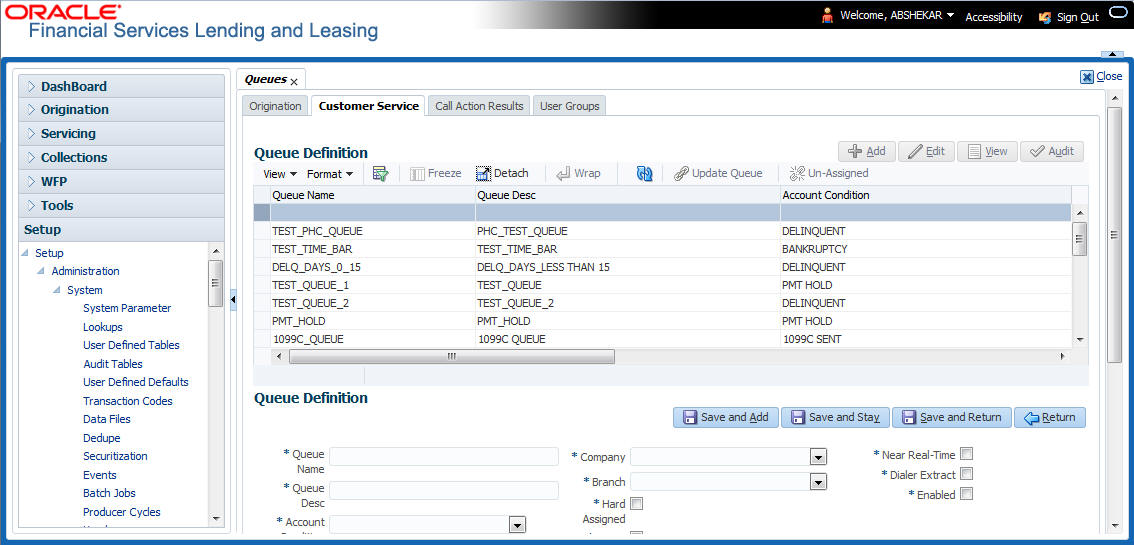
A brief description of the fields is given below:
Field: |
Do this: |
Queue Name |
Specify queue name. |
Queue Desc |
Specify queue description. |
Account Condition |
Select account condition from the drop-down list. |
Priority |
Specify the priority. |
Company |
Select the company from the drop-down list. |
Branch |
Select the branch from the drop-down list. |
Hard Assigned |
Check this box to assign an equal amount of accounts to each individual user working on a that queue. Also, an account that is hard assigned remains assigned to the individual who opens that account until that person is longer working that queue. |
Group Follow-up Ind |
Check this box to enable the bank to indicate whether the accounts belonging to the same customer have to be followed-up in groups. |
Near Real-Time |
Check this box to select the queues for the near real time refresh. You can specify the time interval and frequency to run this queue. When a batch is run, it picks only customer service queues marked as “Real Time” queues for re-assignment. |
Dialer Extract |
Check this box to indicate if the accounts satisfying the selection criteria should be extracted from the batch process or not. If the user is hard-assigned, then user gets identified by the dialer system as ‘Permission to call” user. The extract will also have data pertaining to customer time zone and privacy opt out indicator. |
Enabled |
Check this box to activate the queue. |
- Perform any of the Basic Actions mentioned in Navigation chapter.
- Click the Setup > Setup > Administration > User > Queues > Customer Service > Selection Criteria.
- In the Selection Criteria section, you can define the account selection criteria with the following fields. Perform any of the Basic Operations mentioned in Navigation chapter.
A brief description of the fields is given below:
Field: |
Do this: |
Seq |
Specify sequence numbers. |
( |
Specify left bracket. |
Parameter |
Select the parameter from the drop-down list. |
Comparison Operator |
Select comparison operator from the drop-down list. |
Criteria Value |
Specify criteria value. |
) |
Specify right bracket. |
Logical Expression |
Specify logical operator from the drop-down list. |
Enabled |
Check this box to enable the selection criteria. |
- Perform any of the Basic Actions mentioned in Navigation chapter.
- Click the Setup > Setup > Administration > User > Queues > Customer Service > Sort.
- In the Sort section, you can define the account selection criteria with the following fields. Perform any of the Basic Operations mentioned in Navigation chapter.
A brief description of the fields is given below:
Field: |
Do this: |
Seq |
Specify sequence number. |
AssAgpCode |
Select sort field from the drop-down list. |
Order |
Select sort order from the drop-down list. |
- Perform any of the Basic Actions mentioned in Navigation chapter.
- Click Setup > Setup > Administration > User > Queues > Customer Service > Responsibilities and Users.
- In the Responsibilities section, you can define the responsibilities that are authorized to work on the queue. Perform any of the Basic Operations mentioned in Navigation chapter.
A brief description of the fields is given below:
Field: |
Do this: |
Responsibility |
Select the responsibility from the drop-down list. |
Enabled |
Check this box to enable the responsibility. |
- Perform any of the Basic Actions mentioned in Navigation chapter.
- In the Users section, you can define the users who are authorized to work on the queue. Also, you can hard assign the queues to the user. Perform any of the Basic Operations mentioned in Navigation chapter.
Note
The system allows the work queue list to be sorted by user-defined criteria.
A brief description of the fields is given below:
Field: |
Do this: |
Name |
Select user name from the drop-down list. |
# Assigned |
Specify number of accounts assigned. |
Hard Assigned |
Check this box to hard assign. (For more information, see the following section in this chapter, Using the Hard Assigned Feature). |
Enabled |
Check this box to enable. |
- Perform any of the Basic Actions mentioned in Navigation chapter.
- Click Setup > Setup > Administration > User > Queues > Customer Service > Data Node Assignments. You can enable the administrator to configure the User interface nodes that should be made available for the applications that are being processed in that particular origination queue.
- In the Data Node Assignments section, perform any of the Basic Operations mentioned in Navigation chapter.
A brief description of the fields is given below::
Field: |
Do this: |
Node |
Specify the node. |
Enabled |
Check this box to enable the record. |
- Perform any of the Basic Actions mentioned in Navigation chapter.
- Click Load Queue Nodes on the Node Assignments sub screen to display the respective UI nodes in the origination module.
- Click Setup > Administration > User > Queues > Origination > Group Assignment. In the Group Assignment sub tab, you can add user groups to Customer Servicing Queue and also if required, you can un-assign users from the user group.
Note
Modification of user details (adding or disabling users) within a user group which is added to Group Assignment will implicitly be updated in Responsibilities and Users tab also.
- In the User Group section, Click Add. You can also perform any of the Basic Operations mentioned in Navigation chapter.
A brief description of the fields is given below:
Field: |
Do this: |
Group Name |
Select the user group name from the drop-down list. The list displays the pre-defined user groups available in the system. |
Enabled |
Check this box to enable the user group. |
- Perform any of the Basic Actions mentioned in Navigation chapter.
- (Optional) Click 'Un-Assigned' button to un-assign all the users of the group in the queue.
Note the following:
- If the queue is 'Hard Assigned', then it implies that all users in the user group(s) attached to that queue are not 'Hard Assigned'. Hence all those Users should have to be explicitly marked as hard assigned in the queue added through user group.
- User added directly to the queue should be disabled manually. For common users present at Queue and User Group, you need to manually maintain the data in sync.
- Following table indicates various combinations for enabling and disabling Users and User Group(s) from Queue and User group(s).
Entity
Added in Queue
Added in User Groups
Enabling and Disabling options
User
Yes
No
User should be disabled /enabled only in that particular Queue.
No
Yes
User should be disabled / enabled in all the Queues where the user group is attached.
User Group
Yes
No
User group should be disabled /enabled only in that particular Queue.
No
Yes
User group should be disabled / enabled in all the Queues where the user group is attached.
Group Follow-up
The system enables lending institution to conduct “one time only” follow-up activity on the Customer Service screen, if the customer has multiple accounts in various conditions or in various queues. This avoids unnecessary confusions that arise when more than one user is performing collection tasks on multiple accounts belonging to the same customer.
You can follow-up on multiple accounts in the same condition at the same time using the group follow-up functionality. The system locks the accounts in the low priority queues and displays the same in the high priority queues. You can perform the follow-up activity on all the accounts when the account in the high priority queue becomes due for follow-up.
For example,
Suppose a customer holds three accounts, one that’s 30 days delinquent and in the 0_30_DAYs_DEL queue, one that’s 60 days delinquent and in the 30_60_DAYs_DEL queue and one that’s 90 days delinquent and in the 90+_DAYs_DEL.
a) If each of the queues Group Followup Ind is unchecked on the Customer Service screen, then no group follow-up will be performed.
b) If each of the queues Group Followup Ind is checked on the Customer Service screen, while updating the follow-up date for the low priority days queue, then the system will use the 90 days follow-up date
c) If the Group Followup Ind is checked on Customer Service screen for the 0_30_DAYs_DEL and 30_60_DAYs_DEL queues and note the 90+_DAYs_DEL queue, and the customer has accounts in each of the queue, then the system will use the follow-up date of 60 days for the low priority account.
Using the Hard Assigned feature
The system’s “Hard Assigned” queues feature allows companies to evenly distribute accounts between users. The following example explains how it works:
Let’s say there are 40 unassigned accounts in a queue. Three users are assigned to the queue, Hard Assigned is checked for two.
When you select Update Queue on the Customer Service screen (or Oracle Financial Services Lending and Leasing processes the CUSTOMER SERVICE QUEUE PROCESSING nightly batch) each of the two Hard Assigned users receives 20 accounts, while the one that isn’t marked as Hard Assigned receives zero.
If users already have accounts assigned to them, the system attempts to balance the workload when assigning new accounts. For example, let’s say there are three users in a queue. The first has 15 accounts, the second has ten and the third has five. If there are ten new accounts, the system would give the third user the first 5 accounts, thus bringing that user's total to ten. The system splits the next five between the second and third, bringing their totals to 13 and 12, respectively.
Note
The system randomly assigns these accounts.
To set up a user as Hard Assigned feature
- Click Setup > Setup > Administration > User > Queues > Customer Service > Responsibilities and Users.
- In the Responsibilities section, select the level responsibility of the users you want to hard assign in the queue.
- In the Users section, check the Hard Assigned check box for each user you want to hard assign.
- On Setup > Setup > Administration > User > Queues > Customer Service, click Update Queue to distribute the applications in the queue to the hard assigned users.
The system displays an Information section with the message as “Queue creation submitted in background”.
- Choose OK beneath the Error Message section box containing the words NO ERROR.
The system distributes and hard assigns the accounts in the queue to the selected users in the Users section.
- Perform any of the Basic Actions mentioned in Navigation chapter.
To remove a user
- In the Responsibilities section, select the responsibility of the user you want to remove.
- In the Users section, select the user you want to work with.
- If you don’t want that user to be hard assigned any longer, uncheck the Hard Assigned check box.
- If you don’t want that user to be assigned to that queue any longer, uncheck the Enabled check box.
- The system updates the number of accounts assigned to a user only after:
- Running the nightly batch job
- Clicking the Update Queue button.
- Perform any of the Basic Actions mentioned in Navigation chapter.
3.8.2 Call Action Results tab
- Click Setup > Setup > Administration > User > Queues > Call Action Results. The screen contains two sections:
- Call Actions
- Call Results
- In the Call Actions section, perform any of the Basic Operations mentioned in Navigation chapter.
You can either define new Call Action details or specify a new action code in the New Action field and click Create Copy to create a copy of selected call action with details.
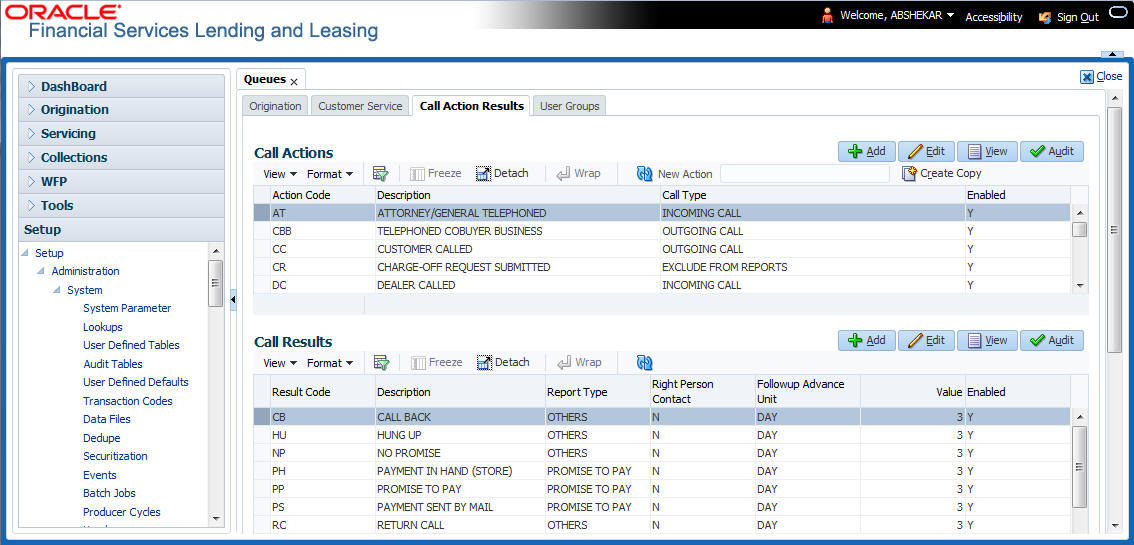
A brief description of the fields is given below:
Field: |
Do this: |
Action Code |
Specify the action type code. |
Description |
Specify the description for the call action type. |
Call Type |
Select the call type from the drop-down list. |
Enabled |
Check this box to enable the call action. |
- Perform any of the Basic Actions mentioned in Navigation chapter.
- In the Call Results section, you can define call action result codes and corresponding descriptions. Perform any of the Basic Operations mentioned in Navigation chapter.
- A brief description of the fields is given below:
A brief description of the fields is given below:
Field: |
Do this: |
Result Code |
Specify the result type code for the specified call action type. |
Description |
Specify the description for the result type. |
Report Type |
Select the report type for the result type, from the drop-down list. |
Right Person Contact |
Check this box to indicate that result type is a right person contact. |
Follow-up Advance Unit |
Select the unit for advancing the follow-up date/time from the drop-down list. |
Value |
Specify the value for the follow-up advance unit. |
Enabled |
Check this box to enable the result. |
- Perform any of the Basic Actions mentioned in Navigation chapter.
Queues are further filtered based on the following criteria:
- Conditions
- Responsibilities
The Conditions section determines whether the selected action/result will cause the listed conditions to be opened or closed. It also determines whether the queue will be opened or closed.
- In the Conditions section, perform any of the Basic Operations mentioned in Navigation chapter.
A brief description of the fields is given below:
Field: |
Do this: |
Condition |
Select the account condition to be open/close for the action from the drop-down list. |
Condition |
Select ‘Open’ to open the listed condition, ‘Close’ to open the listed condition, or ‘NA’, if the condition is not applicable. |
Queue |
Select ‘Open’ to open the listed Queue, ‘Close’ to open the Queue, or ‘NA’, if the Queue is not applicable. |
Enabled |
Check this box to enable the account condition. |
- Perform any of the Basic Actions mentioned in Navigation chapter.
- In the Responsibilities section, define the responsibilities that are authorized to use the call action result combination.Perform any of the Basic Operations mentioned in Navigation chapter.
A brief description of the fields is given below:
Field: |
Do this: |
Responsibility |
Select the responsibility that can perform the action result from the drop-down list. |
Allowed |
Select ’Yes’ if access is allowed. |
Enabled |
Check this box to enable the responsibility. |
- Perform any of the Basic Actions mentioned in Navigation chapter.
3.8.3 User Groups Tab
The User Groups tab in Queues is a centralized repository which allows you to define user groups, add and remove users from user groups.
The User Groups tab consists of User Group Definition section listing the defined User Groups and User section below listing the associated users of the selected User Group.
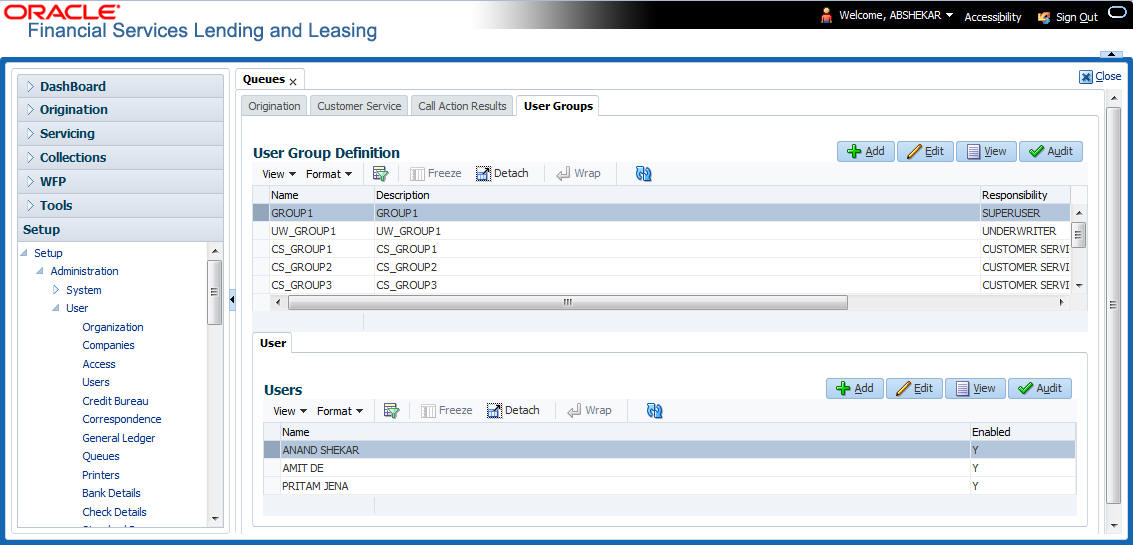
To define a User Group
- On the Oracle Financial Services Lending and Leasing home screen, click Setup > Administration > User > Queues > User Groups.
- In the User Groups section, Click Add. You can also perform any of the Basic Operations mentioned in Navigation chapter.
A brief description of the fields is given below:
Field: |
Do this: |
Name |
Specify user group name. |
Description |
Specify an appropriate user group description. The same is used while referring this User Group on other screens. |
Responsibility |
Select the responsibility of the user group from the drop-down list. You can later add only those ‘Users’ who have the selected responsibility into the user group. |
Enabled |
Check this box to enable the user group. |
- Perform any of the Basic Actions mentioned in Navigation chapter.
To add Users to User Group
- On the Oracle Financial Services Lending and Leasing home screen, click Setup > Administration > User > Queues > User Groups.
- In the User Groups section, select the required User Group.
- In the Users section, Click Add. You can also perform any of the Basic Operations mentioned in Navigation chapter.
A brief description of the fields is given below:
Field: |
Do this: |
Name |
Select the user from the drop-down list, The list displays the available users based on the responsibility defined for the user group. |
Enabled |
Check this box to enable the user. |
- Perform any of the Basic Actions mentioned in Navigation chapter.
3.9 Printers
The Printers screen allows you to set up an unlimited number of network printers and fax devices to be used with the system server. The system uses the information on this screen while selecting a printer, when the printing process involves a batch job or uses a job scheduler. Examples include printing reports and correspondence.
The printers and fax devices can be set up at each organization, division, or department to promote efficient printing of documents, and reports. The system uses this information during product setup and on the Letters screen in the Batch Printer field.
Special printer names
The following printer names are predefined and have specific functions within the system:
Name |
Description |
UNDEFINED |
Indicates that the document to be printed is to be previewed in your browser instead of actually printing the document. |
archive |
Instead of sending an item to the printer, the system generates a PDF document and saves it in the archive directory on your server. |
For Loan origination correspondences that can be faxed, the system e-mails the document as a PDF attachment to the consumer for direct Loans or to the producer in the case of in-direct Loans. |
|
fax |
For Loans origination correspondences that can be faxed, the system generates a PDF document and will send to the fax server defined in System Parameters. |
Additionally, you may set up composite entries in the Printer Name field to perform two or more functions at the same time. This can be done by defining a printer name with the following format:
Printer name = <Printer_Name1> + <Printer_Name2>
For example, if a printer named jet4050 was previously defined, as were the special printer names listed above, then the following additional printers could be defined:
Name |
Description |
jet4050+archive |
Prints the document with the jet4050 printer and archives the document. |
fax+archive |
Faxes and archives the document. |
email+archive+jet4050 |
E-mails, archives, and prints the document with the jet4050 printer. |
To set up the Printers
- Click Setup > Setup > Administration > User > Printers. The system displays the Printers screen
- In the Printers section, perform any of the Basic Operations mentioned in Navigation chapter.
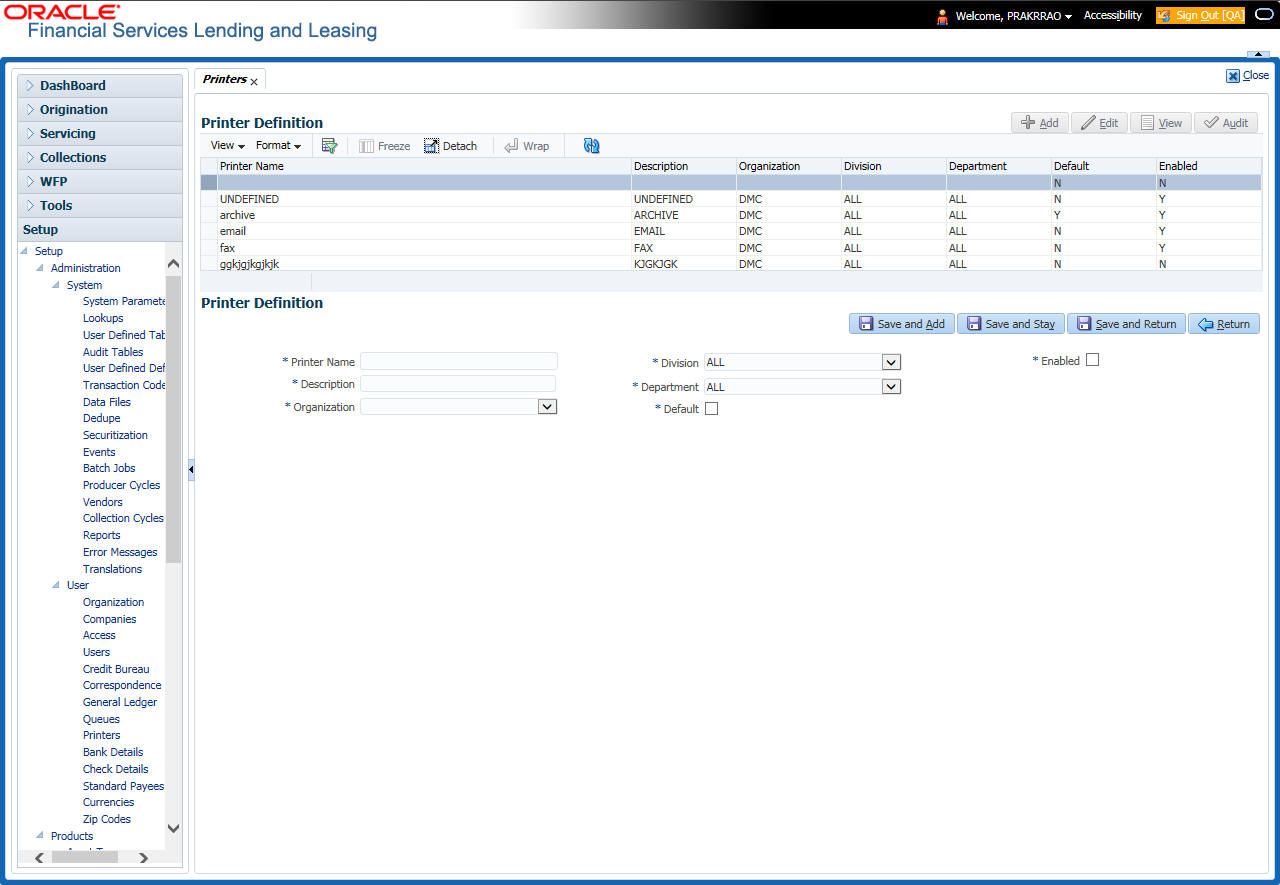
A brief description of the fields is given below:
Field: |
Do this: |
Printer Name |
Specify the printer name. The name of the printer as defined by the server. For a UNIX server, the name might be jet4050, while to access the same printer from a Windows server the name would be: \\servername\jet4050. |
Description |
Specify the description for the printer. |
Organization |
Select the organization to which the printer belongs, from the drop-down list. |
Division |
Select the division to which the printer belongs, from the drop-down list. The division will be displayed based on the organization selected. |
Department |
Select the department to which the printer belongs, from the drop-down list. The department will be displayed based on the division selected. IMPORTANT: When you select a printer to use, the system searches for a best match using the following attributes: 1 Organization 2 Division 3 Department Hence, Oracle recommends creating a version of each edit, where ALL is the value in these fields. It is also recommended that, you define a default printer for an Organization, Division and Department. |
Default |
Check this box to set the printer as a default printer. |
Enabled |
Check this box to enable the printer and that the printer is active. Note: Never disable the UNDEFINED printer. |
- Perform any of the Basic Actions mentioned in Navigation chapter.
3.10 Bank Details
The Banks screen defines the banks, a company/branch uses for processing Automatic Clearing House (ACH) and lock box payments.
Note
This is “behind the scenes” information that the system uses for payments and does not appear on any other forms.
To set up the Banks
- Click Setup > Setup > Administration > User > Bank Details link. The system displays the Bank Details screen.
- In the Banks Definition section, perform any of the Basic Operations mentioned in Navigation chapter.
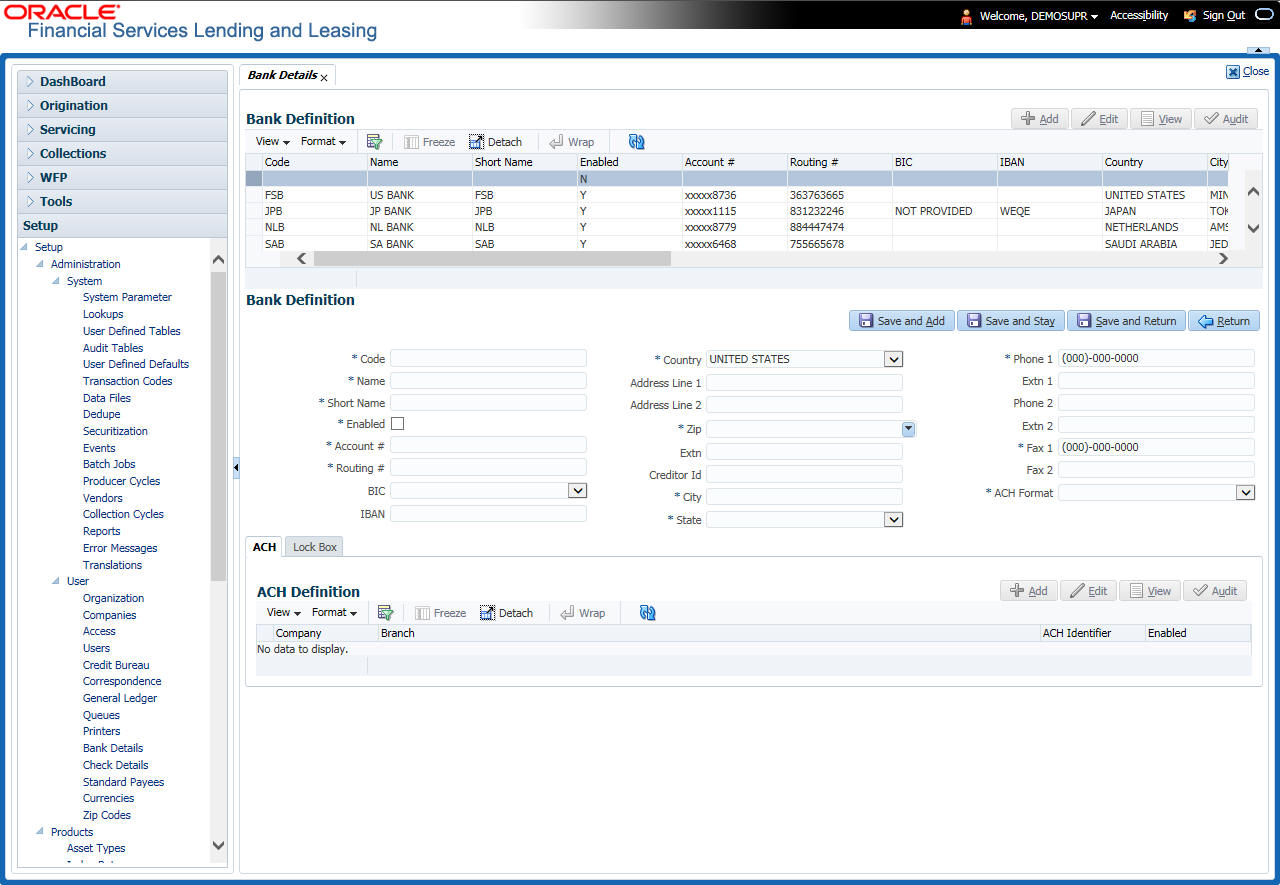
A brief description of the fields is given below:
Field: |
Do this: |
Code |
Specify the bank code (ID used internally by Oracle Financial Services Lending and Leasing to represent the bank). |
Name |
Specify the name for the bank. |
Short Name |
Specify the short name for the bank (ID displayed to represent the bank. This may be included in any output files). |
Enabled |
Check this box to enable and indicate this as an active bank |
Account # |
Specify the account number used for banking transactions with the bank. Note: If the organizational parameter UIX_HIDE_RESTRICTED_DATA is set to Y, this appears as a masked number; for example, XXXXX1234. |
Routing # |
Specify the routing number of the bank. |
BIC |
Select the Business Identifier Code from the drop-down list. The list displays the BIC codes defined in the system. |
IBAN |
Specify the IBAN (International Bank Account Number). IBAN is used for identifying bank accounts across national borders with a minimal of risk of propagating transcription errors. Ensure that value entered satisfies the check-digit validation based on modulo 97. On save, system automatically validates the IBAN number length based on country code, characters, white spaces, and checksum. Validation is also done during posting non-monetary transaction (ACH Maintenance). You can maintain the IBAN length and other details required as per the country code in the user defined table (Setup > Administration > System > User Defined Tables). Note: IBAN for 'NL' country code (IBAN_FORMAT_NL) is defined by default with length of IBAN as 18. |
Country |
Select the country where the bank is located, from the drop-down list. |
City |
Specify the city where the bank is located. |
State |
Select the state where the bank is located, from the drop-down list. |
Address Line 1 |
Specify the address line 1 for the bank. |
Address Line 2 |
Specify the address line 2 for the bank. |
Zip |
Specify the zip code where the bank is located, from the drop-down list. |
Extn |
Specify the extension of the zip code where the bank is located. |
Creditor Id |
Specify the creditor identification details. |
Phone 1 |
Specify the primary phone number of the bank. |
Extn 1 |
Specify the phone extension for the primary phone number. |
Phone 2 |
Specify the alternate phone number for the bank. |
Extn 2 |
Specify the phone extension for the alternate phone number. |
Fax 1 |
Specify the primary fax number for the bank. |
Fax 2 |
Specify the alternate fax number for the bank. |
ACH Format |
Select the ACH format accepted by this bank from the drop-down list. The list displays the following options: - NACHA Format - SEPA Format |
- Perform any of the Basic Actions mentioned in Navigation chapter.
- Click Setup > Setup > Administration > User > Bank Details > ACH.
- On the ACH Definition sub screen, you can create ACH files for the bank listed in the Banks section. Perform any of the Basic Operations mentioned in Navigation chapter.
A brief description of the fields is given below:
Field: |
Do this: |
Company |
Select the portfolio company from the drop-down list. |
Branch |
Select the portfolio branch from the drop-down list. |
ACH Identifier |
Specify the lock box ID provided by the bank. This field is used in the ACH files to identify the bank. |
Enabled |
Check this box to enable the ACH and indicate this as an active ACH identifier. |
- Perform any of the Basic Actions mentioned in Navigation chapter.
- Click Setup > Setup > Administration > User > Bank Details > Lock Box.
- On the Lock Box sub screen, you can create lock box files for the bank listed in the Banks screen. Perform any of the Basic Operations mentioned in Navigation chapter.
A brief description of the fields is given below:
Field: |
Do this: |
Lock Box Identifier |
Specify the lock box ID provided by bank. This field is used in the lock box files to identify the bank. |
Company |
Select the portfolio company from the drop-down list. |
Branch |
Select the portfolio branch from the drop-down list. |
Enabled |
Check this box to enable the lock box. |
- Perform any of the Basic Actions mentioned in Navigation chapter.
3.11 Standard Payees
The Standard Payees screen defines the third parties that are frequent payees for checks issued within your organization. These payees are then available on the Consumer Lending screen’s Advance Entry screen. When you select the Payee # in the Advance Allocation section, the system completes the remaining fields in this screen with information from the Standard Payees screen.
Note
The Payee # field on the Advance Payment forms is a non-validated field. This allows you to select an entry or enter one of your own.
To set up the Standard Payees
- Click Setup > Setup > Administration > User > Standard Payee. The system displays the Standard Payees screen.
- In the Payee Definition section, perform any of the Basic Operations mentioned in Navigation chapter.
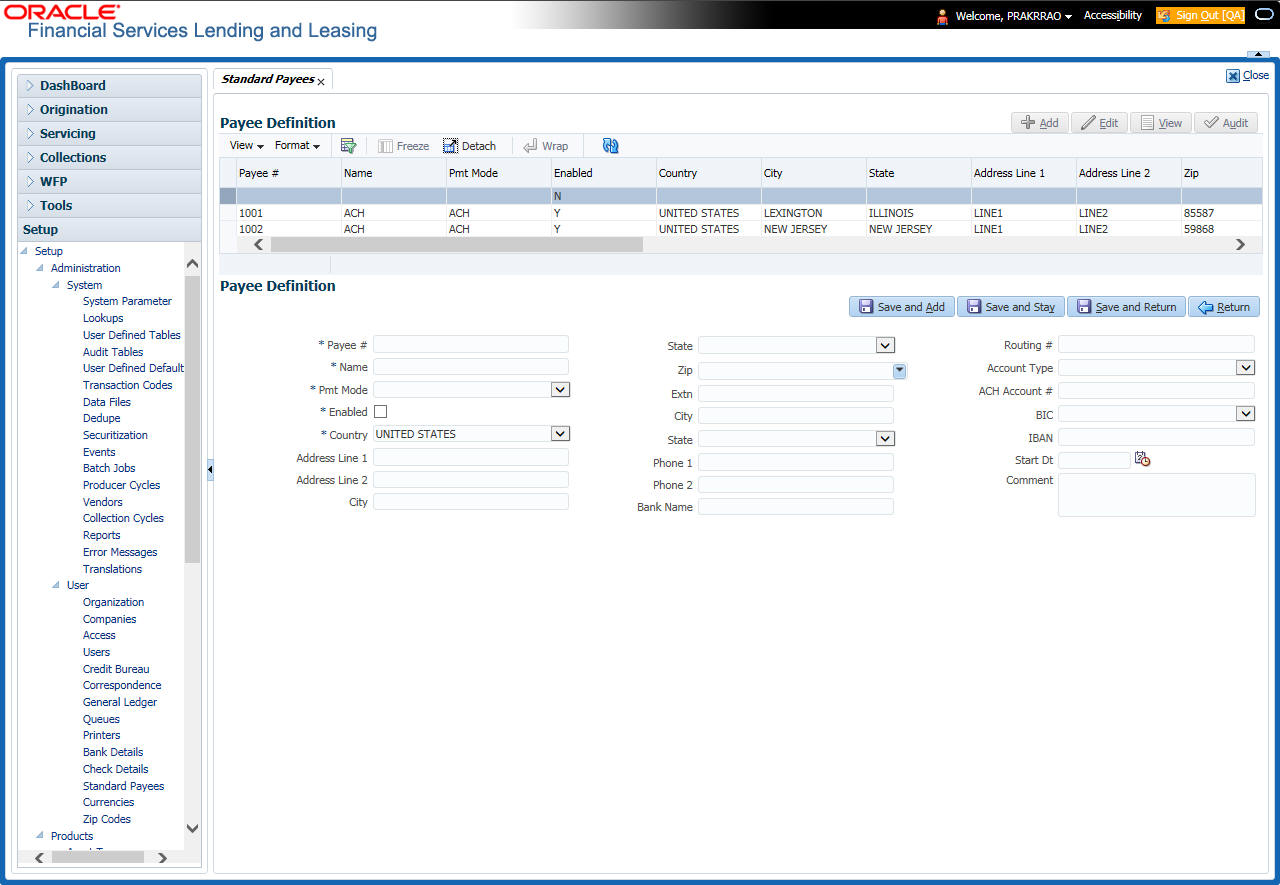
A brief description of the fields is given below:
Field: |
Do this: |
Payee # |
Specify the payee number (Identifier for the payee). |
Name |
Specify the payee name. |
Pmt Mode |
Select the payment method for the payee from the drop-down list. |
Enabled |
Check this box to enabled the payee. |
Country |
Select the country where the payee is located from the drop-down list. |
City |
Specify the city where the payee is located. |
State |
Select the state where the payee is located from the drop-down list. |
Address Line 1 |
Specify the address line 1 for the payee (optional). |
Address Line 2 |
Specify the address line 2 for the payee (optional). |
Zip |
Select the zip code where the payee is located from the drop-down list. |
Extn |
Specify the extension of the zip code where the payee is located. |
Phone 1 |
Specify the primary phone number for the payee. |
Phone 2 |
Specify the alternate phone number for the payee. |
Bank Name |
Specify the payee ACH bank name used by the standard payee. |
Routing # |
Specify the payee ACH bank routing number of bank used by the standard payee. |
Account Type |
Select the payee type of ACH bank account maintained by the Standard Payee from the drop-down list. |
ACH Account # |
Specify the payee ACH bank account number. |
BIC |
Select the Business Identifier Code from the drop-down list. The list displays the BIC codes defined in the system. |
IBAN |
Specify the IBAN (International Bank Account Number). IBAN is used for identifying bank accounts across national borders with a minimal of risk of propagating transcription errors. Ensure that value entered satisfies the check-digit validation based on modulo 97. On save, system automatically validates the IBAN number length based on country code, characters, white spaces, and checksum. Validation is also done during posting non-monetary transaction (ACH Maintenance). You can maintain the IBAN length and other details required as per the country code in the user defined table (Setup > Administration > System > User Defined Tables). Note: IBAN for 'NL' country code (IBAN_FORMAT_NL) is defined by default with length of IBAN as 18. |
Start Dt |
Specify the payment mode start date, the date the current payment method was implemented (defaults on Pmt Mode change). you can also select from the adjoining calendar icon. |
Comment |
Specify a comment for this advance allocations. This is the default comment to include with payments to this Payee. |
- Perform any of the Basic Actions mentioned in Navigation chapter.
3.12 Check Details
The Check Details screen allows you to set up check details.
To setup the Check Details
- Click Setup > Setup > Administration > User > Check Details. The system displays the Check Details screen.
- In the Check Definition section, perform any of the Basic Operations mentioned in Navigation chapter.
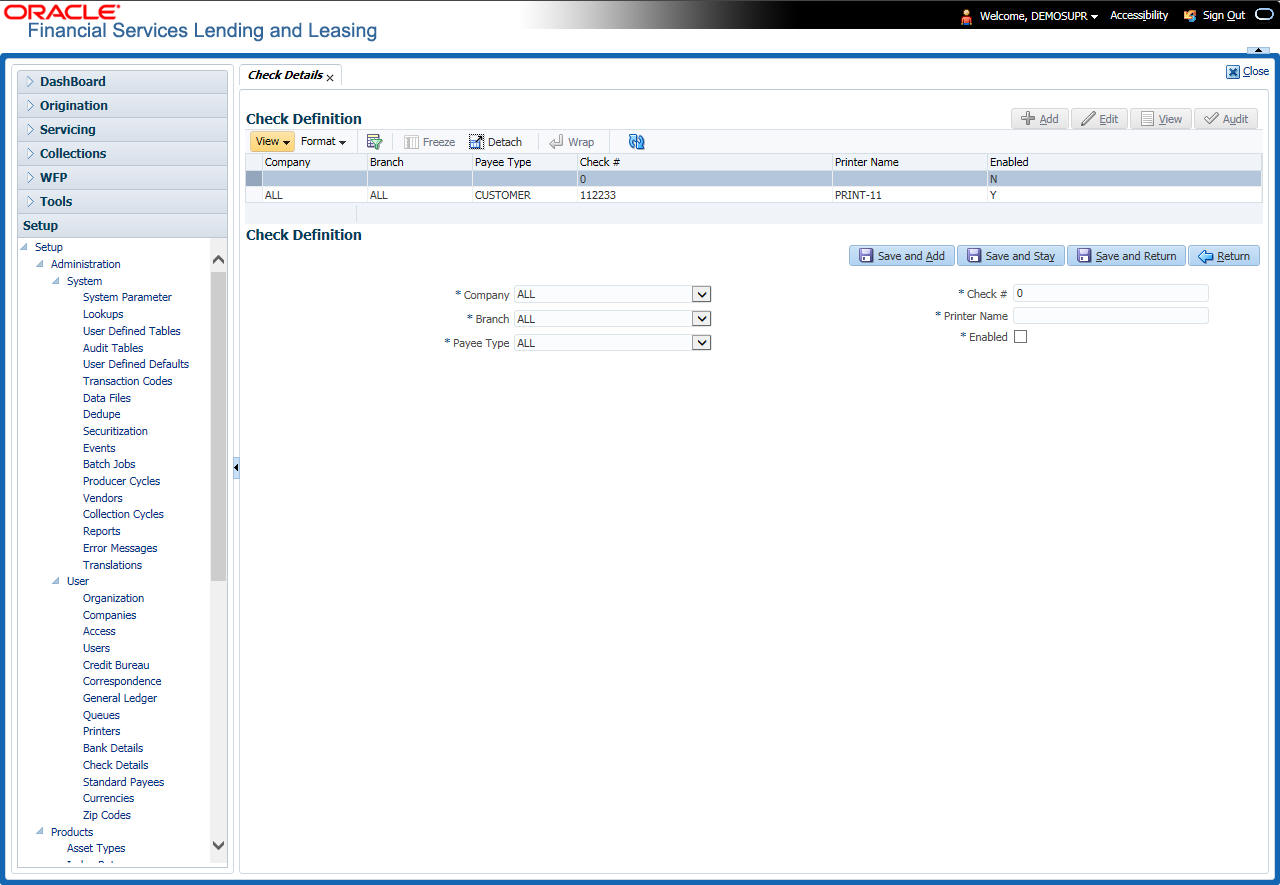
A brief description of the fields is given below:
Field: |
Do this: |
Company |
Select the company from the drop-down list. |
Branch |
Select the branch from the drop-down list. |
Payee Type |
Select the payee type from the drop-down list. |
Check # |
Specify the check number (required). |
Printer Name |
Specify the printer name (required). |
Enabled |
Check this box to enable the check details entry. |
- Perform any of the Basic Actions mentioned in Navigation chapter.
3.13 Currencies
The Currencies link allows you to set up currency details.
Navigating to currencies
- Click Setup > Setup > Administration > User > Currencies. The system displays the Currencies screen. In this screen, you can set up:
- Currency Definition
- Currency Pair Definition
3.13.1 Currency Definition
The Currency Definition screen allows you to set up currency details.
To set up the currency definition information
- Click Setup > Setup > Administration > User > Currencies > Currency. The system opens the Currency Definition tab by default.
- In the Currency section, perform any of the Basic Operations mentioned in Navigation chapter.
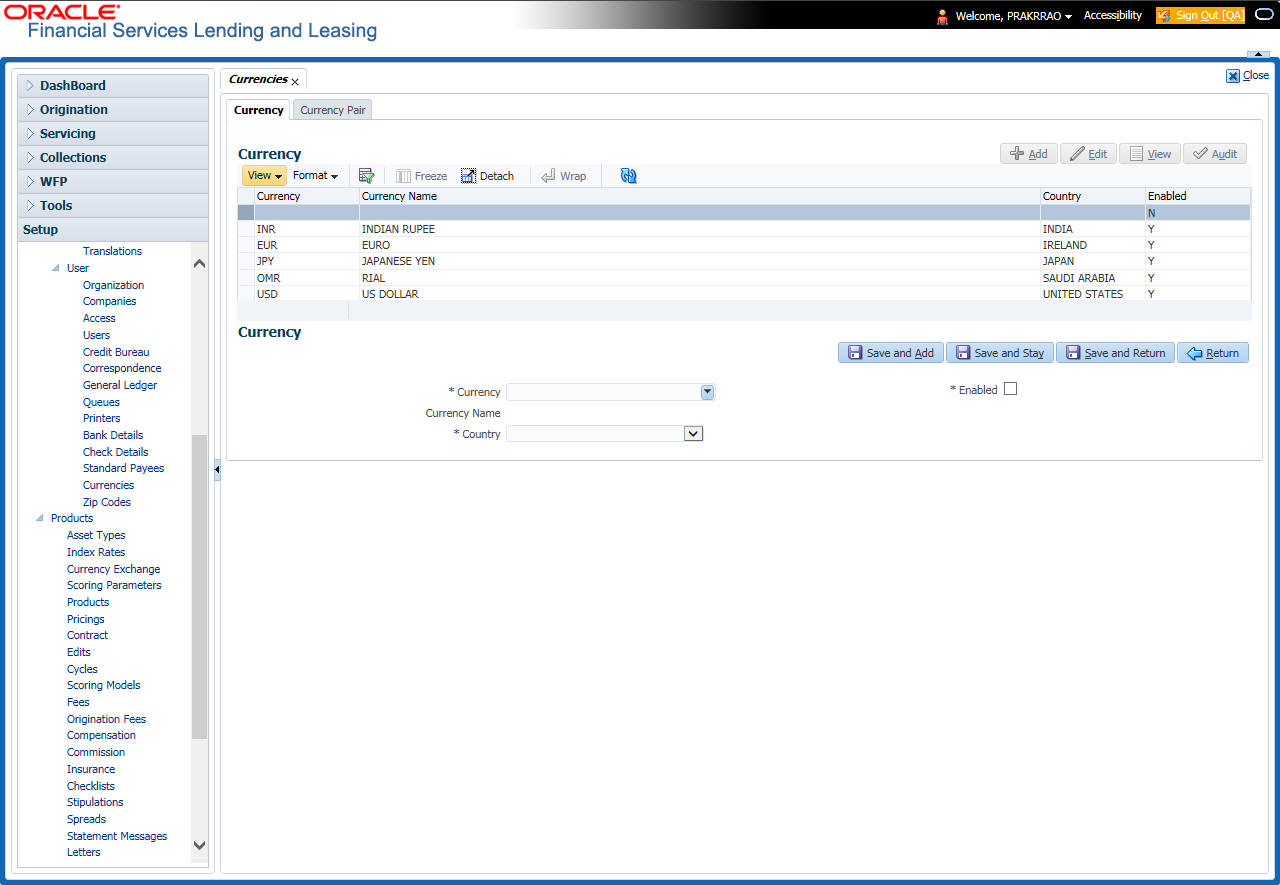
A brief description of the fields is given below:
Field: |
Do this: |
Currency |
Select the currency you want to define, from the drop-down list. |
Currency Name |
The system displays the currency name based on the currency selected. |
Country |
Select the country for which the currency is defined, from the drop-down list. |
Enabled |
Check this box to enable the currency entry. |
- Perform any of the Basic Actions mentioned in Navigation chapter.
3.13.2 Currency Pair link
The Currency Pair Definition link allows you to set up currency pair details.
To set up the currency pair definition information:
- Click Setup > Setup > Administration > User > Currencies > Currency Pair. The system displays the Currency Pair Definition screen
- In the Currency Pair Definition section, perform any of the Basic Operations mentioned in Navigation chapter.
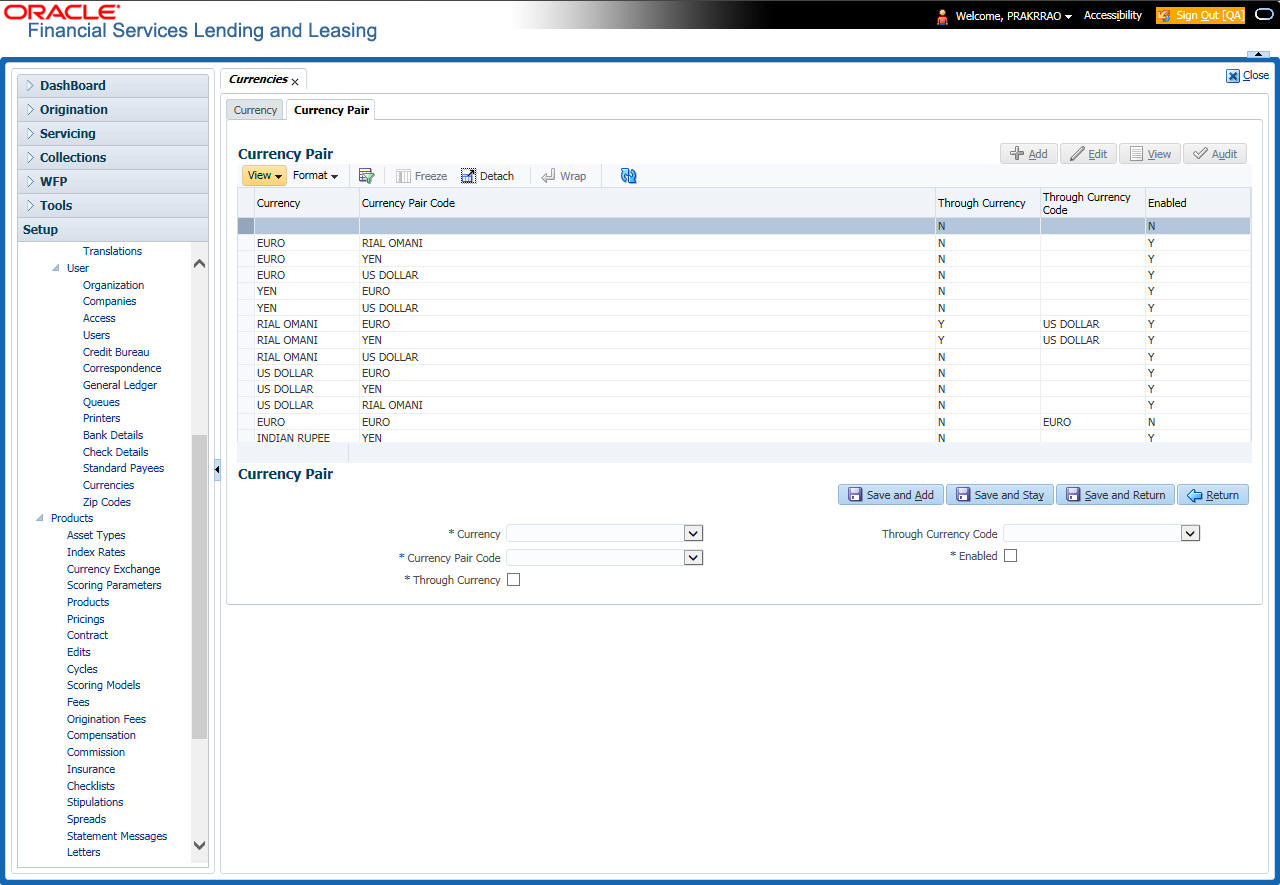
A brief description of the fields is given below:
Field: |
View this: |
Currency Code |
Select the currency code from the drop-down list. |
Currency Pair Code |
Select the currency pair code from the drop-down list. |
Through Currency |
Check this box to set the selected currency as a through currency. |
Through Currency Code |
Select the through currency code from the drop-down list. |
Enabled |
Check this box to enable the currency pair entry. |
- Perform any of the Basic Actions mentioned in Navigation chapter.
3.14 Zip Codes
The Zip Codes screen allows you to set up zip code details.
To set up the zip codes information
- Click Setup > Setup > Administration > User > ZipCodes. The system displays the Zip Codes screen
- In the Zip Codes section, perform any of the Basic Operations mentioned in Navigation chapter.
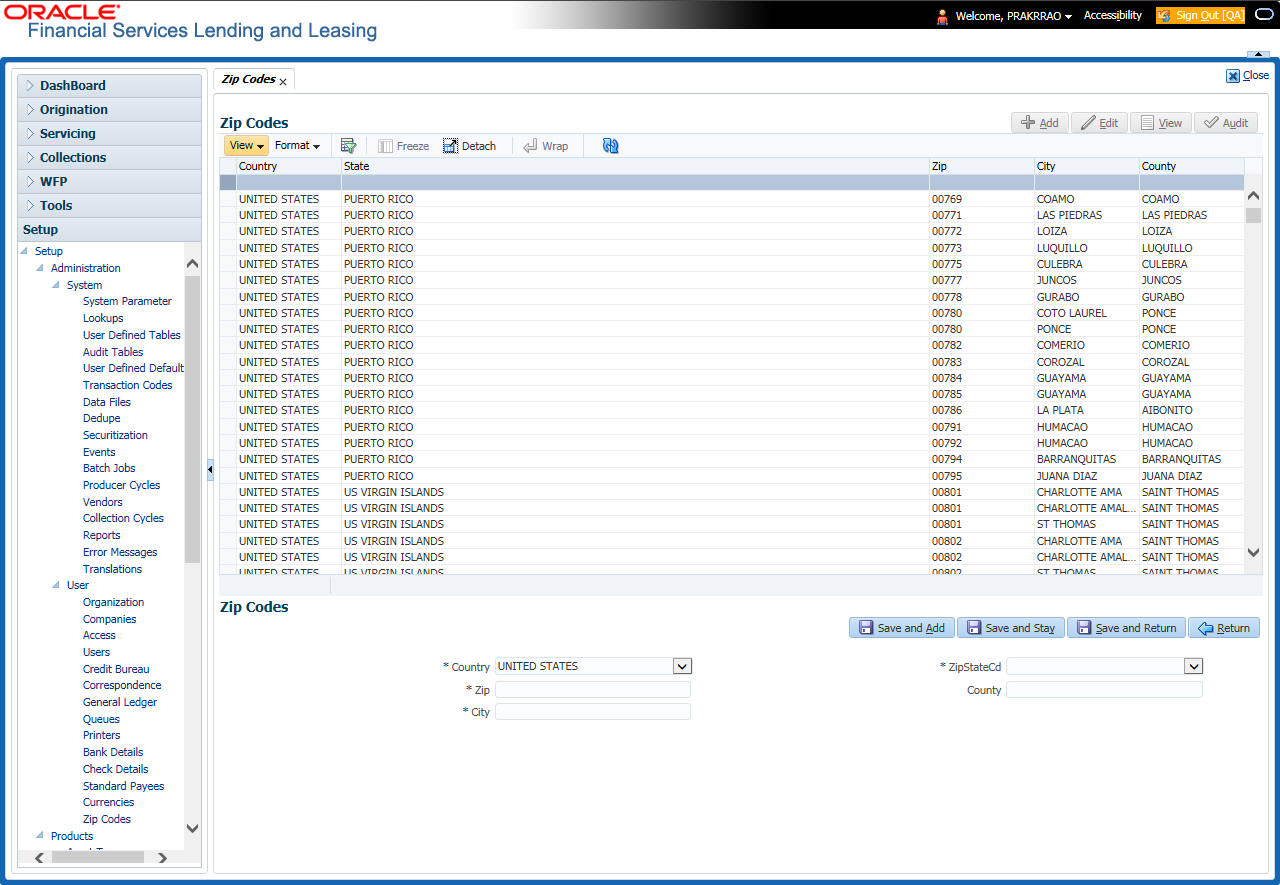
A brief description of the fields is given below::
Field: |
View this: |
Country |
Select the country from the drop-down list. |
State |
Select the state from the drop-down list. |
Zip Code |
Specify the zip code (required). |
City |
Specify the city. |
County |
Specify the county. |
- Perform any of the Basic Actions mentioned in Navigation chapter.